It’s been a little bit quiet on the blog front, lately – but that’s not because I’ve not been out scouting locations since the last post in August. I’d had the idea for a while that I’d like to expand from a still photo & blog posting format to making location films for a YouTube channel; well, finally – I’ve put that into action!
There’s one location video up at present – the first half of a trip I did back in October around Fulham, West Brompton and Chelsea; the video of the second half of this trip should be coming very soon.
I’ve also filmed material from a subsequent location trip in December ’23, which took in an arc from Bayswater to Clerkenwell, via Edgeware, Primrose Hill and King’s Cross. I will be working on the videos from this trip once the ‘Fulham & West Brompton Part 2’ video is published; however, there may be a bit of a snag with that one in that some of the footage I’d intended to use under ‘Fair Use’ law is initially blocked from YouTube by the copyright holder (Fremantle Media). I’m pretty confident that I have a decent Fair Use case – I’m not publishing significant portions of the footage compared to their entire run time, I’ve changed the ‘purpose’ from narrative storytelling to a documentary on the changing face of London, I’m using it to educate and inform – etc. However, the AI sitting behind the YouTube publishing engine just matches content to a database and says “nope” – so I may have to jump through some hoops to get the next videos up. Either that or, worst case, I’ll have to drastically trim the video and then work on more locations that aren’t from blocked episodes (it seems to be particularly episodes from seasons 3 and 4 that are blocked).
As to the future of written blog posts and still photo comparisons – I’m still hoping to keep these going, including writing up the recent trips that are the subjects of videos so far. It’ll just be a case of when I can actually fit that in!
For the final part of this epic trek (I’d walked over 17 miles by the end of it), I decided to take to the river. It was a nice day to get a little bit of boat-breeze, and I’d prepped finally to try and pick up some of the tangle of locations around St. Katherine’s Dock. Using the river to do so meant I’d be able to trace the voyage of a couple of Aussie crooks we’ve recently met, and pick up a couple of POV shots from the water to boot. So, off to Embankment Pier and onto the – apparently now Uber-owned – river taxi.
Episode Context – S2E10, “Trojan Bus”
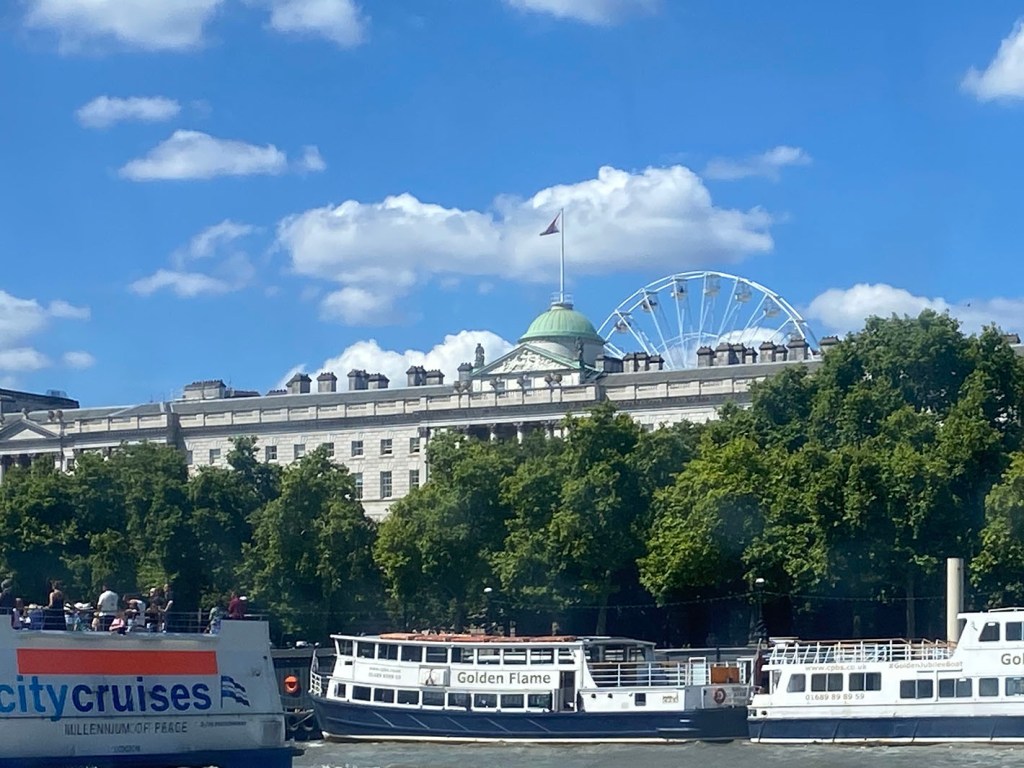
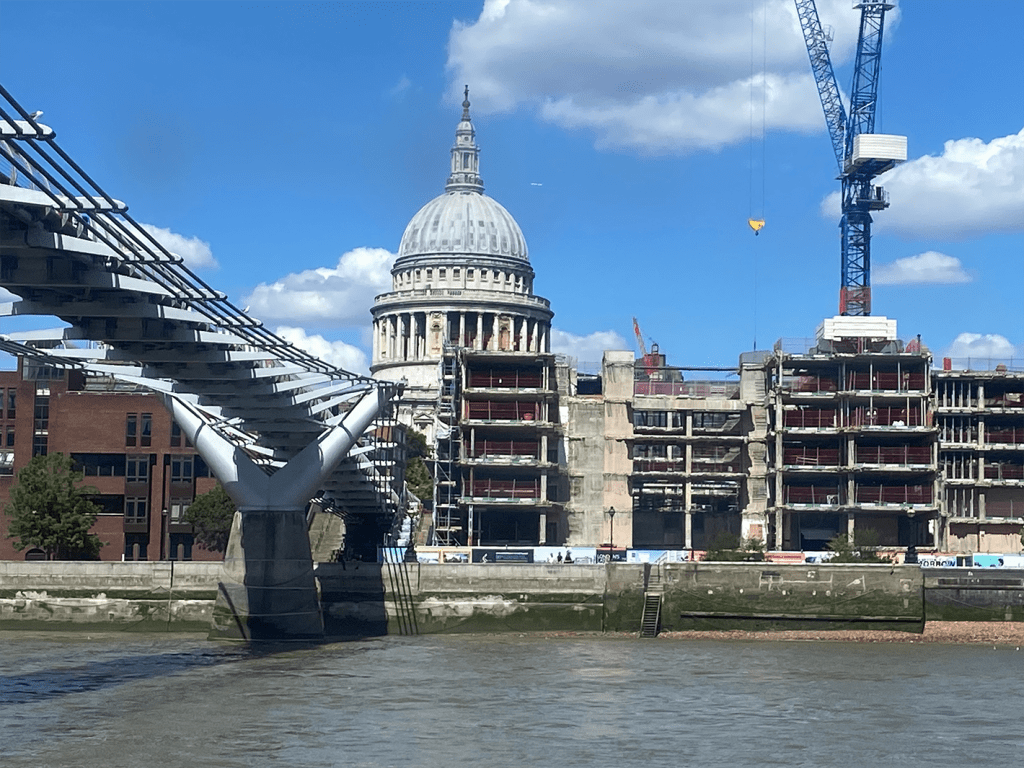
Col and Ray – remember them? Yeah, flash monkeys… Well, their getaway plan involved using a tour boat they’d ‘borrowed’ from Chertsey Marina to escape down the Thames; presumably they figured the Met boys would never think to look for them anywhere but ‘on land’. To familiarise themselves with the river and the escape route, they use the boat to masquerade as legit tour operators, and actually take a bunch of paying tourists up and down the river – delivering some uniquely ‘colourful’ Aussie-style commentary as they go. Never ones for the simple smash and grab when they can rub the law’s nose in it with their brashness, this pair. We get a couple of very recognisable tourist views from the water along the way, to establish their location: Somerset House (1) and St. Paul’s Cathedral (2).
As you’d expect, most of the ‘historic’ buildings along this part of the river are still there (and cleaner), but in and around them all pretty much everything is new. I took the St. Paul’s shot from a bit further down-river, to give the context of the ‘new’ Millennium Bridge. Hard to believe, but Regan and Carter had never even heard of the Millennium Falcon at this point, let alone something called ‘why too Kay’.
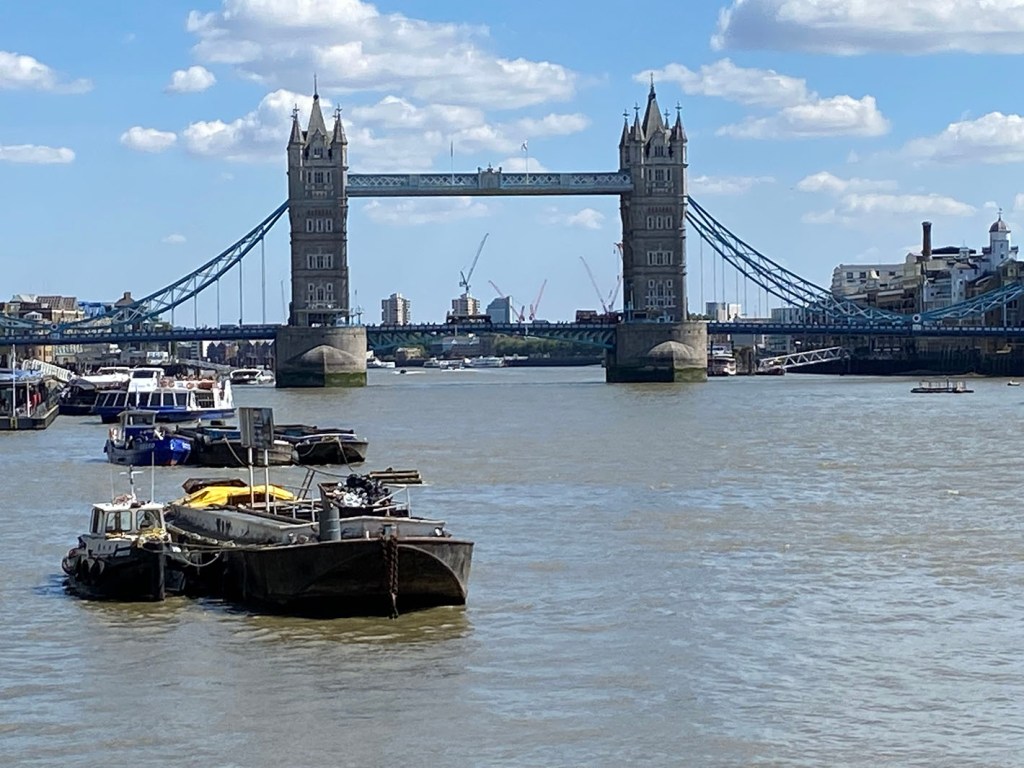
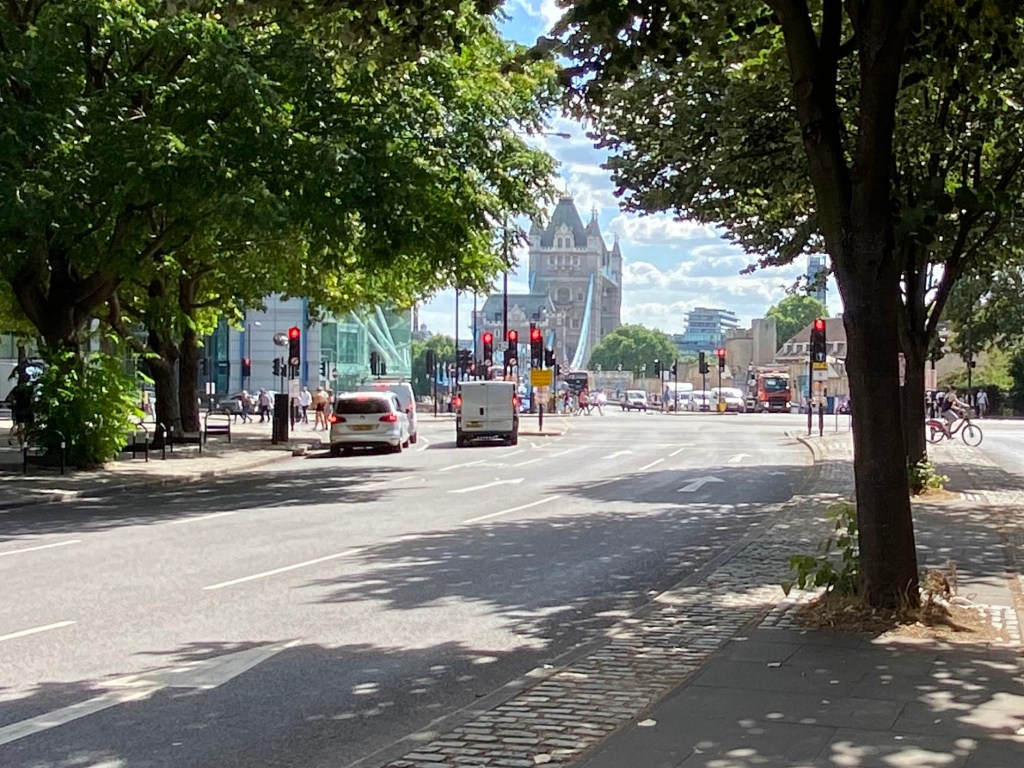
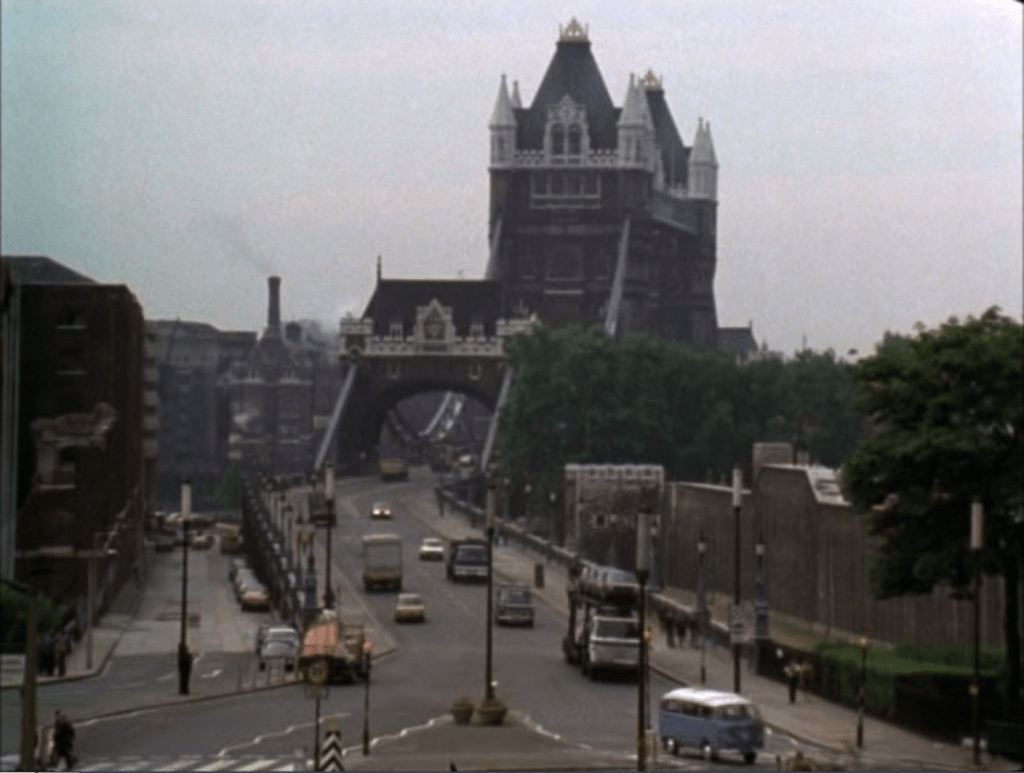
After the job has gone down and Col and Ray are on the river ‘for real’ with the stakes raised and The Squad now on their tail, they are forced to pull over towards Tower Bridge Pier and head for St. Katharine’s Dock because their fuel tank is nearly empty. Having established that they’re in a stolen boat, and quizzed the marina master as to how much fuel they’d have on board, Regan and co. learn that the Aussie Pair aren’t going to make it any further than that – so race to intercept them in the docks. We get a POV shot from Col and Ray’s boat of the iconic bridge; why wouldn’t you, I suppose? I almost felt it not worth taking a ‘now’ view as there can’t be many people other than those living under rocks in the forests of Borneo who don’t know what it looks like – but I could, so I did.
(Why wouldn’t I, I suppose? I haven’t bothered putting a map pin in for this one, though.)
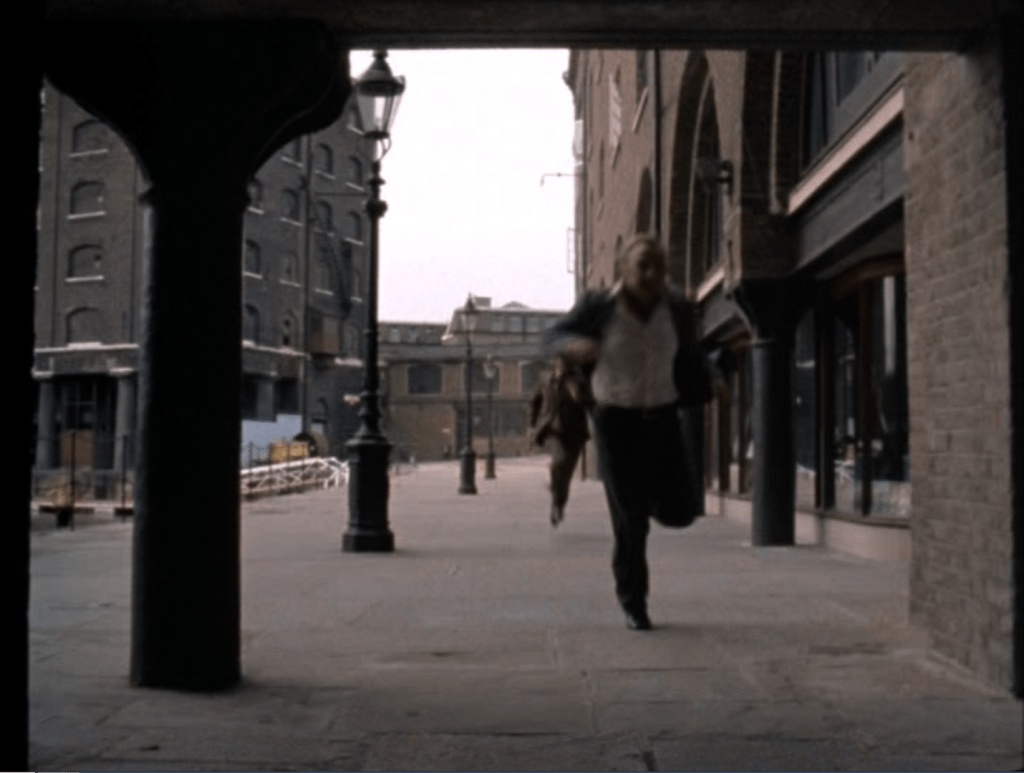
After disembarking the river taxi and stepping back onto dry land, I fought my way through the throngs of tourists in and around The Tower of London and surrounding grounds, and headed into St. Katharine’s Dock. And here’s where things get probably the trickiest of all, in terms of re-tracing the old 70s footsteps of Jack, George and co. If anywhere in London personifies the utter transformation from crumbling old industrial decay to modern, expensive swank – the London Docklands is surely it. There’s just been so much regeneration – land reclaimed, old piers and warehouses torn down, new buildings put up that radically alter or completely block former views – that it’s almost impossible, a few key landmarks aside, to really be sure that you’re in the right spot for any of the shots that were filmed in and around here. But, we’ll do our best eh.
For this particular foray into London’s former working waterfront, we’ll be bouncing between 2 episodes again – the exploits of Col and Ray, whom we’ve just followed down The Thames, and the case of Vic Labbett and his ‘Poppy’ – the stolen 400 Grand he’s back in the country to retrieve.
Episode Context – S2E10, “Trojan Bus”
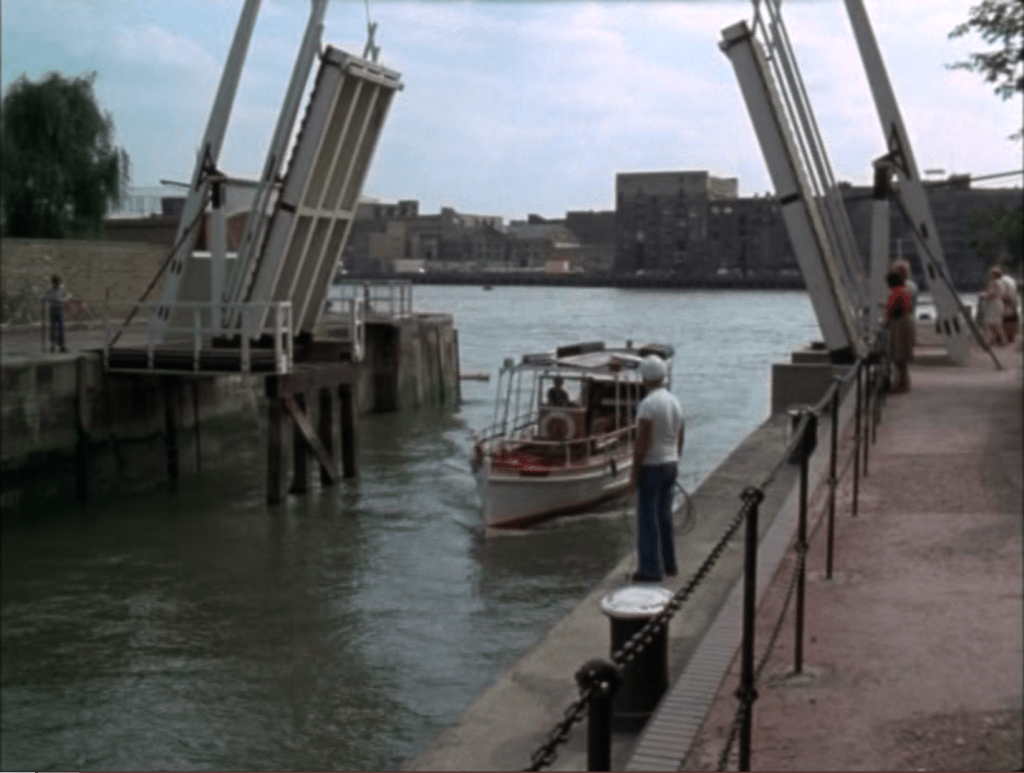
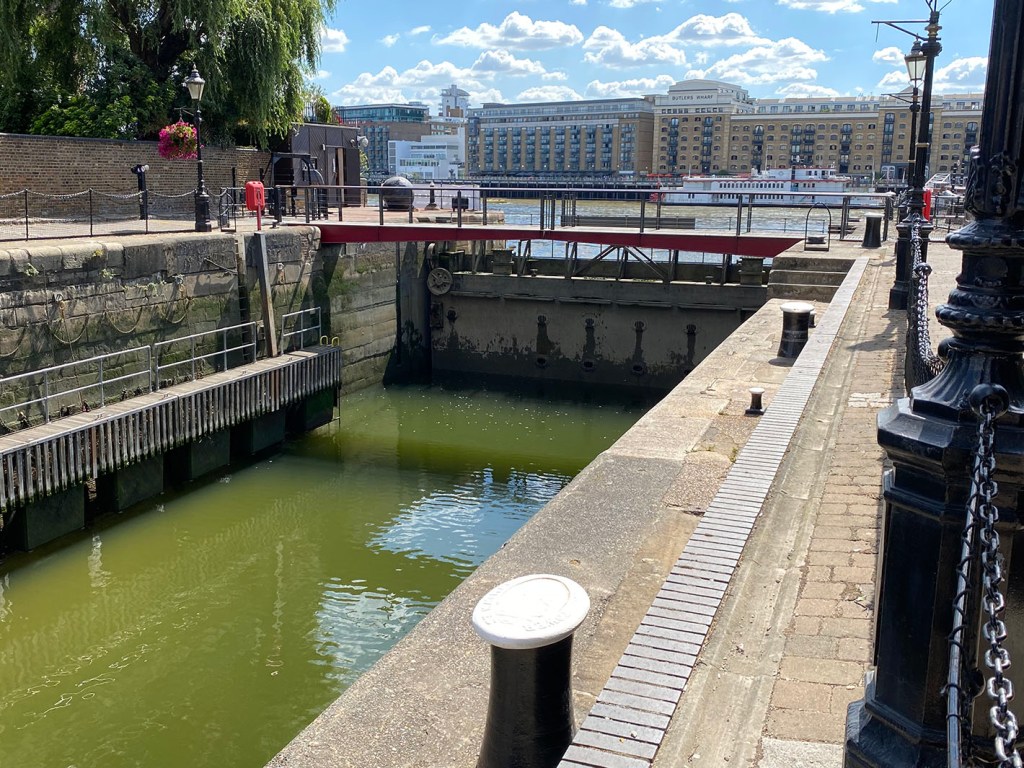
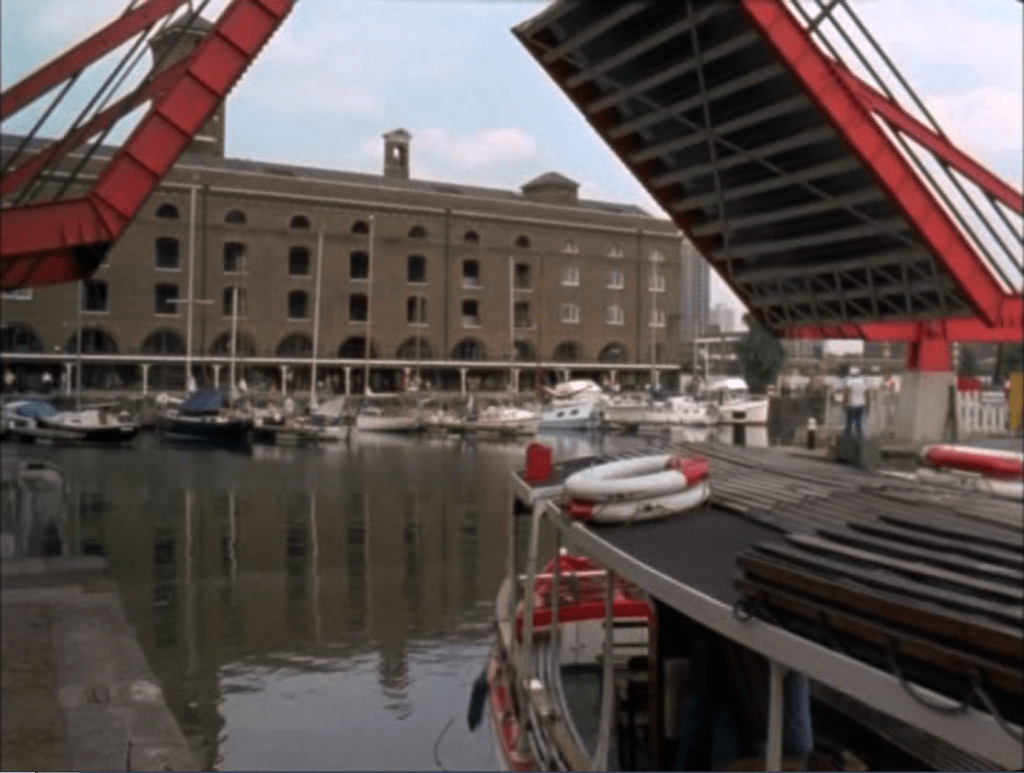
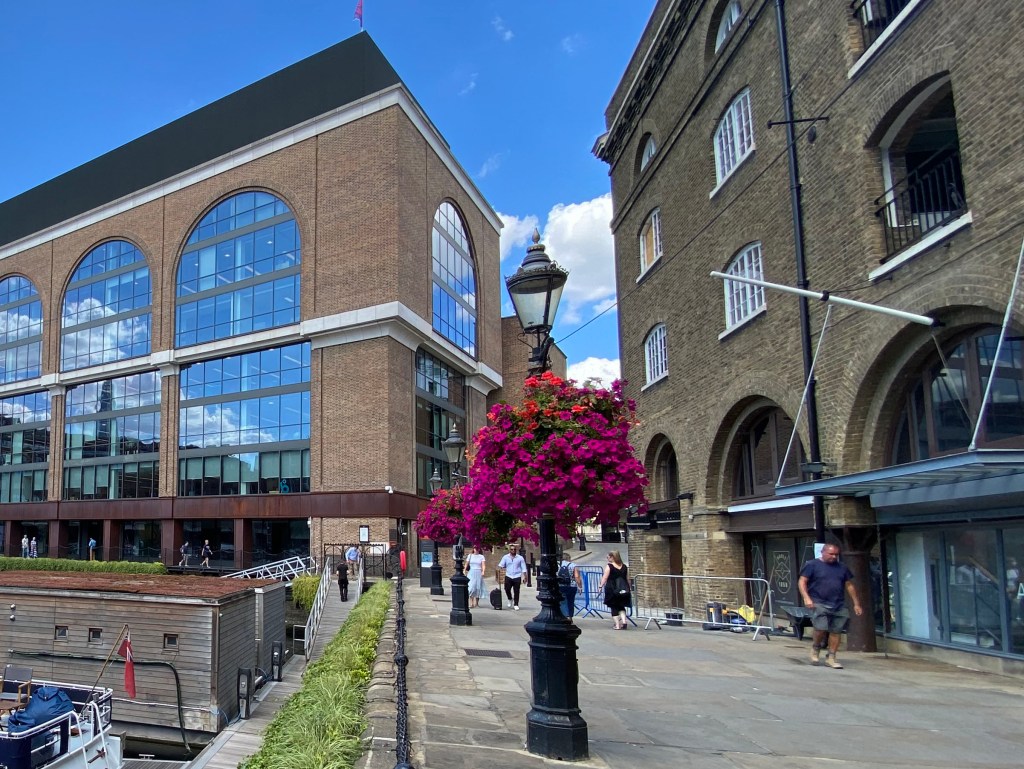
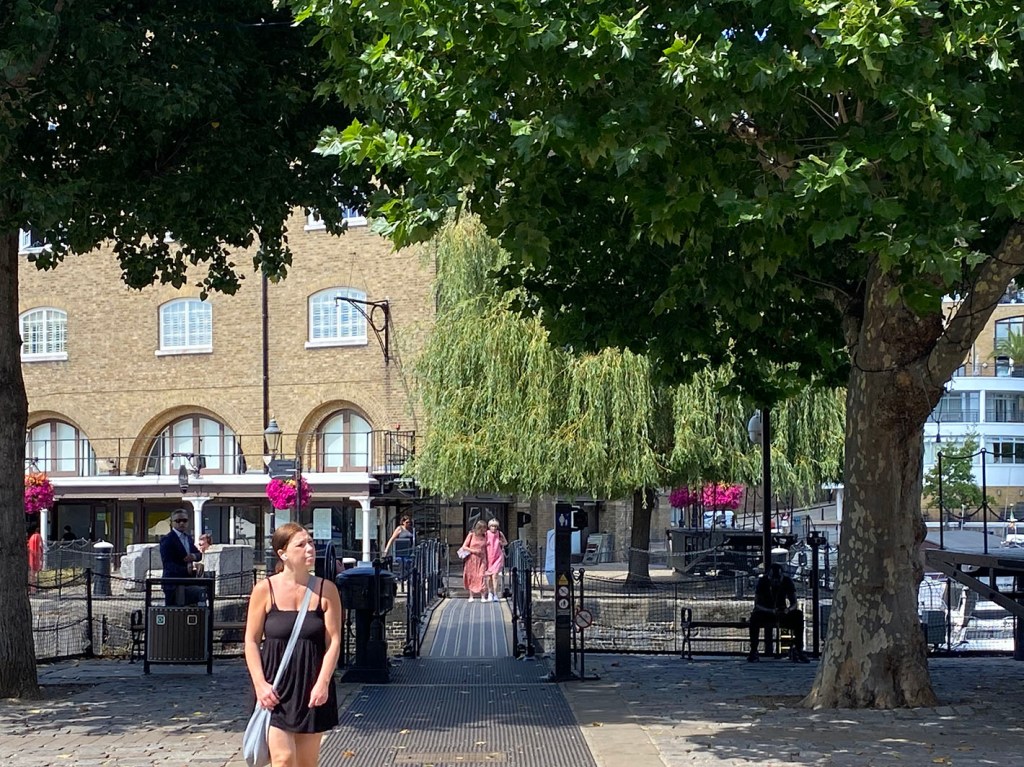
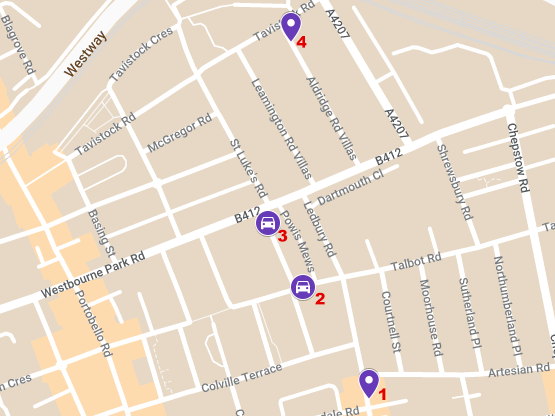
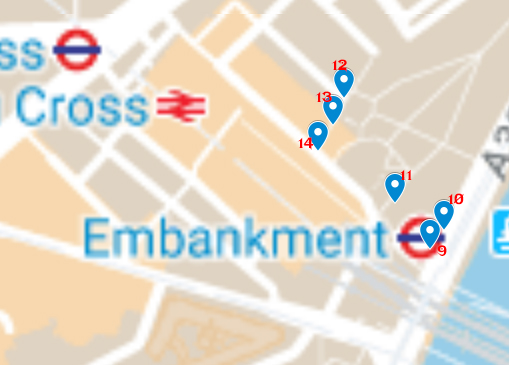
It’s MacGruder and Stackpole we’ll deal with first; as mentioned, they pull their boat into St. Katharine’s Dock as they’ve run out of fuel and their seafaring days are looking decidedly numbered. I haven’t dropped a pin specifically on the entrance to the dock on the map above; however, there’s only one way in from and out to The Thames in any case. First off there’s an outer lock gate; then immediately beyond that a road bridge above the innter gate that raises to let taller vessels through; they’re the thinner and thicker white lines respectively that you can see crossing the dock entrance on the map:
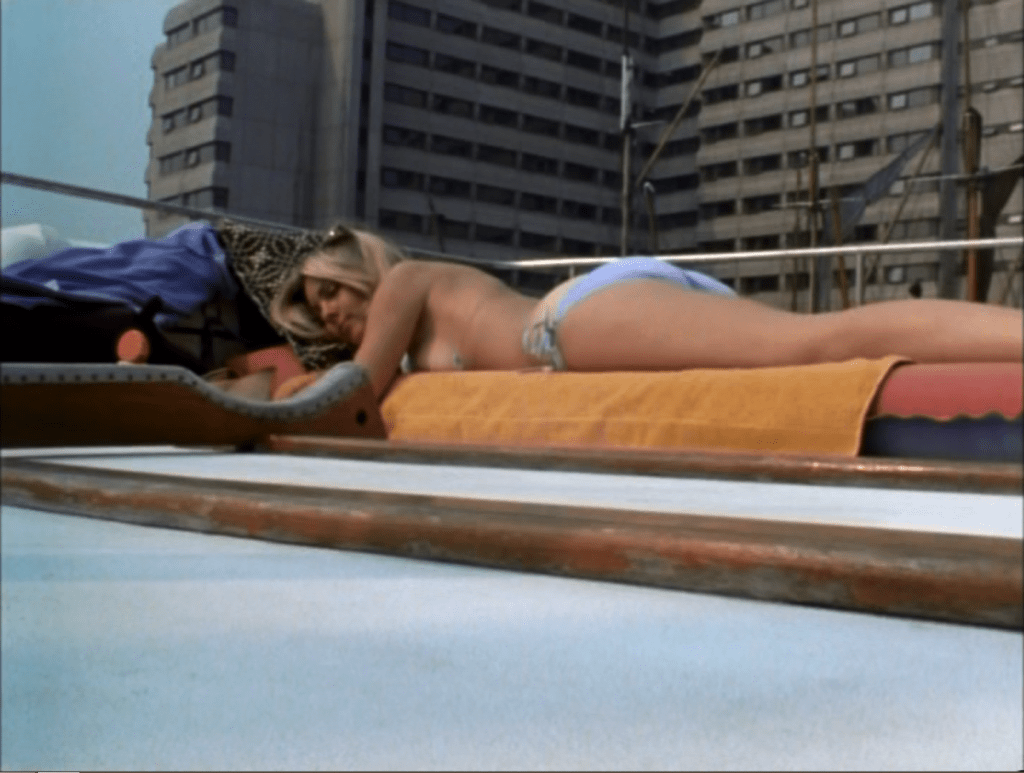
Heading a little further into the marina – and backing up the story a little – we’d actually been here earlier in the episode; it’s where Col sets up the terms of the deal for the Goya with Goldman, on board the latter’s boat (1). I won’t pass judgment here on the fact that said boat was ‘decorated’ – in a very of-the-era manner – by a girlfriend played by then Penthouse and Page 3 model, Gillian Duxbury. Presumably it was partly to give us the nod that Goldman is someone whose shady antics afforded him the high-life, and partly to give Col a bit of character-colouring distraction. Either way – it is what it was:
(One difficulty I had getting quite as close to like-for-like perspectives – besides the fact that you can’t go down onto the pontoons without they keys granted to berth-holders – was that the tide was significantly out on my visit compared to the episode. Had it been higher, the boat on the right would have filled more than just the very bottom of the frame, for example.)
Wandering round St. Katharine’s Dock a little more, we pick back up with the ‘final chase’ part of the episode; The Squad have piled into the docks, and are hunting down Col and Ray who are now shorn of a lot of their swagger and are trying to find somewhere either to hide and evade capture, or hole up for a final gunfight. This is where a lot of the ‘loveable rogue’ veneer of their character is suddenly stripped away, and we see them for what they really are – and what Regan knew all along that they were: violent criminals who would stop at nothing and spare nobody.
There’s a great final shootout in some gloriously derelict, weedy, rubble-strewn ground that I haven’t much of a hope in hell of pinpointing now – it’s all been built on. I feel there may be a series of side-articles here, though at some point: ‘Ones That Got Away’: places that I loved seeing in the episodes that are now lost to the wrecking ball and the cement mixer.
Getting back to the bits we can see: on reflection, I’m annoyed at myself that I didn’t do a better job of checking and adjusting some of these last Ep. 10 shots here – you can clearly see they’re the same locations, but I could get them a lot closer. I may have to revisit this location at some point, but for now here’s The Squad dashing round SKD trying to pin down the errant Aussies:
Particularly annoyed about the last one – would have been so easy to ‘get that right’ had I done a better job of source-checking whilst in that location. I take an iPad with me with all the episode shots on to compare to; but it was a baking hot day and my focus was waning a little – and I don’t think I got it out of the bag at that point. (Maybe that’s a lesson that the epic full-day quests should be broken down into smaller chunks – or else left for days when I’m not likely to melt!) Anyway – moving on.
Episode Context – S2E08, “Poppy”
It’s hard to imagine there was a time when the derelict docks were of interest only to weeds and wildlife (and criminals); the idea that you could stash something below the water line of a crumbling old warehouse pier and it’d still be there several years later seems bonkers now – knowing as we do that if there’s an inch of spare ground anywhere in London today it’ll have flats and offices on it tomorrow. But we’re looking back at very different times, when a case of stolen bonds was indeed the only kind of ‘investment’ you’d find along the Thames’ old industrial wastelands. VIc’s ‘Poppy’, wrapped in several layers of plastic and then shoved inside a briefcase which was chained to a pier support and lowered into the water, has been waiting for his return; once the deal with the insurers and the bank is made, he makes his way amongst the ruined warehouses to retrieve it and meet up with Vane to do the deal.
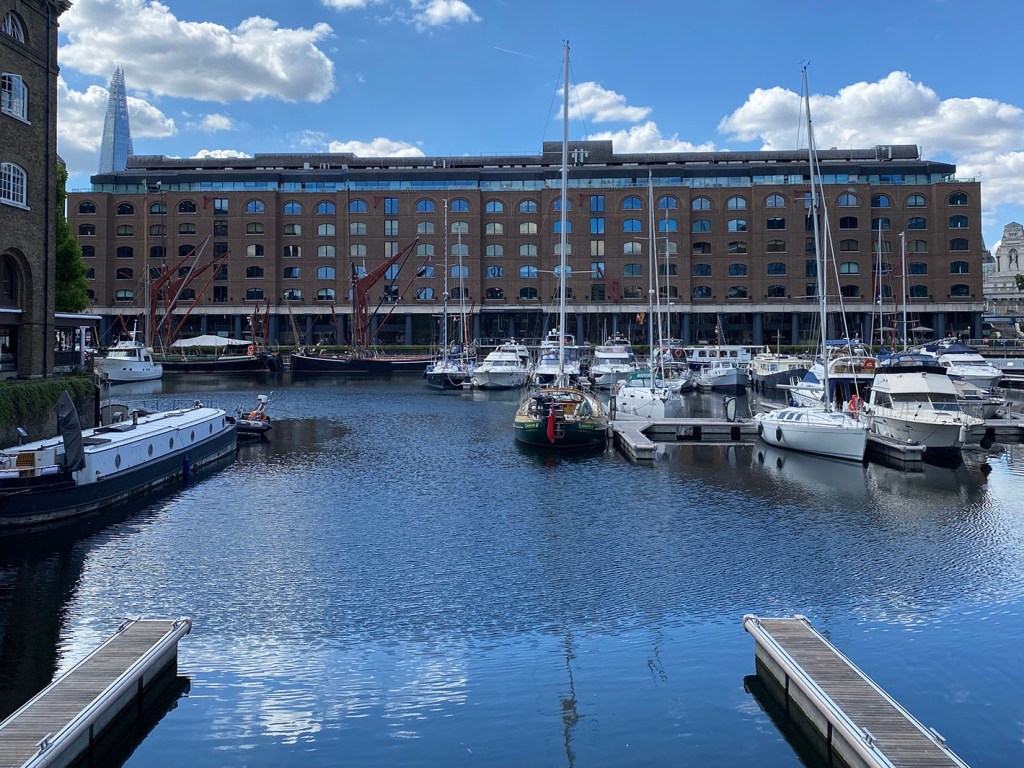
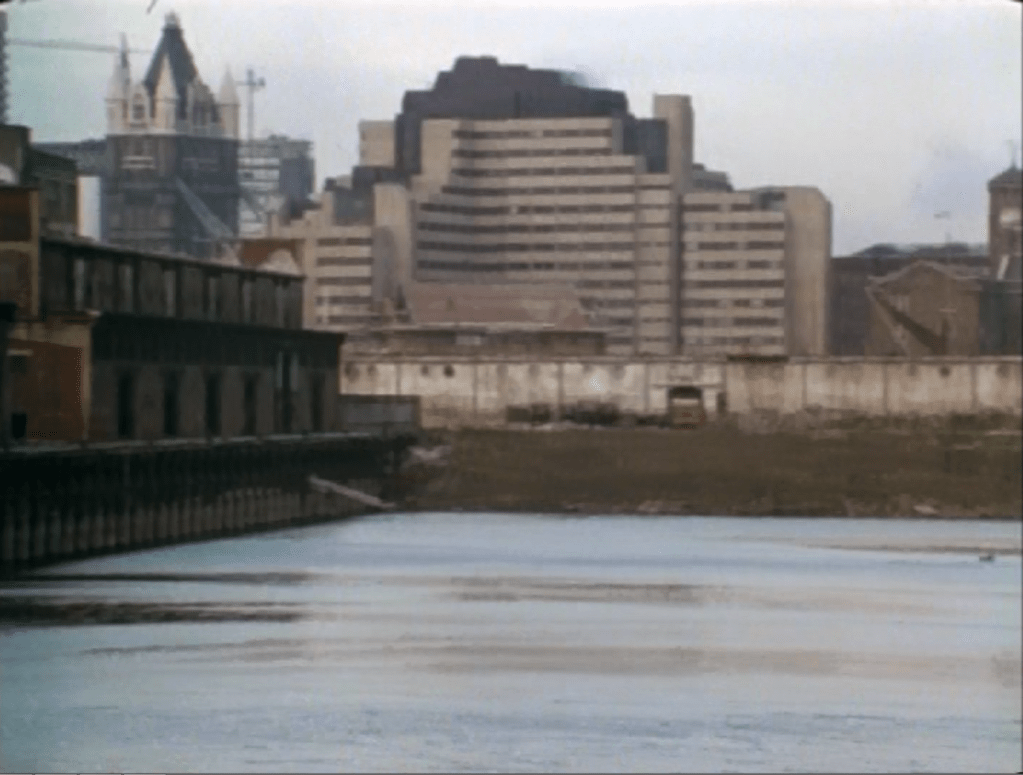
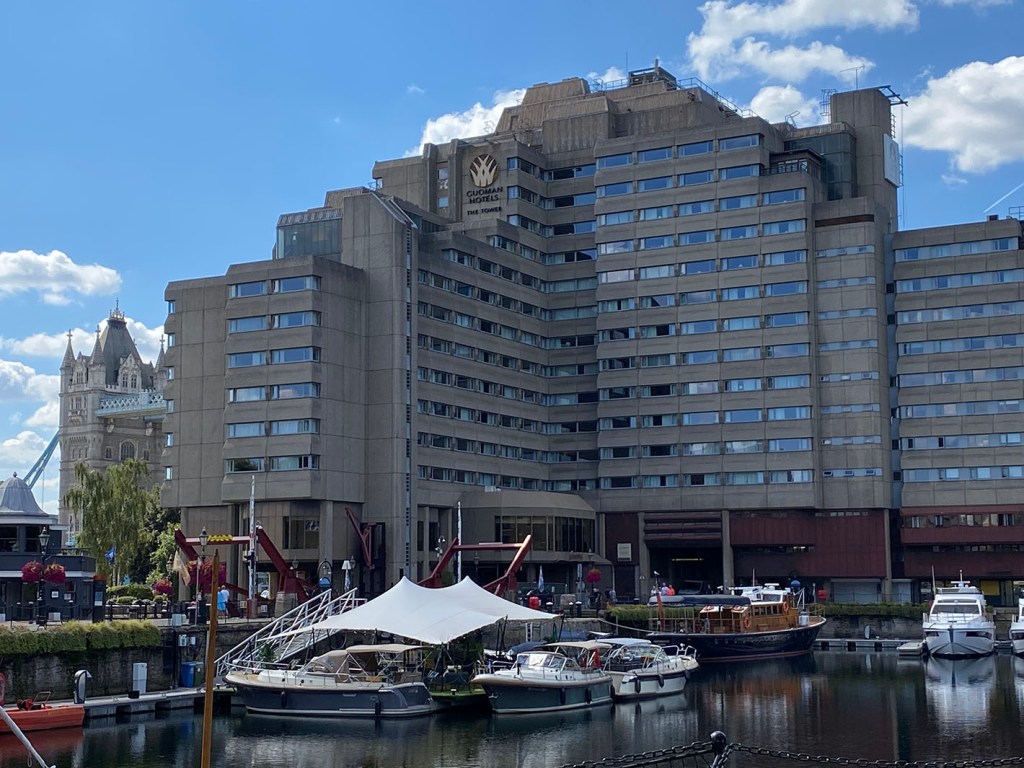
We get an establishing shot, looking across the water back towards (what is now) ‘The Tower’ hotel and Tower Bridge (2):
With the ‘now’ shot above I had to make a bit of a judgment call. The map pin is dropped roughly from where I took the shot; however, if you look at the episode shot, it must actually have been taken from much further to the East – along a section of a different dock that is now filled in. (We’ll come to this in a bit.) I could have gone round to approximately that location – but all you’d have seen is the new flats and other buildings (a pub, amongst other things) in the way. Instead, I chose to take as representative a shot I could of the hotel and one of the towers of Tower Bridge (which, keen observers will note, is the ‘far’ tower rather than the near one seen in the episode, due to the slightly different angle).
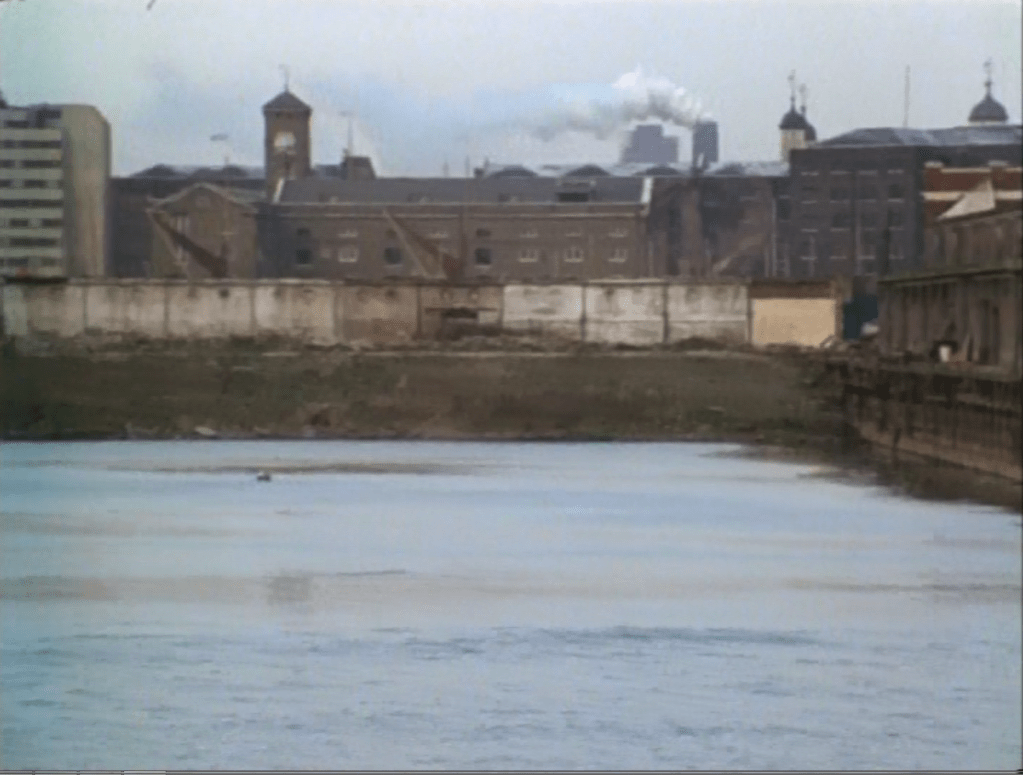
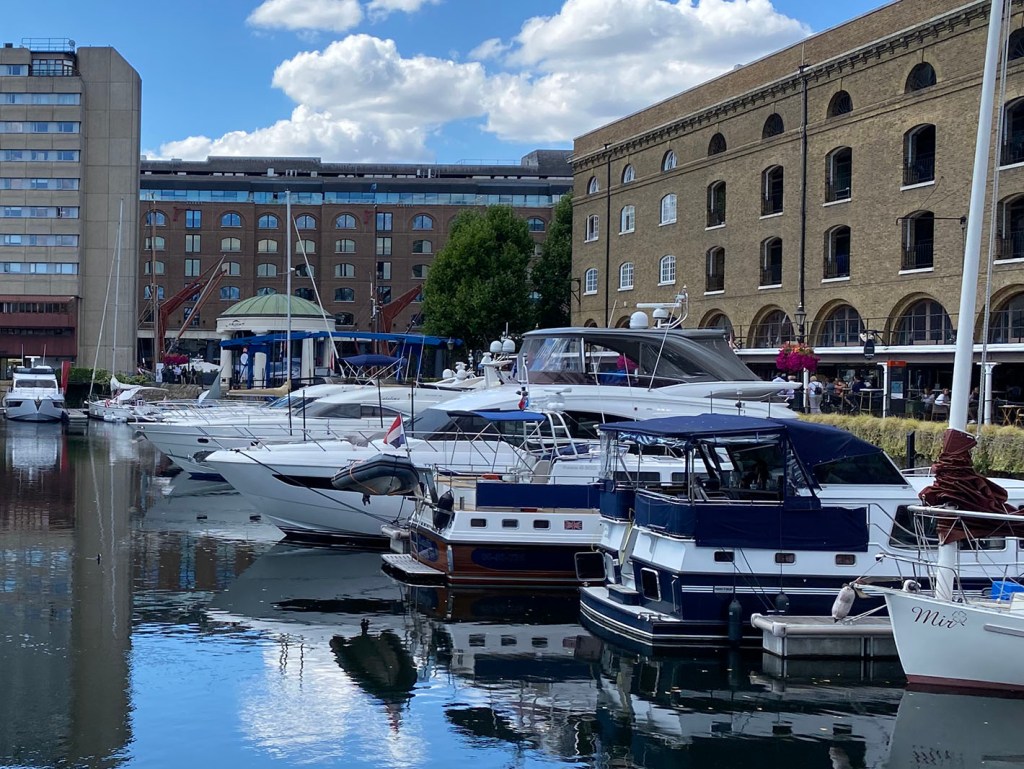
The establishing shot pans right, giving us a lovely sweep of the old warehouses and walls – again, the episode shot is taken from the now-reclaimed dock area, but you can see the corner of ‘The Tower Hotel’ in both images:
At this point the camera switches perspective and shows Vic driving down to the pier where the bonds are hidden; that whole area had some amazing sequences in and out of the industrial decay. As I said – maybe I’ll put those in a separate series of posts, and maybe I’ll be back here some time to get some extra shots (can’t remember if SKD shows up in S3 or S4!) But let’s leave the docks to it, for now.
Episode Context – S2E10, “Trojan Bus”
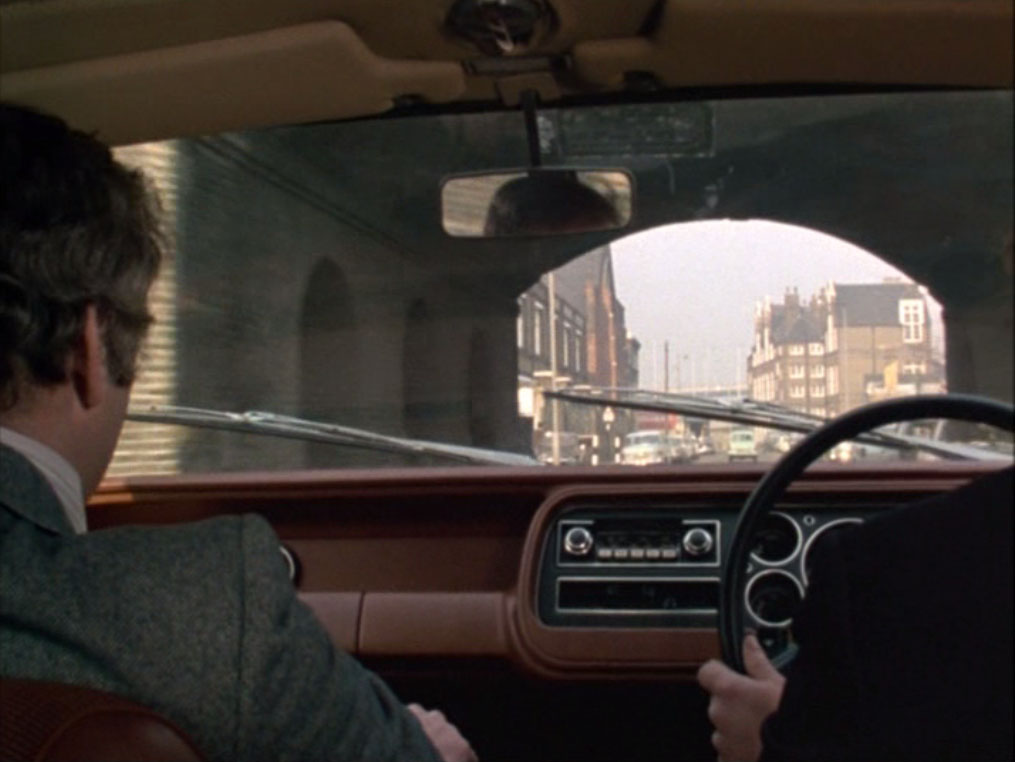
Prior to the closing scenes in the docks, we got a number of establishing location shots of The Squad on their way to apprehend Col and Ray; I kind of ‘worked backwards’ through a couple of these towards the end of the day – so the narrative flow of this blog entry feels a little disjointed. Up on the menu bar, under ‘Sweenealogy’ I also put pages for each episode for which I’ve visited locations – and in those I put the pictures in ‘episode order’, rather than ‘visited order’ as I do for blog entries.
Here’s a POV from inside the iconic brown Ford Consul, as it heads along E. Smithfield to the entrance of St. Katharine’s Dock (3):
Walking further along E. Smithfield, we get to another area that is now largely unrecognisable from its 70s self – and we bounce back yet again to Vic Labbett and his stolen bonds.
Episode Context – S2E08, “Poppy”
As Vic is meeting Vane in a disused warehouse, The Squad rush to nab them in the act of swapping the bonds for the stones. At the last minute, Vic spies The Flying Squad piling in on their location and believes – wrongly – that Vane has tipped them off in order to walk away with both the stones and the money. That little bit of paranoia costs Vane a bullet in the gut – and his life.
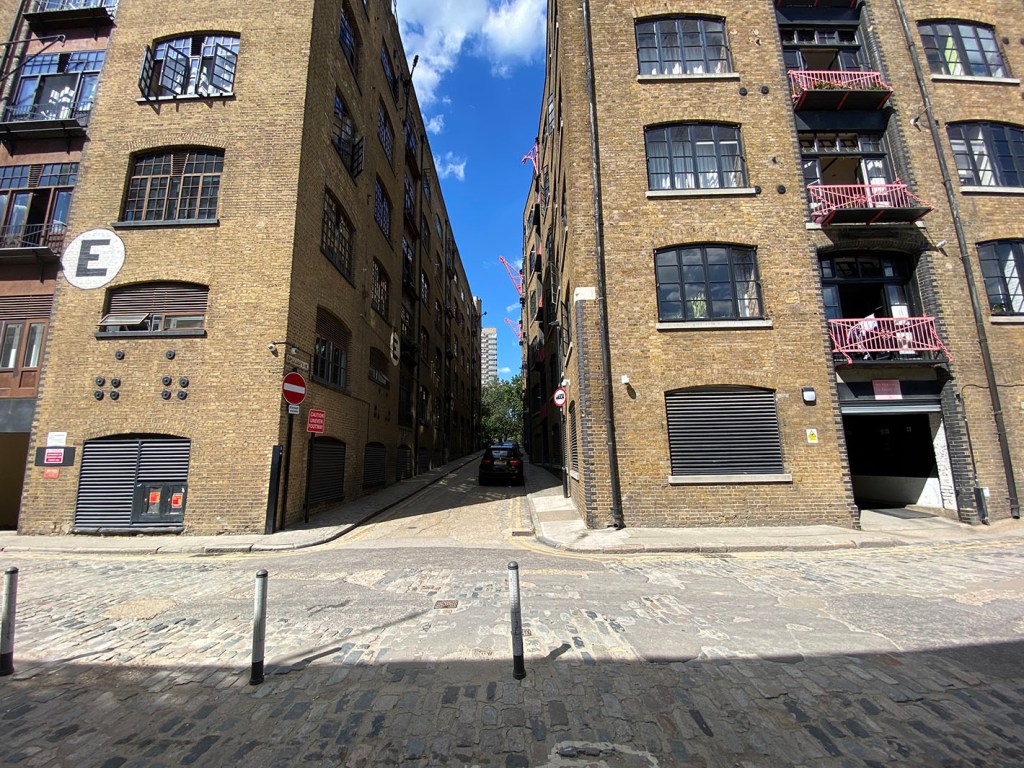
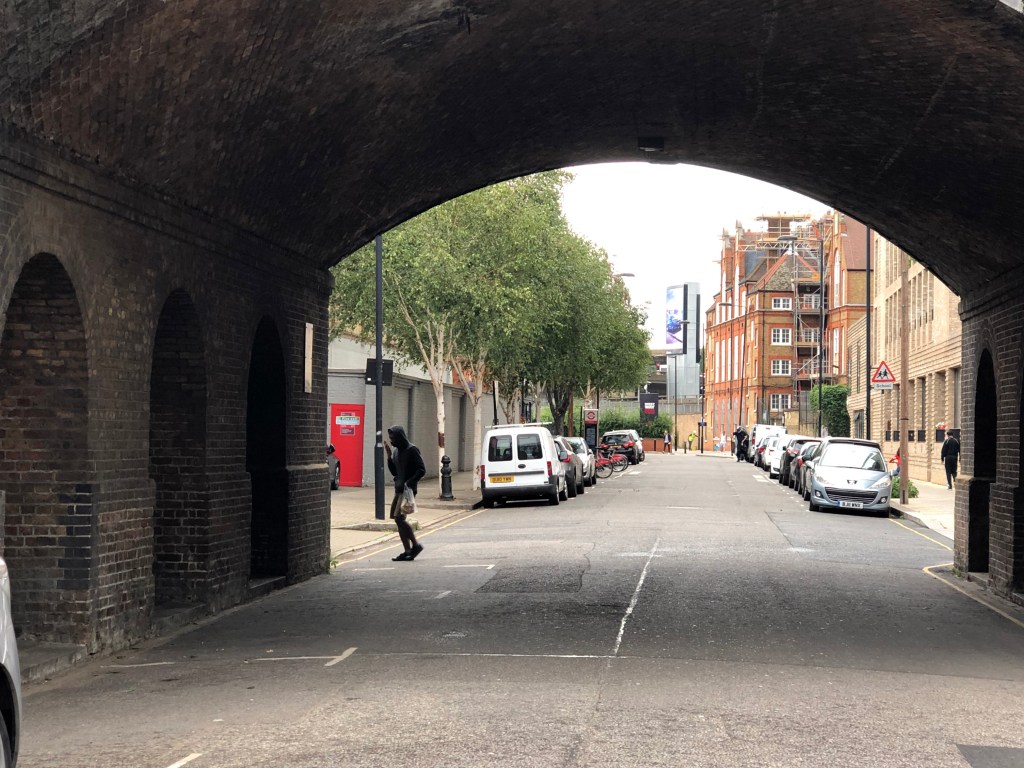
A POV shot from the Squad car as it homes in on the warehouse location is given as Virginia Street (4); hard to be sure as so much has been changed – including road layouts. Here are the closest pair I can match together, but – as with so much of Docklands – it’s getting to be largely guesswork a lot of the time:
The street in the episode turns right when it hits the end wall; in ‘real life’ you actually turn left at the bottom of Virginia St. now. I’ve been up and down the street – and all the ones nearby – from every angle, and nothing really tallies – so I can only imagine that it’s under the heading of ‘changed beyond any reasonable recognition’ now. The road sign you can see in the middle of the episode shot is too blurry to read as we track POV from inside the car, so that’s no help in determining the location.
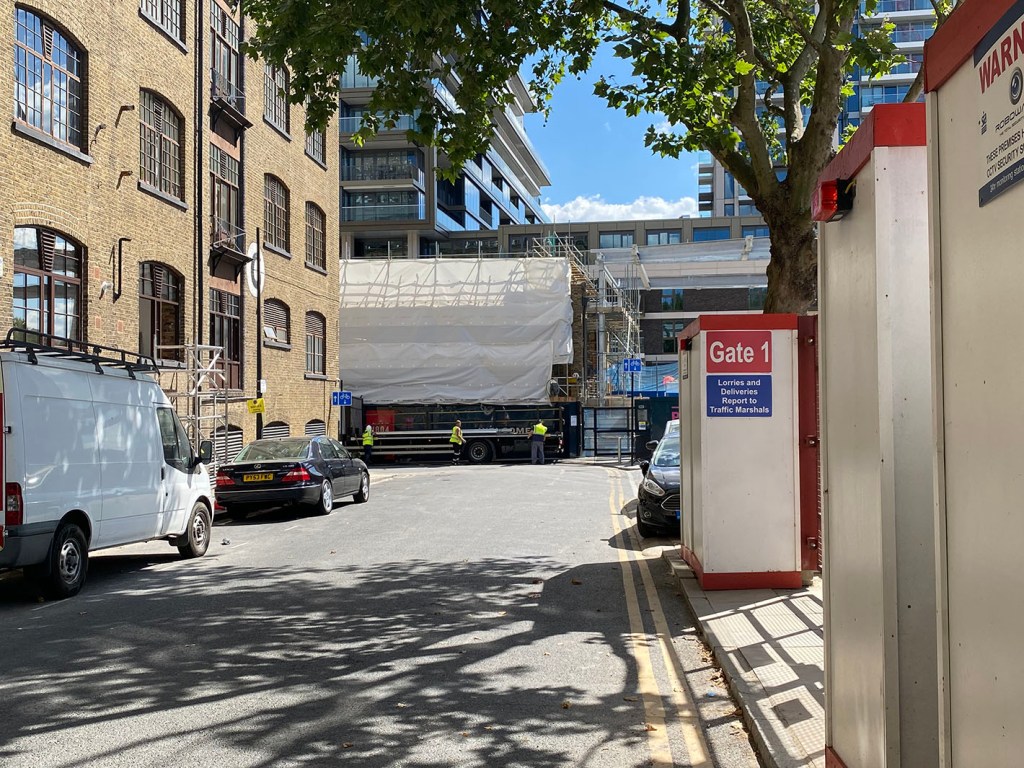
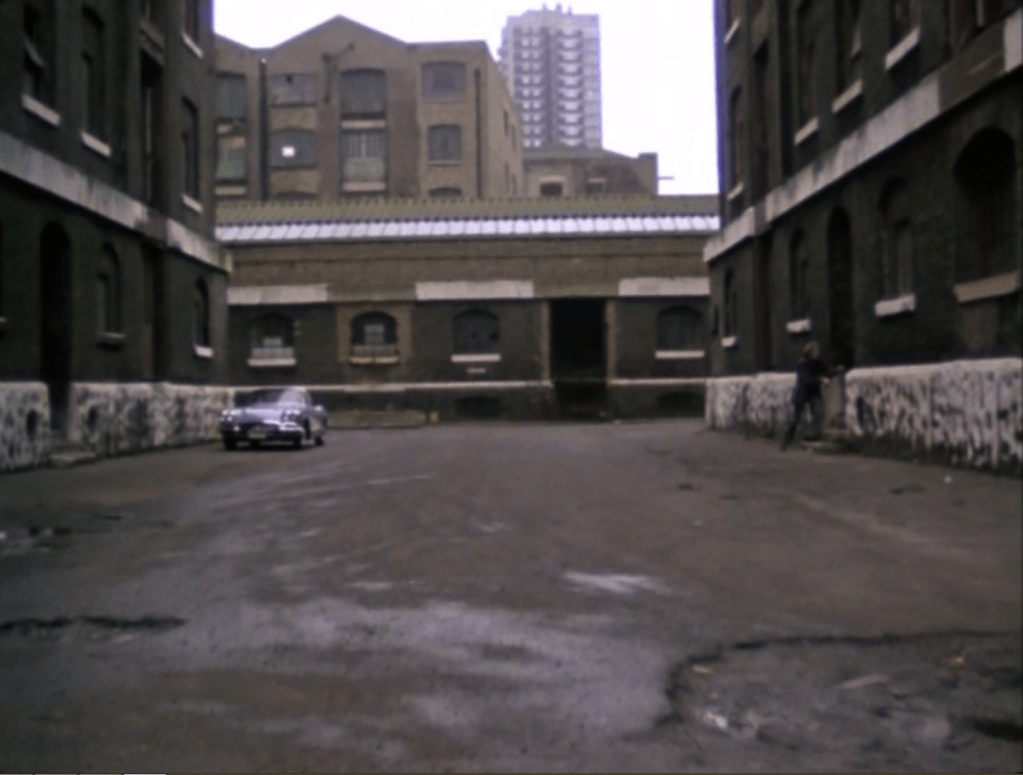
Walking down onto Pennington Street, which is listed as the location of the warehouse where Vic meets Vane to do the deal, we’re again confronted by an area that has changed extensively (5). On both shots below (we’re looking North) you can see a tower block looming in the distance – a lot further away, seemingly, in the perspective of the phone-photo:
The warehouses on the right hand picture – now converted to fancy dwellings, of course – are actually the ones you can see in the middle-distance on the episode shot, beyond the lower-rise units with the glass skylights that run across the middle of the frame. That means the warehouse in which Vic was holed up is South of those lower-rise ones (the ones that run along Pennington Street directly – and which are ‘behind my back’ on the second photo). Vic’s warehouse and those adjacent to it have since been demolished; it would have been fairly difficult to get into the area where they once stood (I’ll explain why in just a sec) – and even had I done so, all you’d have seen is the back of the Pennington Street warehouses. So here, again, I went for ‘as close a view that gives you something recognisable to latch onto as possible’.
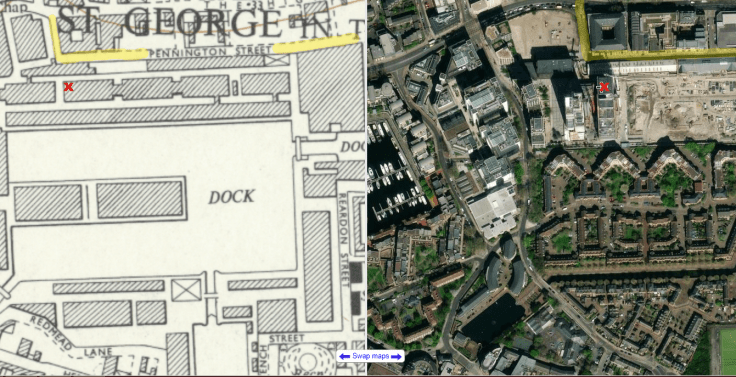
A little further detective work bears out my assumptions above: if you look on Google Maps ‘satellite view’ of where Victoria Street hits Pennington Street, you’ll see that right below those lower warehouses along the southern edge of the latter is a mass of currently razed ground – ‘Merino Gardens’, where new development is taking place. The warehouses in which Vic meets Vane, to which The Sweeney rush, can actually be seen in this old side-by-side map view; hovering your cursor over them on the left puts the right-hand cursor in what is now the new development site:
In the image below, I’ve put an X on the ‘right hand’ warehouse from the episode shot above – the one into which we see George and co running, from Vic’s POV from an upper-floor window. The corresponding X over on the right is a new tower block, and to its right you can see the area of razed ground where further building is taking place:
You can see in the ‘old’ map above that there are access roads in and around the warehouses that no longer exist; it’s possible that some of the in-car POV shots were taken from these. (I’ve highlighted where Victoria Street runs into Pennington Street in yellow.) You can also see on the left-hand side – dominating most of that frame – ‘DOCK’; that is all now filled in and reclaimed land. In the episode, the final chase scenes where The Squad hunt Vic in an out of the old derelict buildings and piers took place here. The pier where the loot is hidden is directly along the northern edge of ‘DOCK’, and you can see some walkways on the right-hand part of the old map that connect the warehouses to the dockside buildings. There’s some good sequences of The Squad running across these.
OK, so I’ve indulged in a little “ones that got away” already. May do more of this in future. Let’s head now towards what was the final location for this particular set of Sweeney shenanigans.
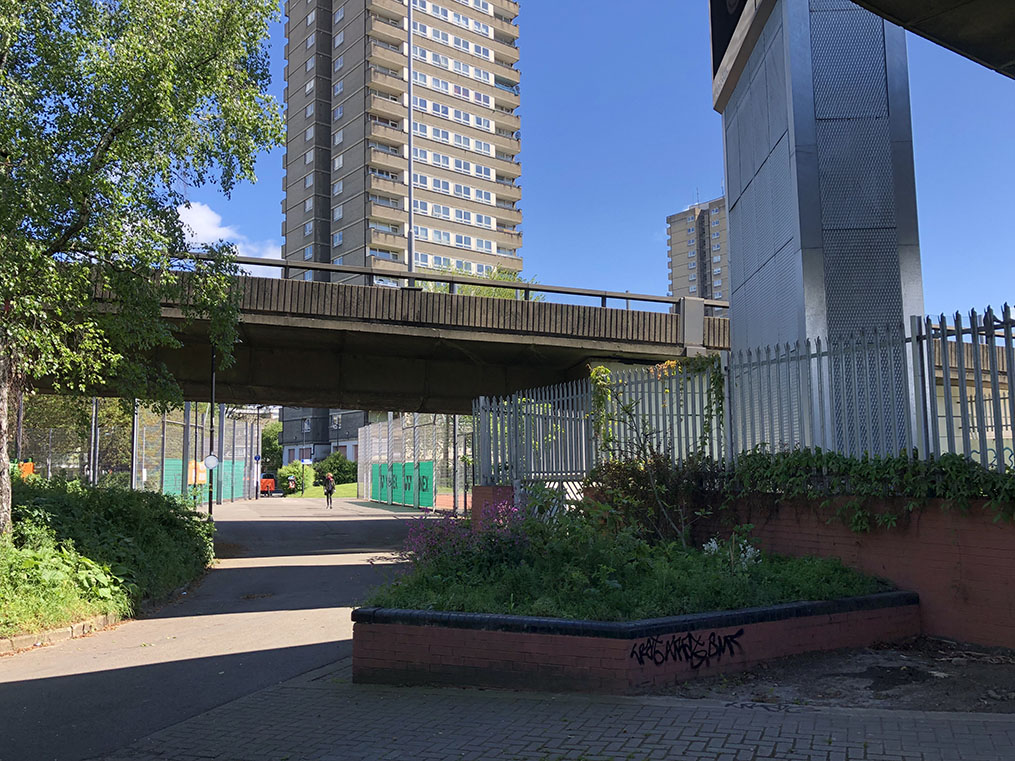
Still working ‘backwards’ through this climactic part of S2E08, we have a shot of the squad car approaching Tower Bridge (6) as it heads to the warehouses on Pennington Street:
Looks very different with the lack of trees and dour 70s rainy grime 🙂 With that, it’s time to leave Vic and his Poppy and head – nowhere, we’re staying right here – for what was finally, the last action of the day.
Episode Context – S2E10, “Trojan Bus”
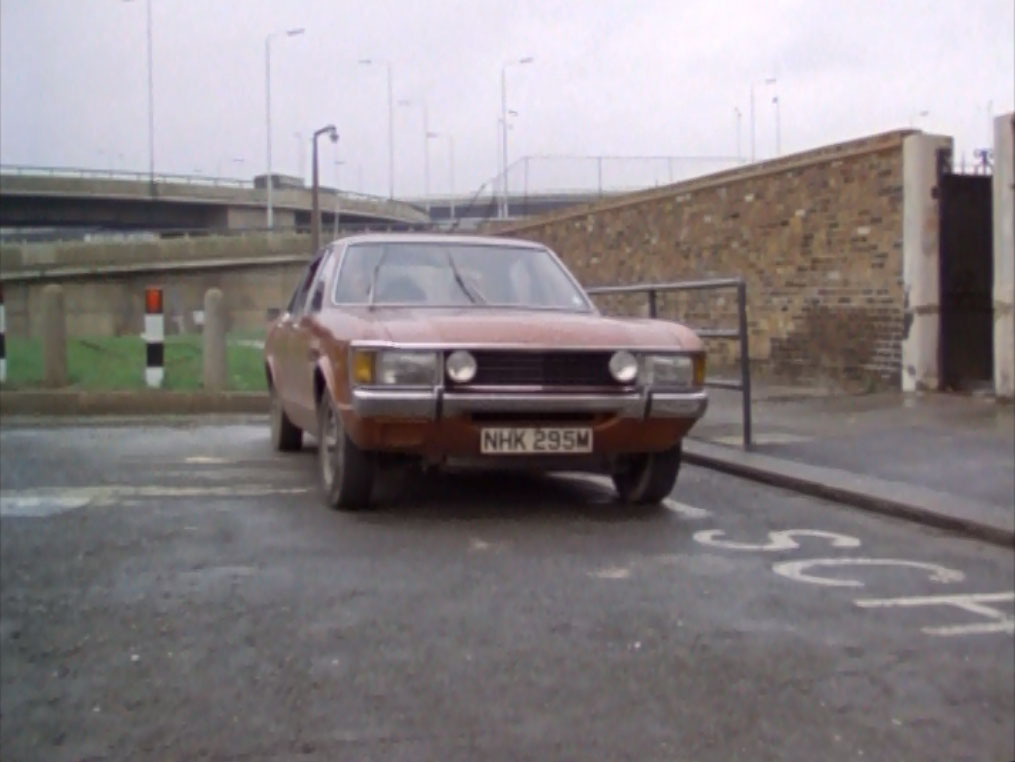
Another set of villains hiding in the docks; another establishing sequence of The Squad racing in their Ford Consuls towards Tower Bridge to intercept (7). We’re back after Col and Ray – this is just prior to the shots from the car as it pulls into St. Katharine’s Dock via the ‘elephant gates’ earlier in the post:
I did my best here, but short of climbing a tree or standing in the middle of traffic, I couldn’t get quite like-for-like angles 🙂
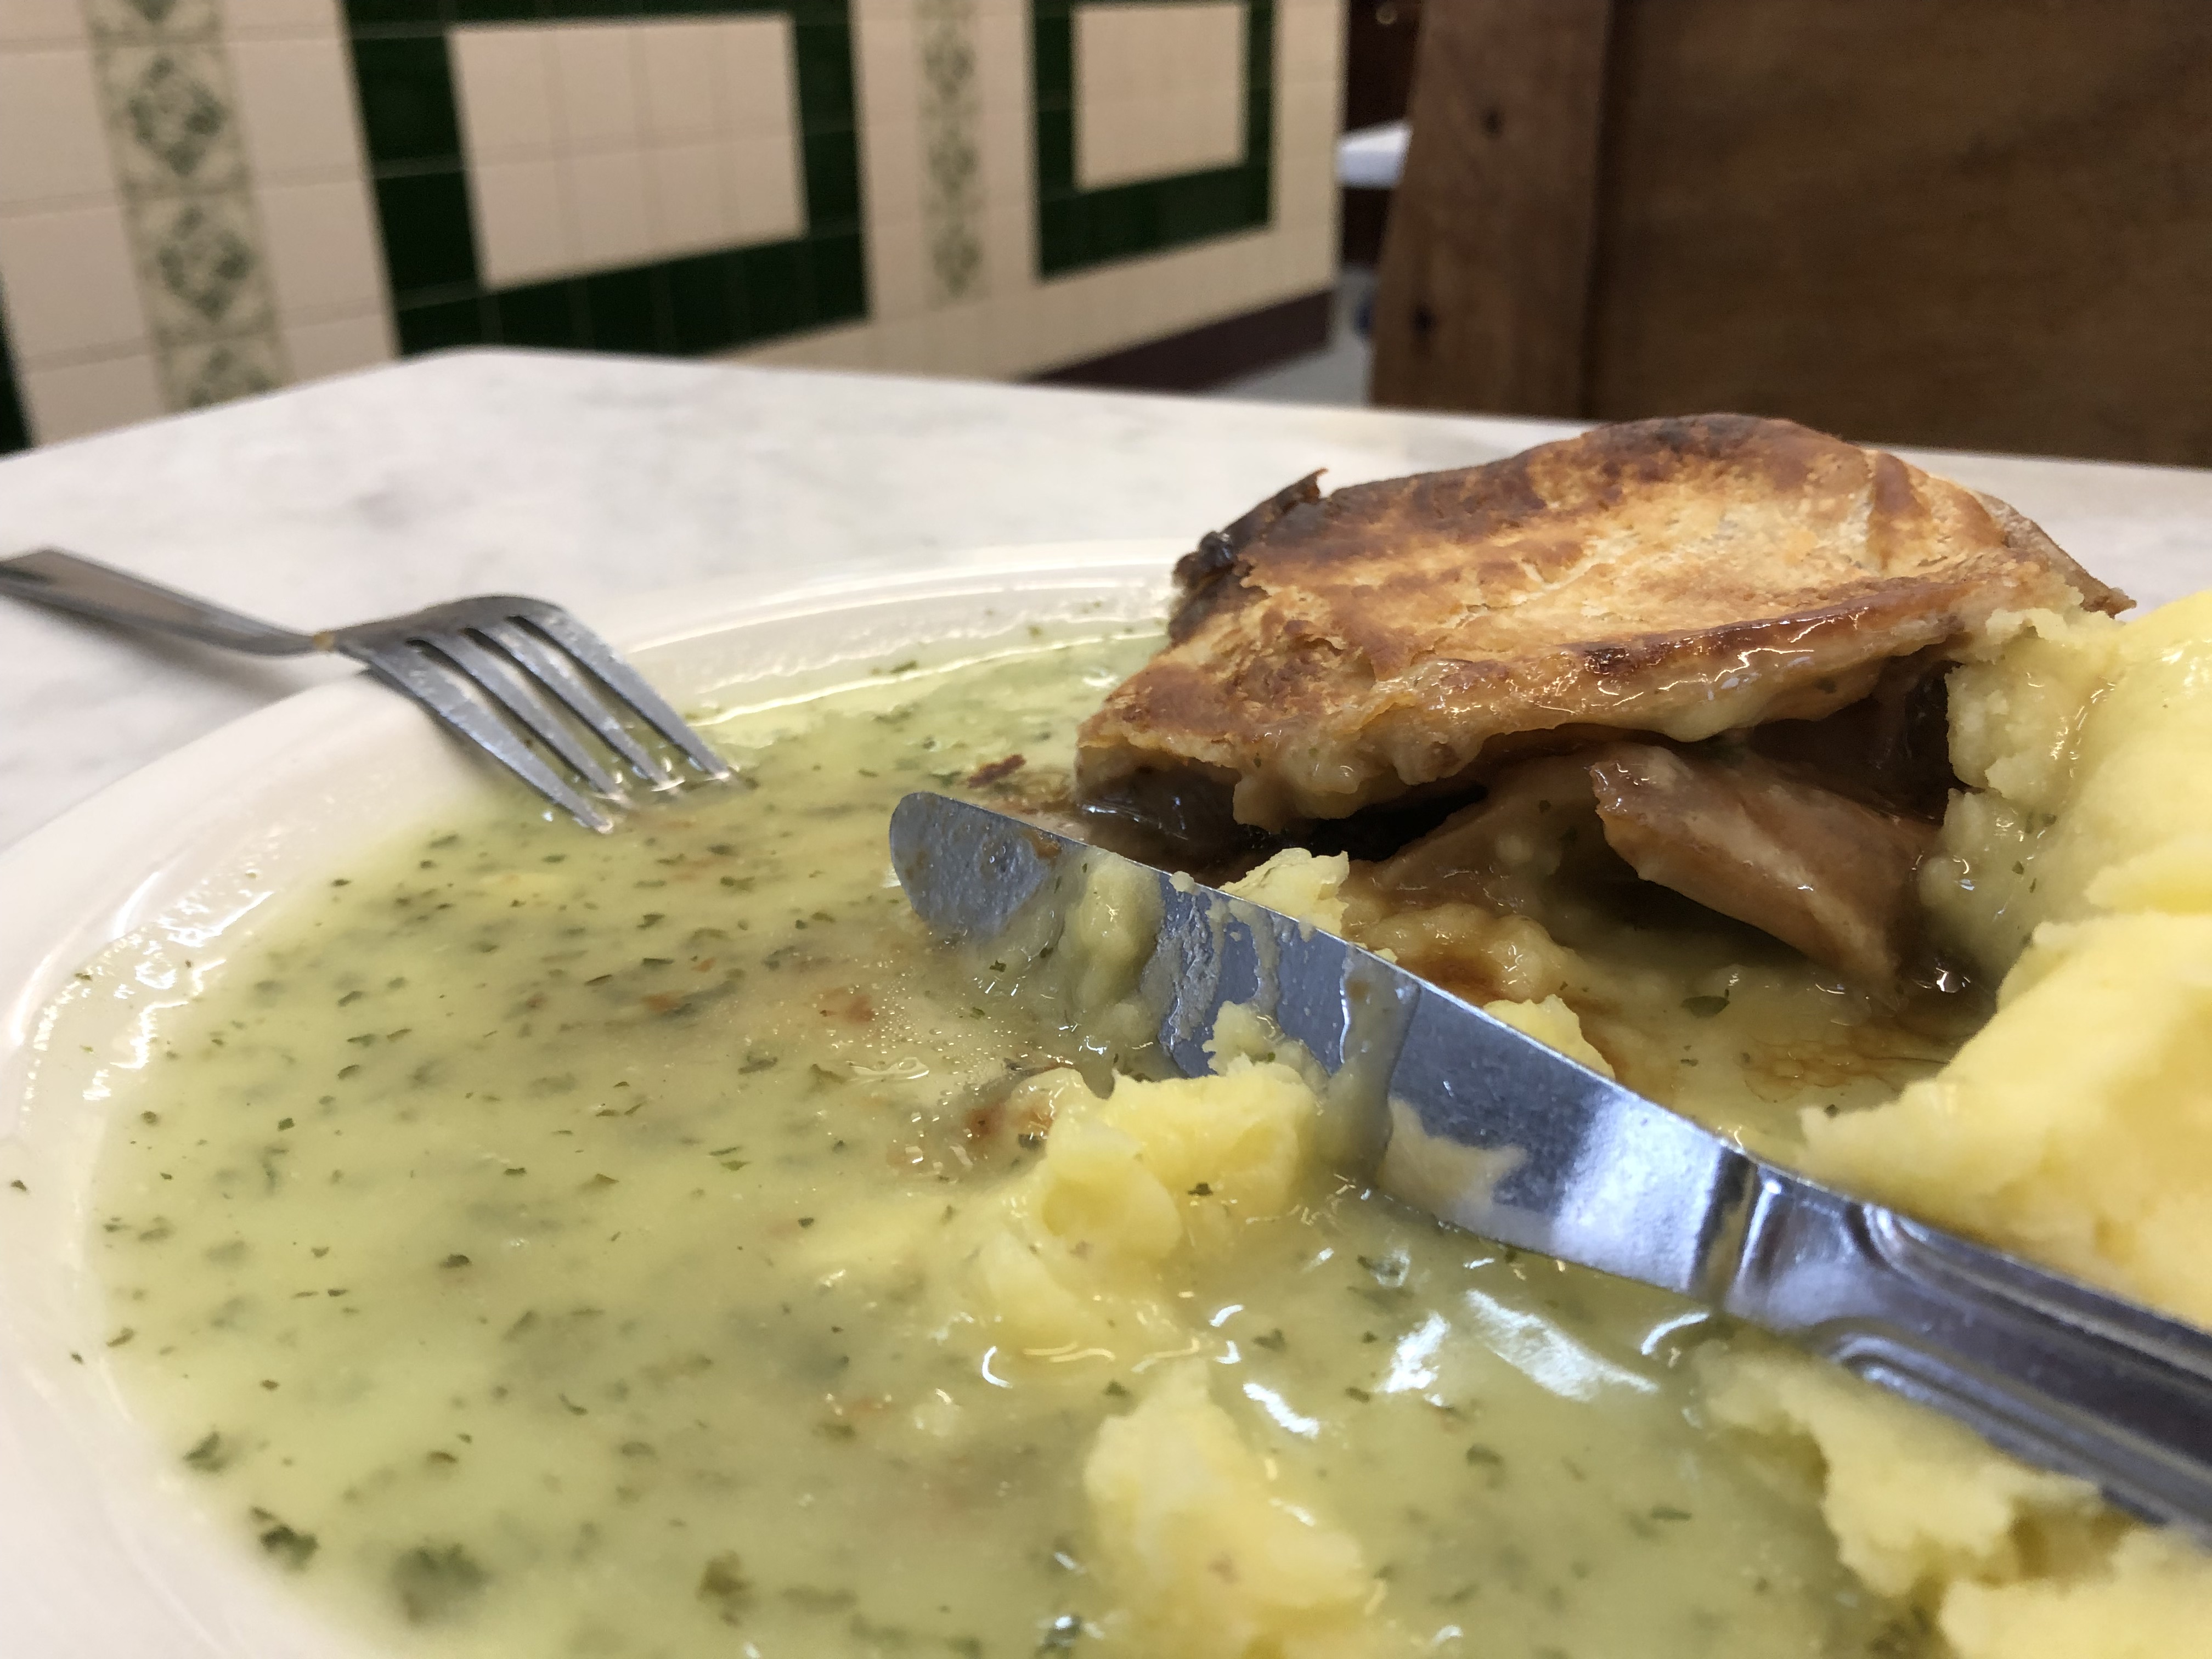
So there we have it; my biggest quest yet – and all on a burning hot August day. By this time I was pretty much cooked, and – though I’d prepped for heading North towards some other locations – I decided to head to Tower Hill tube and back to Waterloo for a train home. But not before a quick – and though I say it myself, well-earned – bit of liquid refreshment. Cheers!
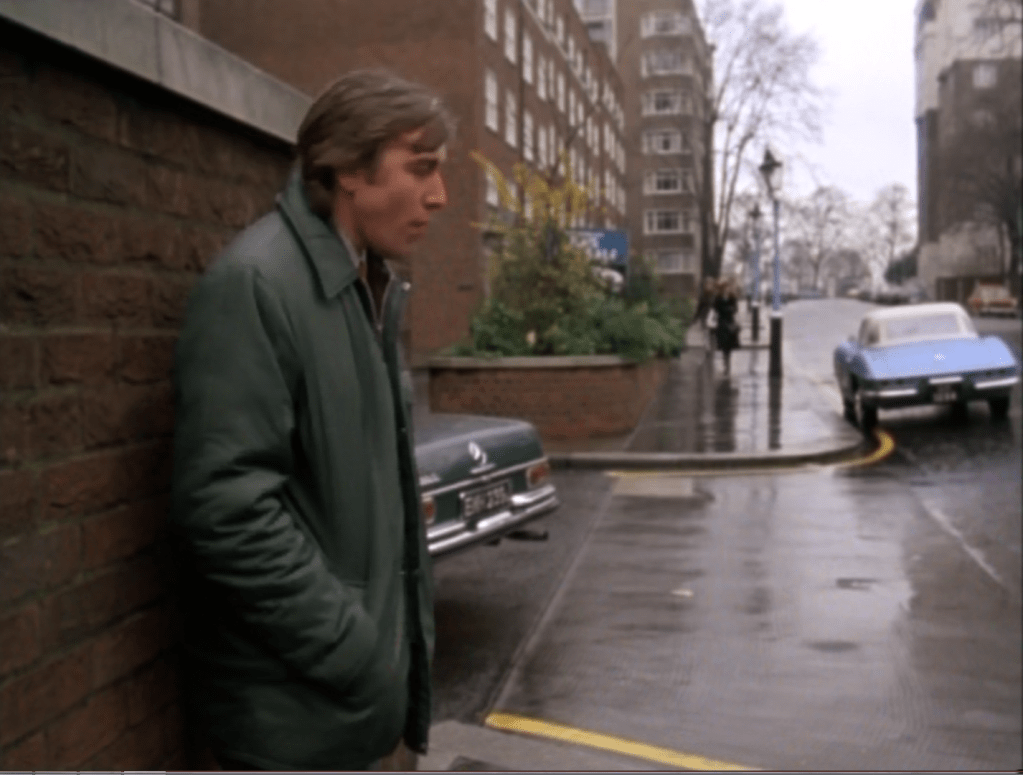
We left Part 2 just outside Julie’s in Holland Park, having just failed to apprehend the mystery diner who’d met up with Frankie Little. This trip spent quite a bit of time bouncing about between episodes 9 and 11 of Season 2, and it was back to the former for the next location.
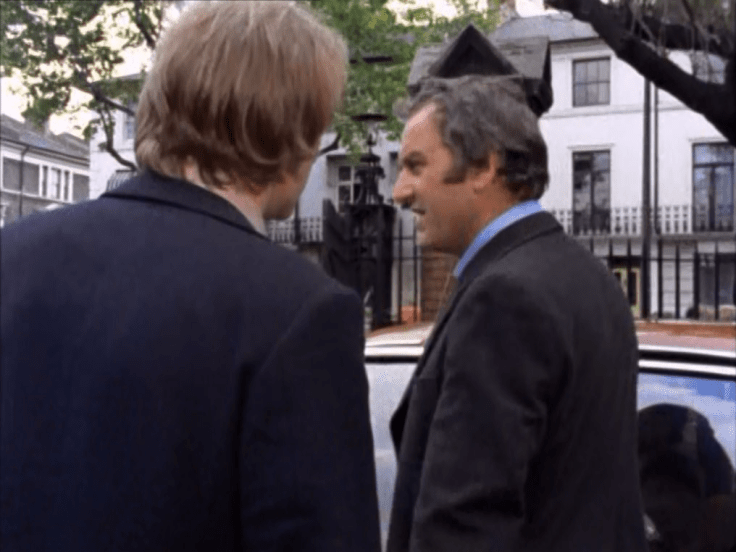
Episode Context – S2E09, “Stay Lucky, Eh?”
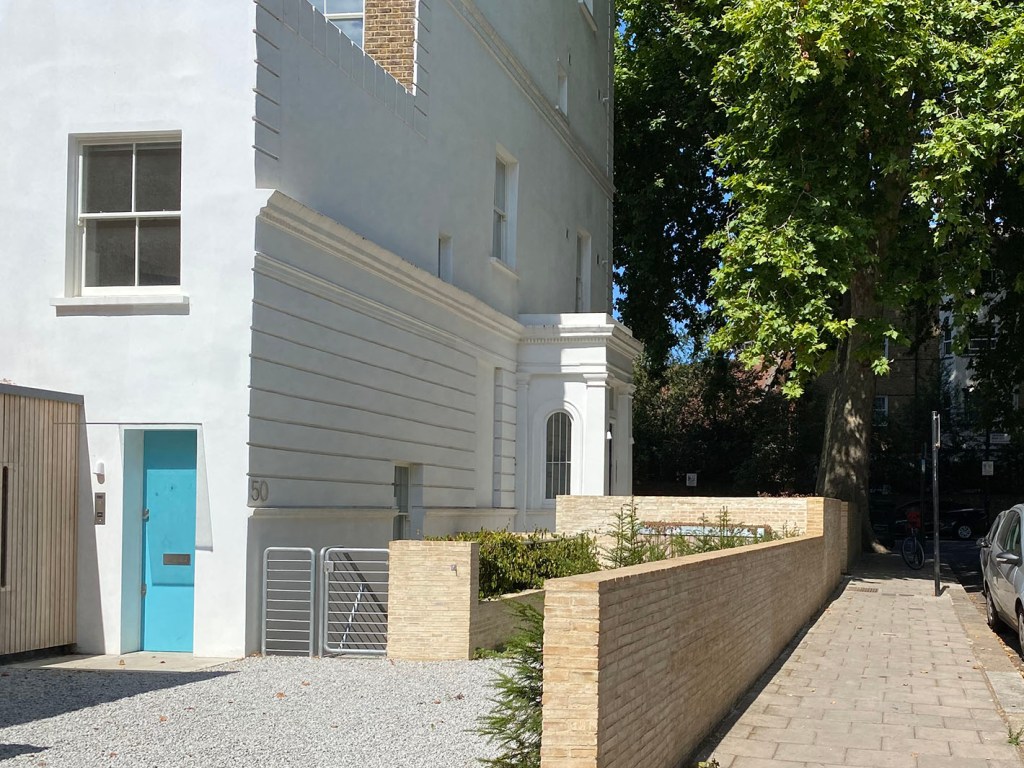
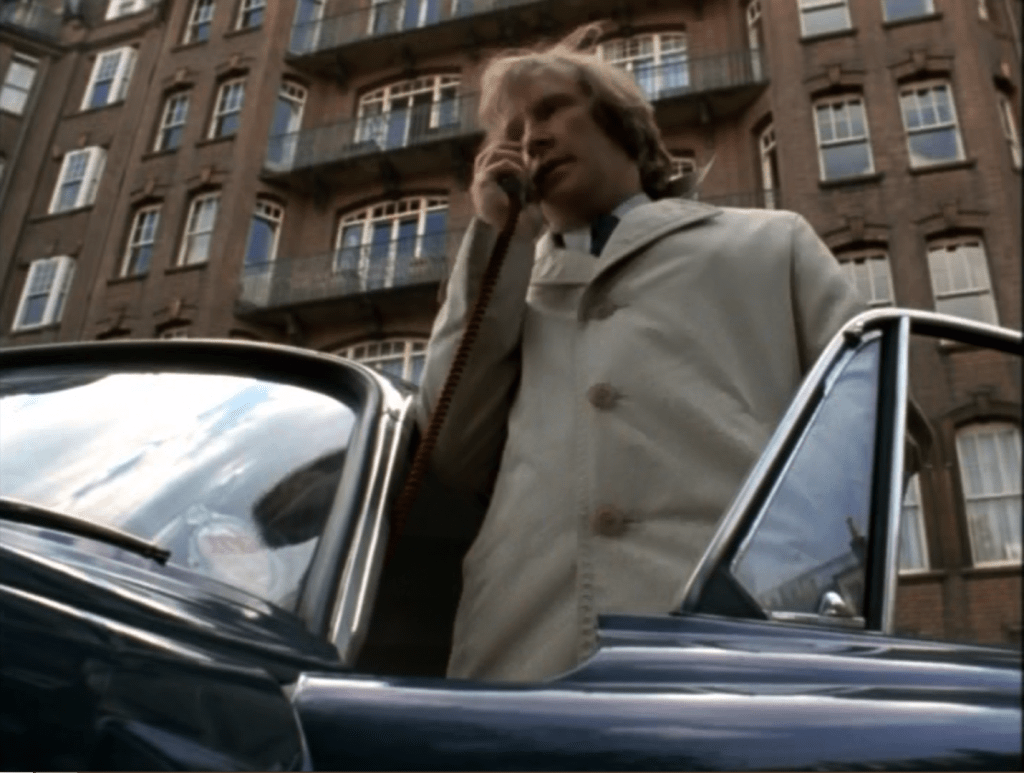
Back to Tony Kirby, and the case of his unrewarded 2 grand, the missing loot from the job he financed, and the errant Tyson and Jenner. There are a number of scenes set inside Kirby’s house – very swanky digs fitted and furnished with the best that ill-gotten gains have to acquire, as you’d imagine; however, there weren’t any exterior establishing shots or similar until quite late on in the story. At this point, a set up has been instigated by The Squad wherein the mystery robber who swooped in and took the spoils is known to be heading back to the theatre where Herbie Mew – the little bird who’s been tweeting him information on the jobs being pulled, but who now refuses to have anything more to do with him since it turned ugly (shooters and so forth) – works. Regan and co. make a tip-off to Kirby’s crew that the thief who took ‘their’ money will be there – so Kirby and co. tool up and head to the theatre. We see them leaving Kirby’s house, on Hillsleigh Road just off Holland Park Drive.
Next up was a bit of a walk North, through Notting Hill in the direction of Westbourne Park. We were to return to the exploits of Tyson and Jenner and co. fairly soon; but first of all, a detour into a ‘new’ episode for me.
Episode Context – S2E10, “Trojan Bus”
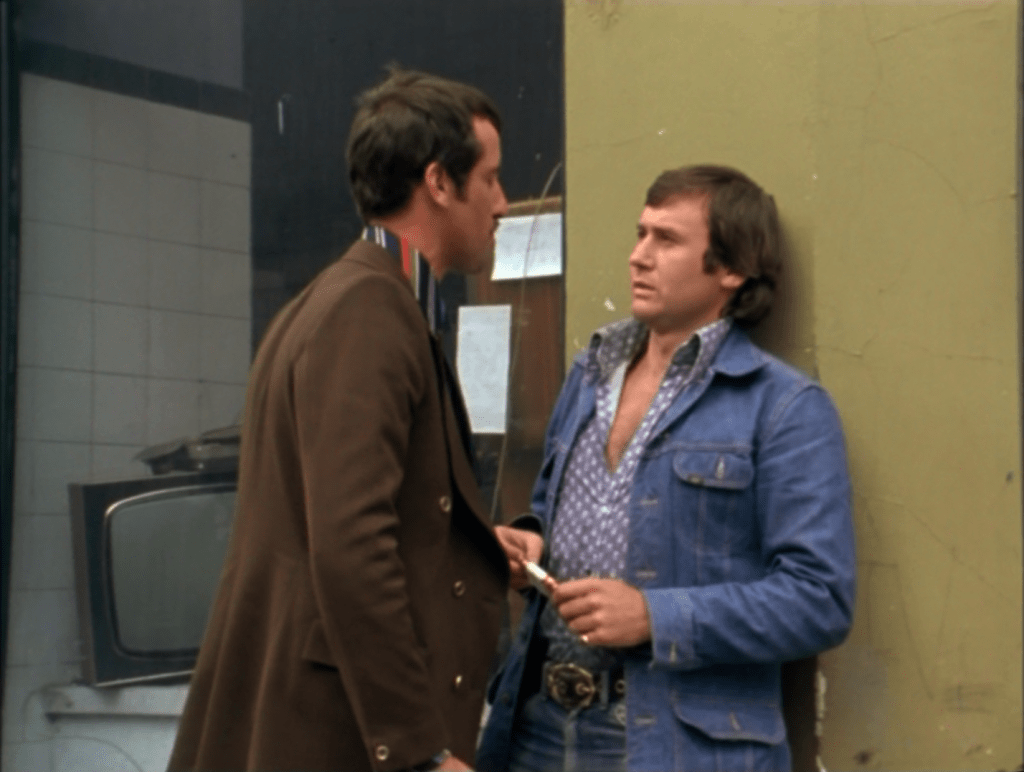
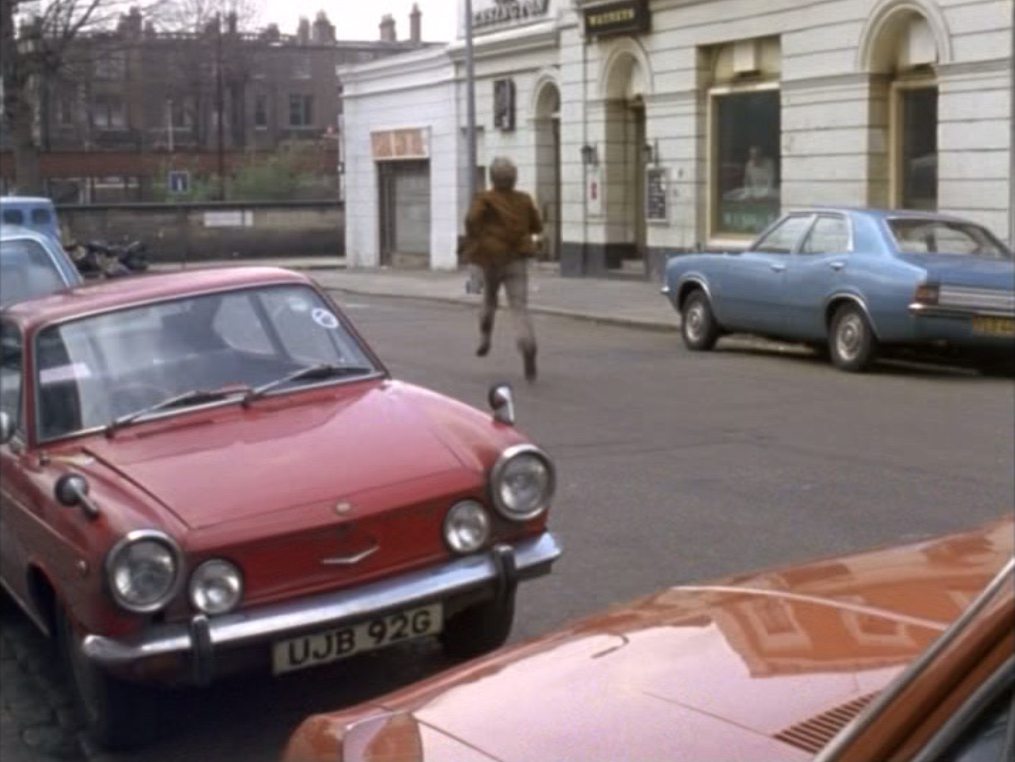
We’ve not been there yet in any of my travels, but an earlier episode in S2 sees two young Aussie tearaways – MacGruder and Stackpole (Col and Ray to their associates) – pull a series of audacious armed robberies of Krugerrands before escaping the country. All flash and swagger, they are convinced they have the measure of the British law enforcement, and are back on our soil – this time to pull off an art heist. Independent art dealer Leonard Geisler has a rare self-portrait by Goya, that he’s about to sell to a buyer from one of Europe’s big-league galleries. Tipped off about the painting by his assistant, Nancy (“there’s got to be a bird… there’s always a bird”), the Aussie Boys test Geisler’s credulity by first pulling an old “buy-back” scam on him; when that goes off as expected, they are green-lit for the real job of snatching the painting, which they plan to sell to a buyer from Amsterdam.
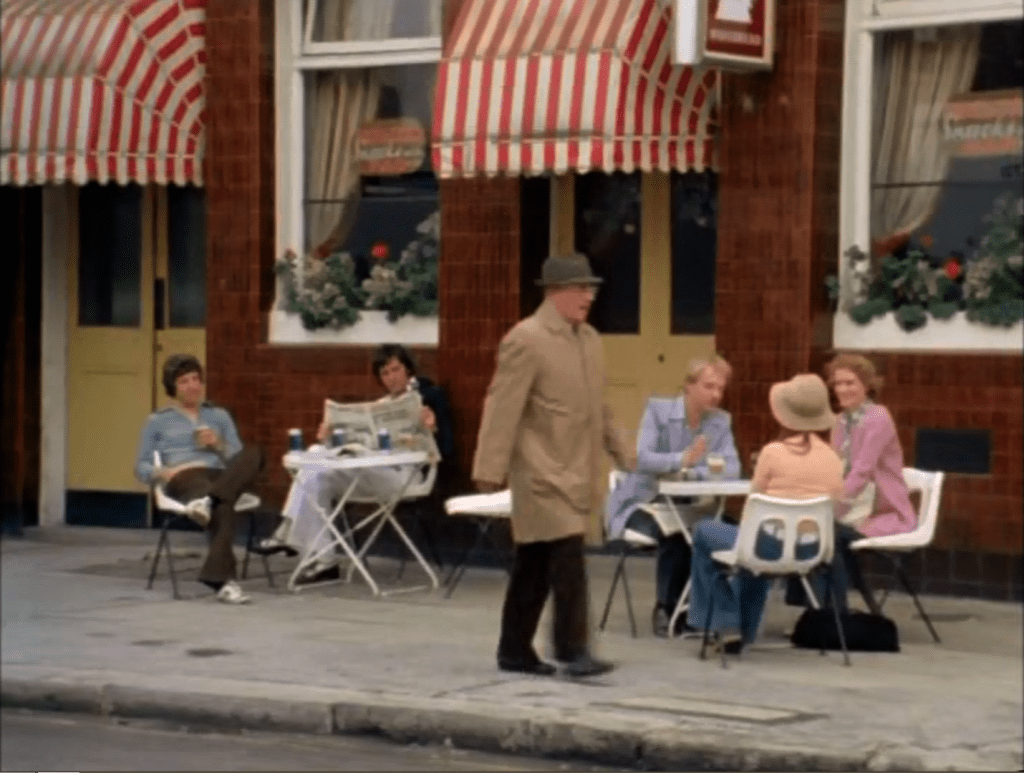
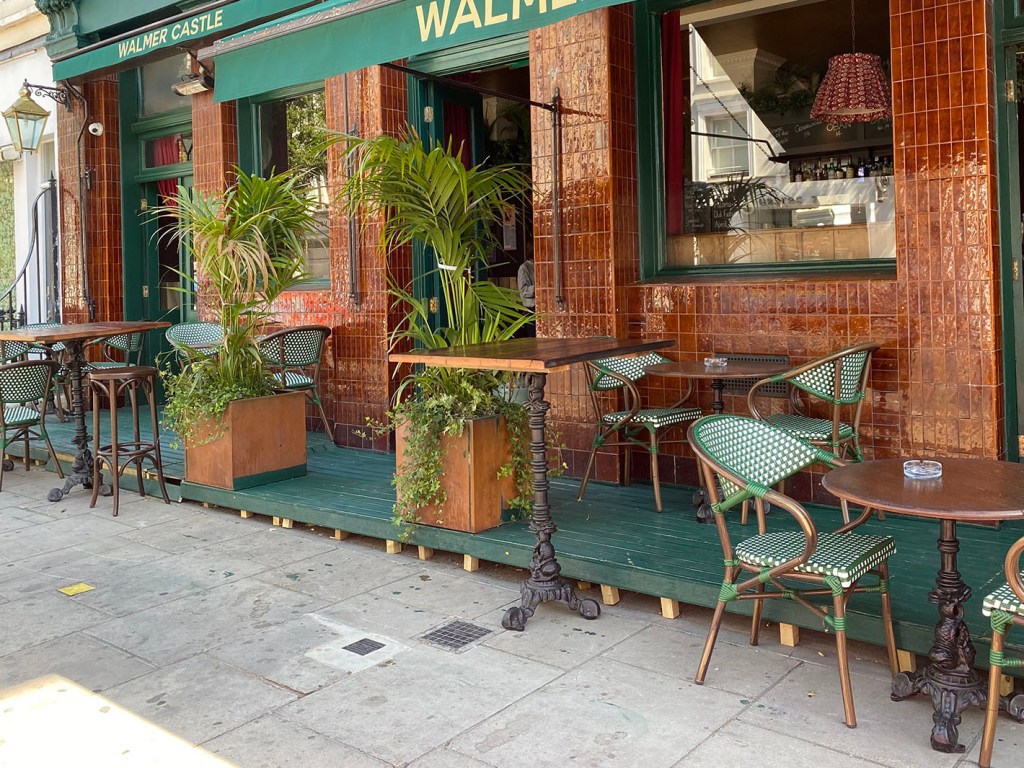
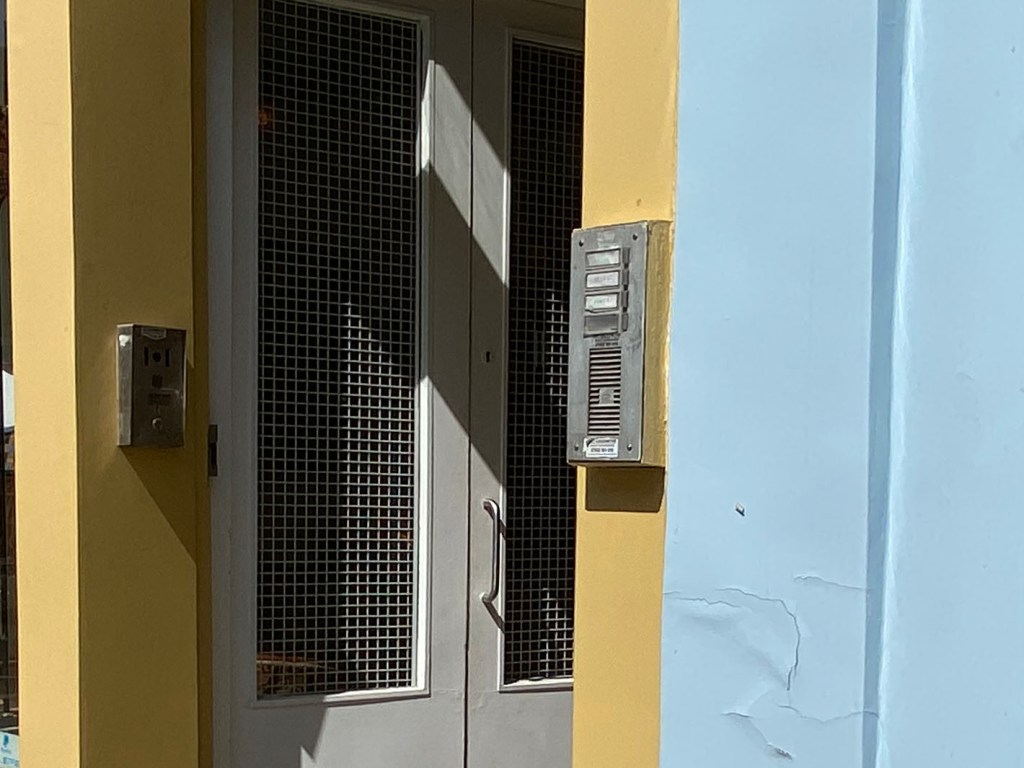
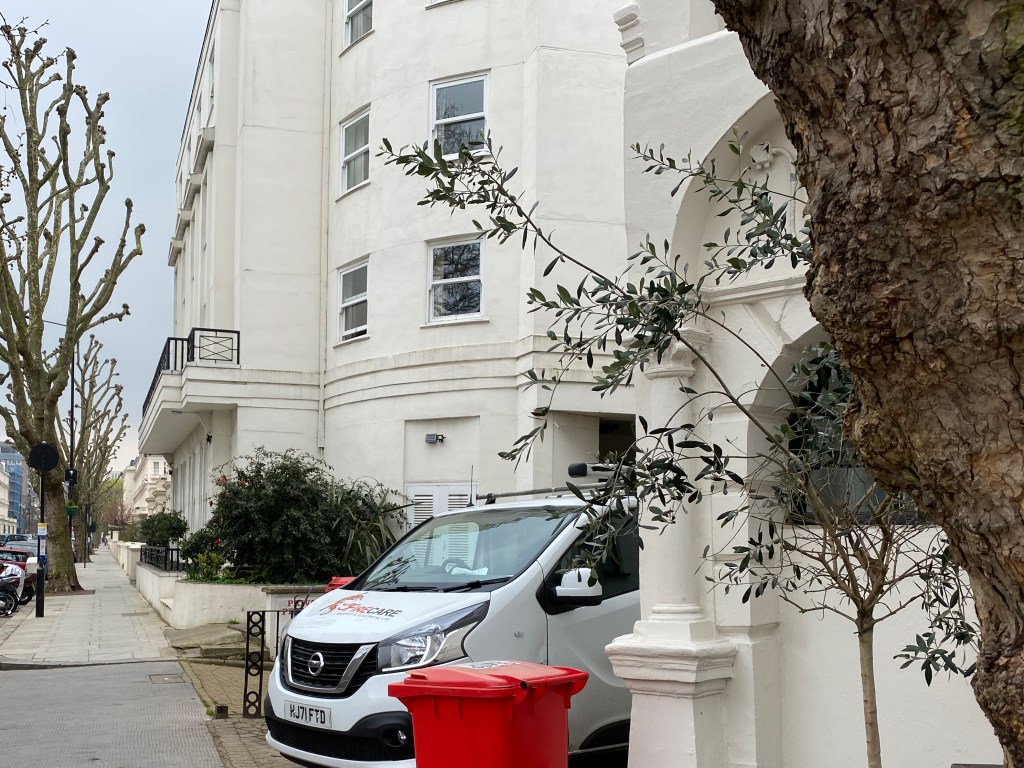
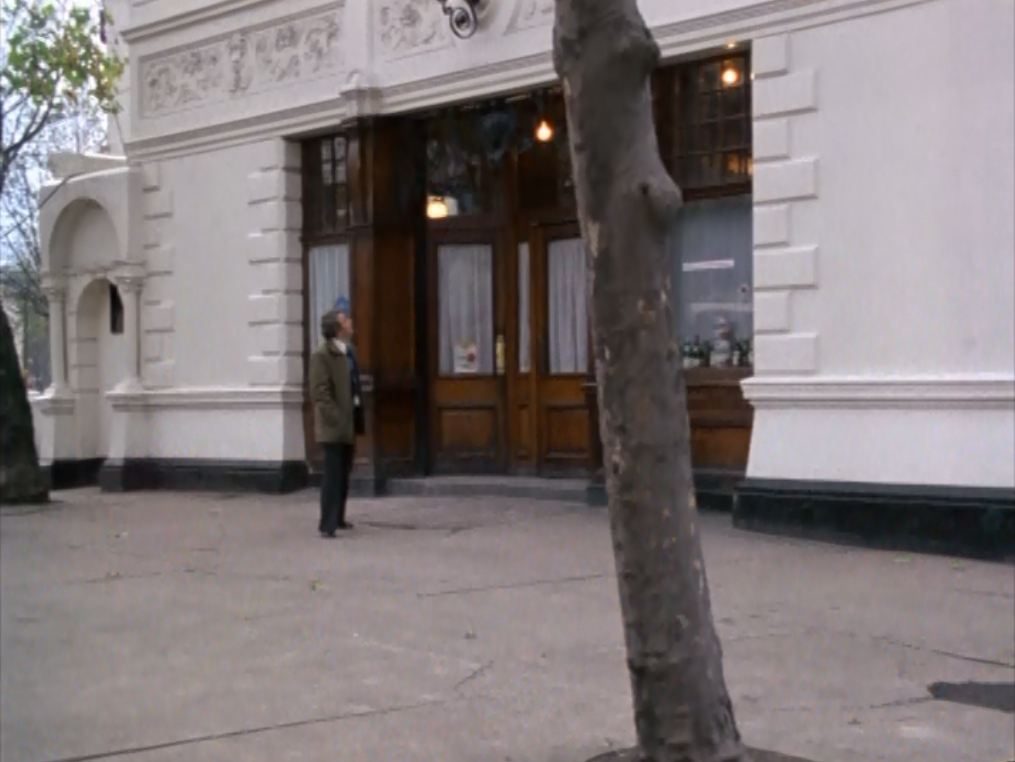
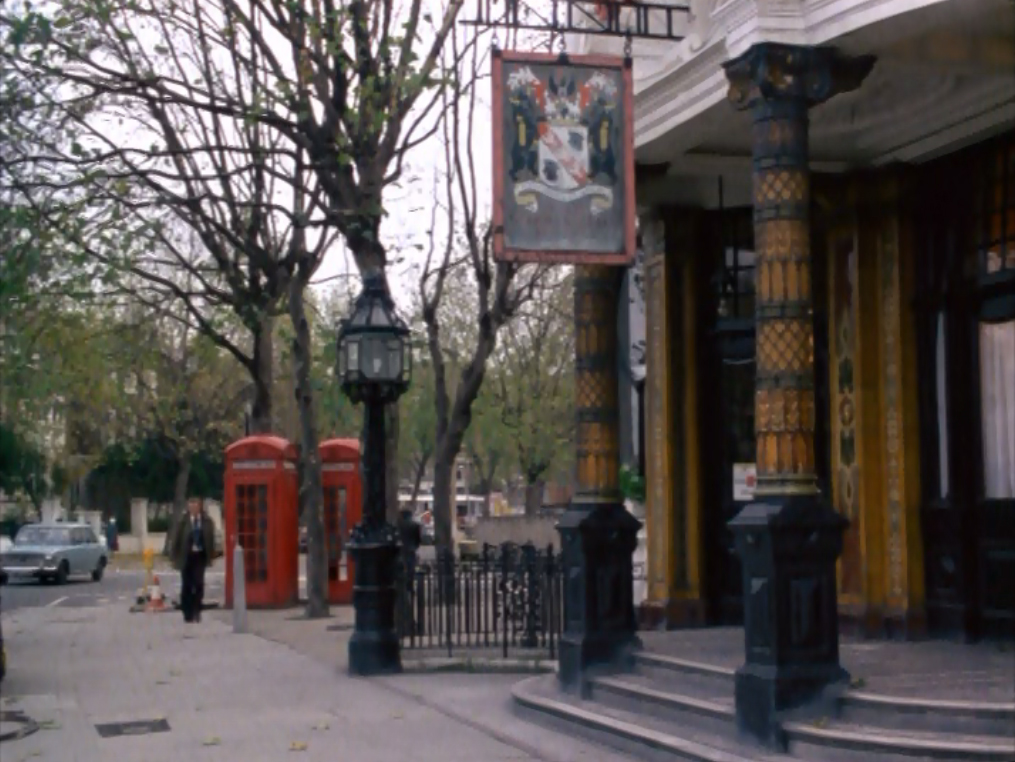
Geisler’s art gallery is on Ledbury Road (1), next door to ‘The Walmer Castle’ pub, from where Col and Ray observe his comings and goings:
You can see that the pub has had the inevitable spruce-up; nice to see the old tiles still intact, though. On the top pair of pictures, a lot has obviously changed; the basements have been opened up, the frontages have been redone, and the door to Number 60 which served as the gallery entrance (from which Col is exiting on the left-hand shot) has been moved to the right of the premises, and is now directly adjacent to the pub.
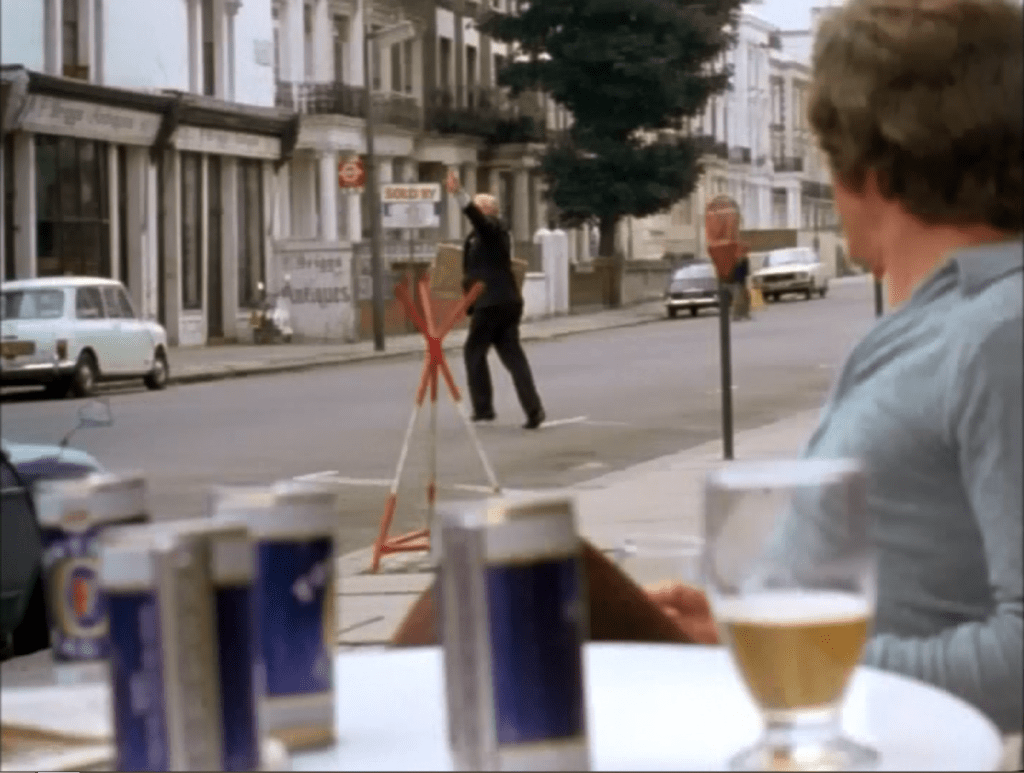
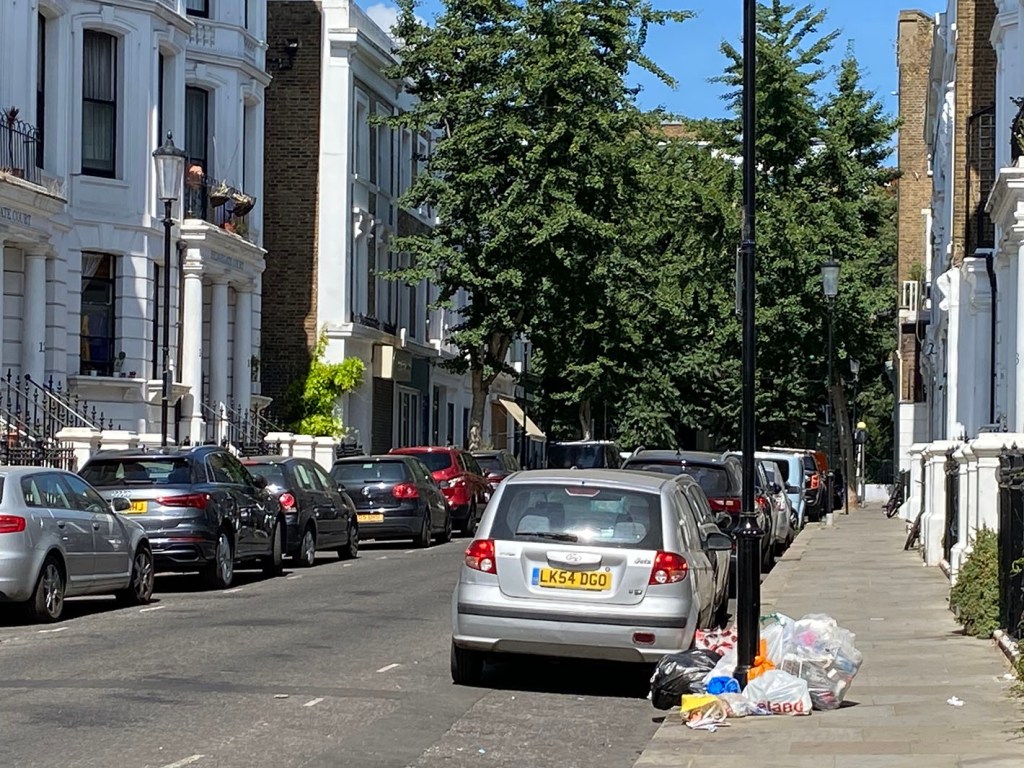
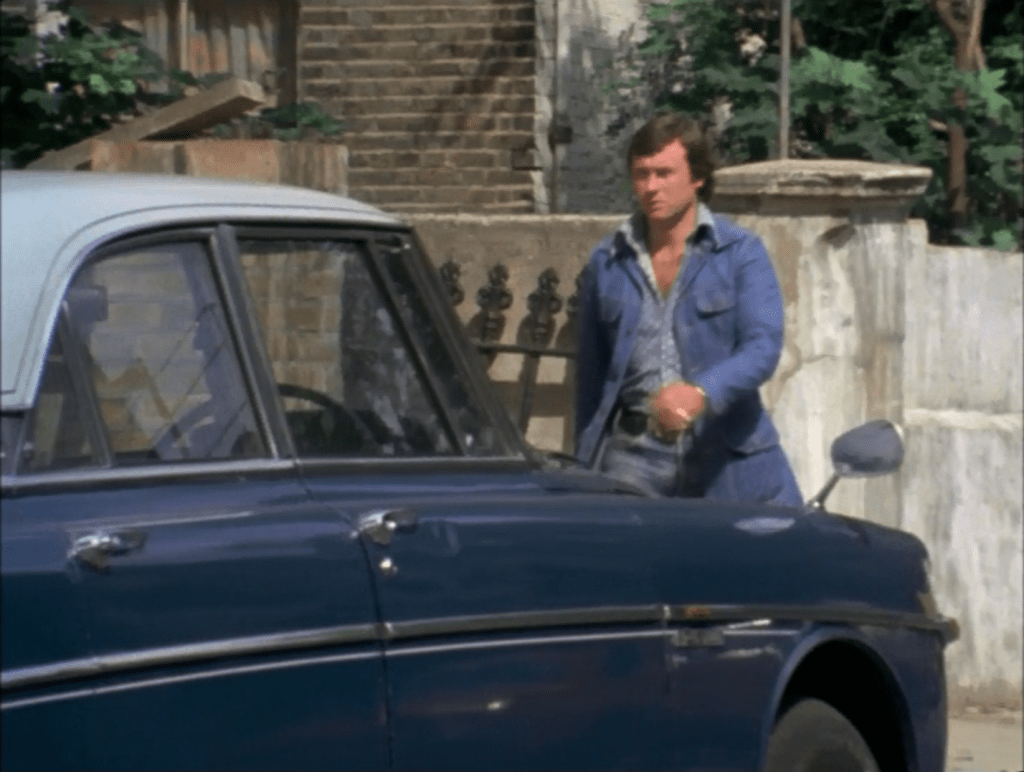
In the meat of the episode, Col and Ray steal a bus to snare Geisler – who always catches the same one from outside the gallery when travelling to appointments. In the first pair of shots, they observe Geisler from the pub as he heads to the bus stop:
For the job itself, Nancy makes sure to shoo Geisler out of the gallery with the Goya in time to catch ‘his bus’ (she’s convinced him that nobody would suspect a little old man with a brown paper package is carrying anything valuable) – the bus in question being the stolen one that Col and Ray are driving up Ledbury Road from the South:
After that little interlude into Aussie territory (if you’re not now humming ‘Nice and Easy Does It’ to yourself, then clearly you’ve never met Col and Ray!) it was a short walk North to grab the final set of locations in this neck of the woods.
Episode Context – S2E09, “Stay Lucky, Eh?”
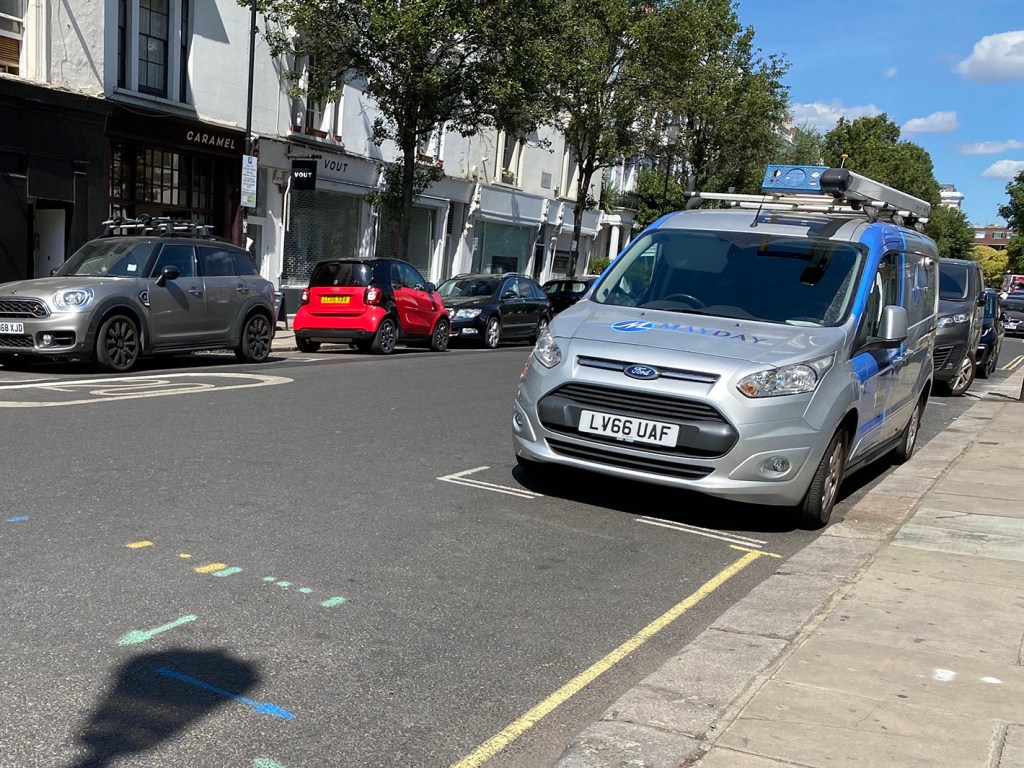
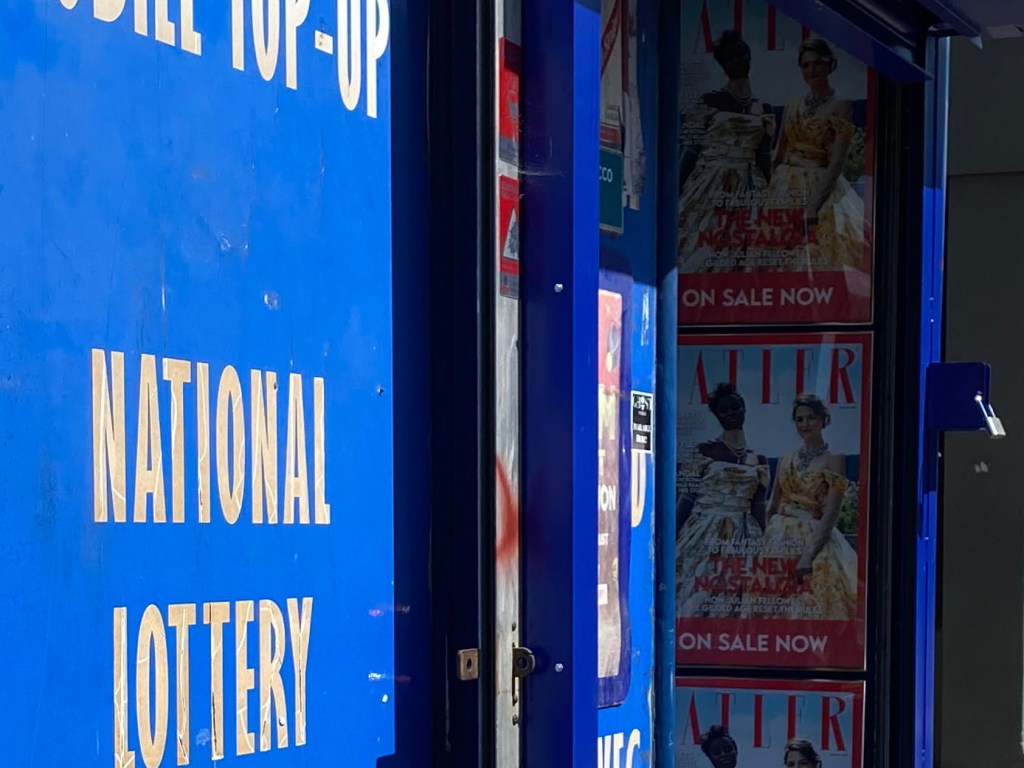
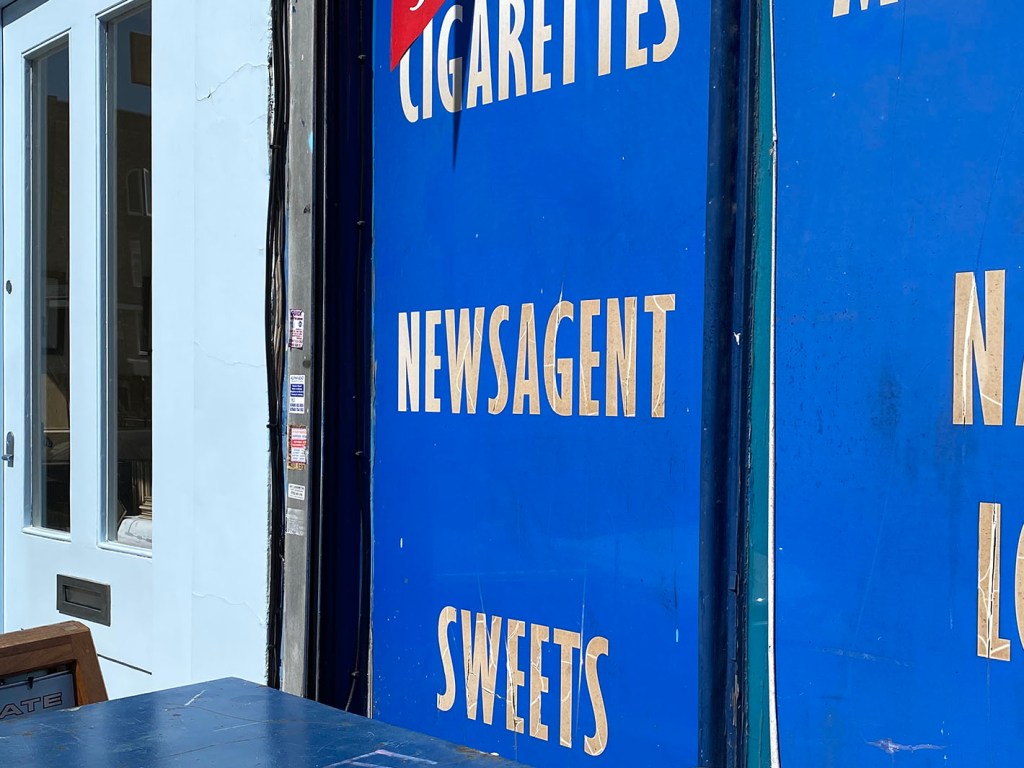
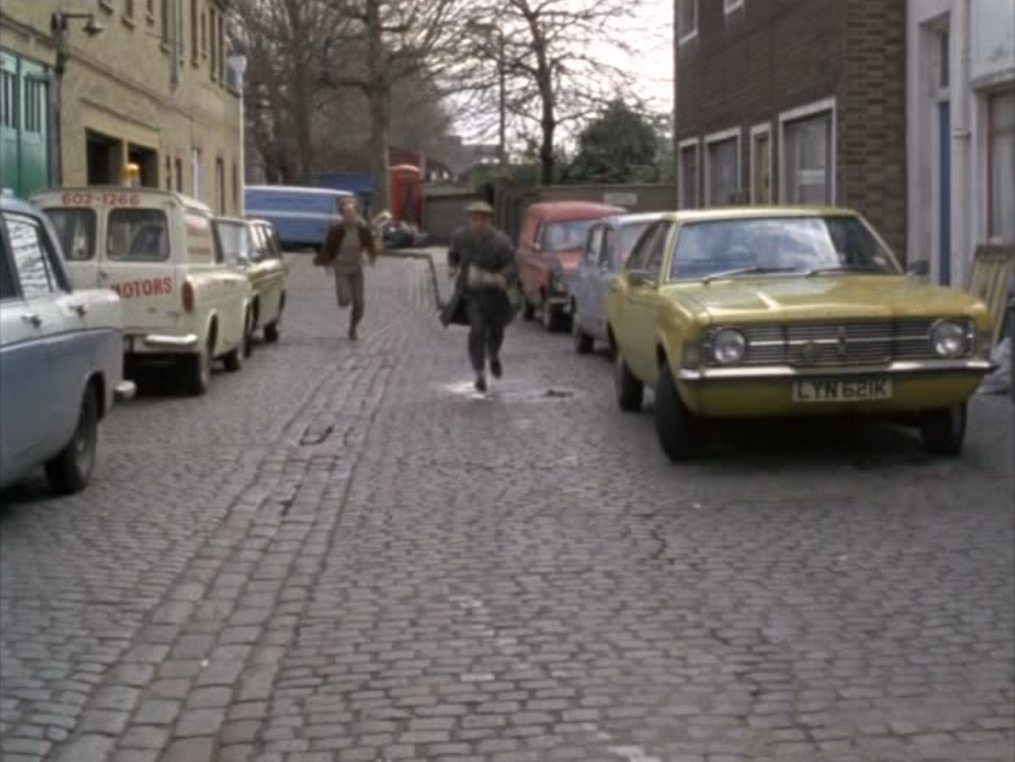
I said it wouldn’t be long before we were back on the trail of Tyson and Jenner, and here we are. Skef Warren and Kirby’s other henchmen have been out trying to unearth Tyson, who has been laying low since the ill-fated job. They catch up with him coming out of a newsagents on Talbot Road (2) – and Skef ‘persuades’ Tyson to join them in Kirby’s car to go for a little chat with Tony about the job.
The shots are all very closely cropped action, so it’s difficult to immediately tell from them that the ‘now’ shots are definitely the same place; you’ll just have to trust my meticulous research on that one 🙂
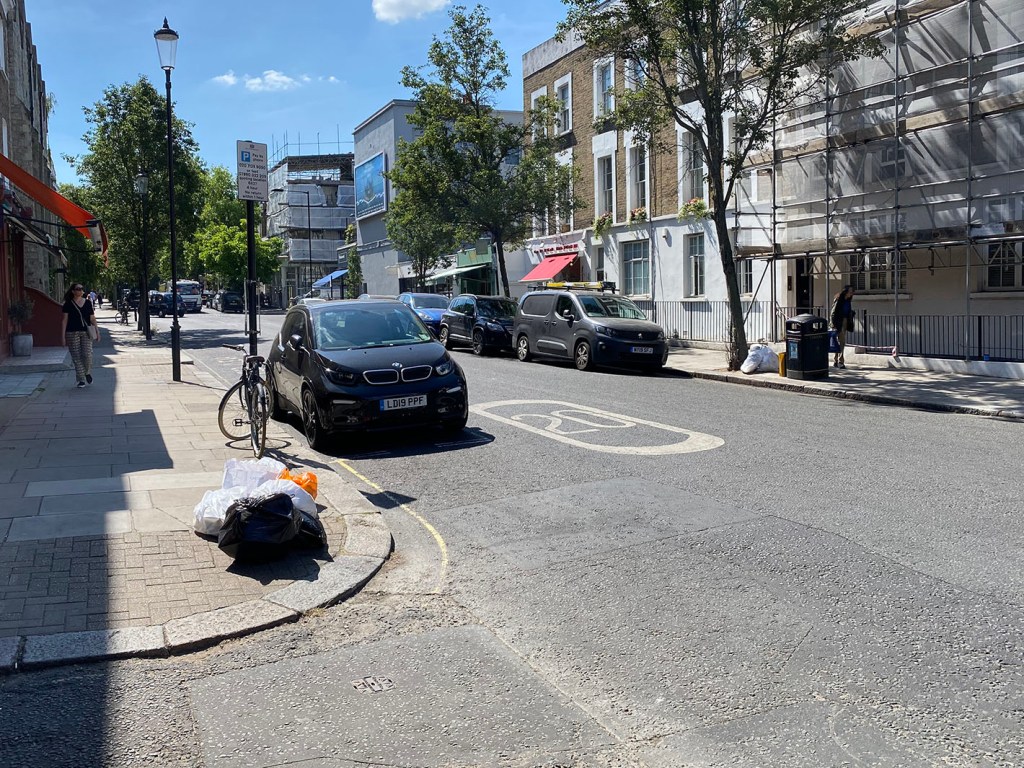
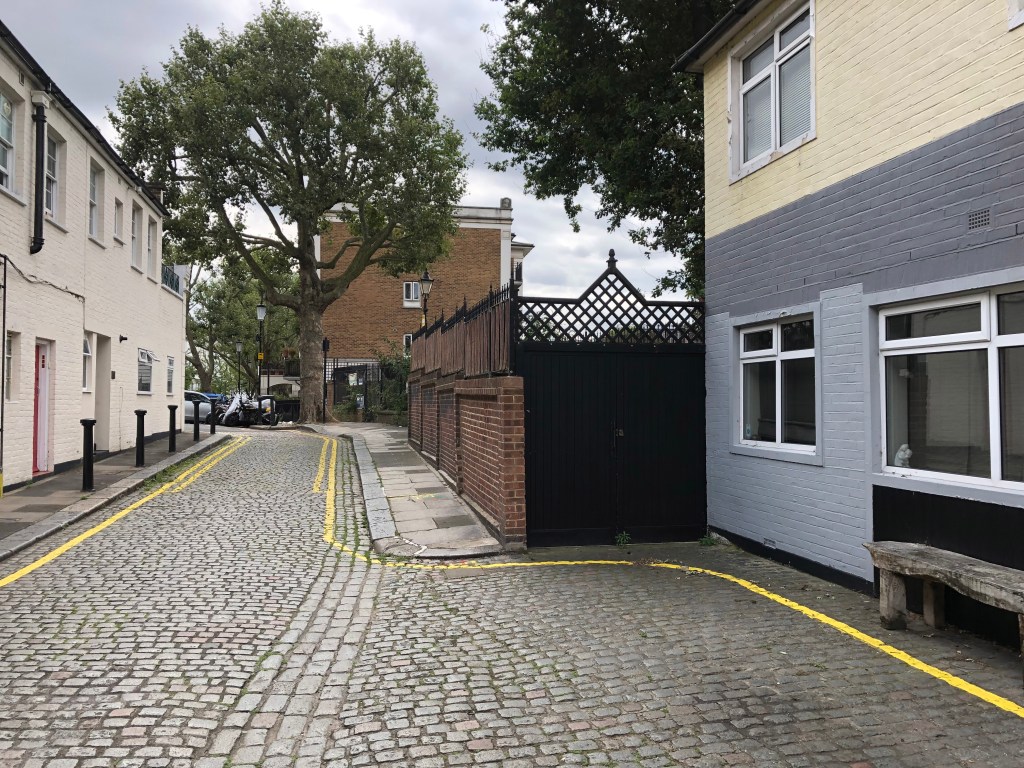
Once they’ve come to a gentleman’s agreement that Tyson will accompany them to see Kirby, the car drives off up Powis Terrace (3):
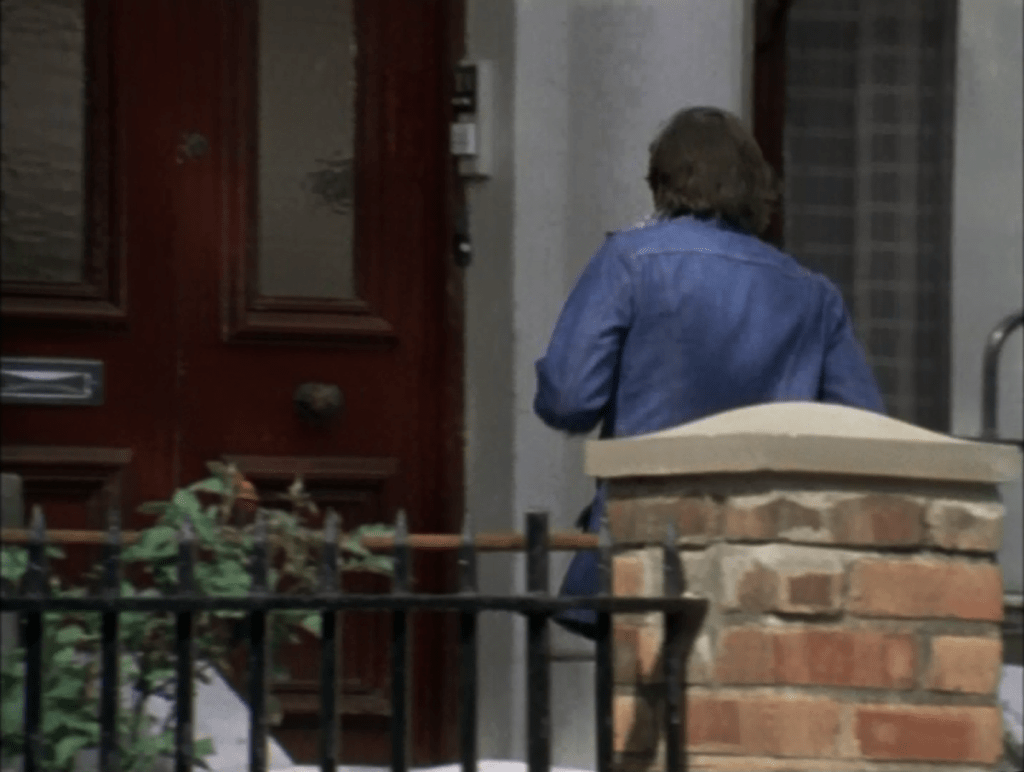
After this, I had just one more stop to make on what had already been a fairly epic first part to the day – another little walk further to the North to Aldridge Road Villas (4). Number 46 is where Jenner lives with his wife Liz; Regan and Carter have the place staked out, and see Tyson going to visit them, both to find out about Jenner’s treatment for the gunshot wound, and to report on what has happened between him and Kirby’s crew:
Again, we have some pretty closely-framed shots here, but you can definitely see that the door to number 46 is the same, just repainted black, Some of the original walls and railings are still intact, too – but the house on the corner that Tyson passes in the first pair of pics has obviously been largely demolished to make way for a far more modern ‘Grand Designs’ type affair.
With that, it was finally time to declare lunch; I walked the rest of the way up to Westbourne Park, and caught the tube via Paddington (and a quick stop there for a sandwich) back to Embankment for the final part of the day.
A hot, sunny August day when the city swelters can be a bit of a double-edged sword for such exploits as tracing The Squad’s old haunts. On the one hand, you get to enjoy the fine weather without fear of being cold and soggy; however, it also means that London Town is full to bursting with tourists, and (a factor you wouldn’t immediately consider) the trees are in full leaf, and doing a fine job of obscuring lots of things you’d like to photograph. However, not to be deterred, I set off bright and early on the train and arrived at Waterloo just around 8AM. I walked from there – via a coffee stop at Embankment – to the first port of call, Old Compton Street.
Episode Context – S1E05, “Jigsaw”
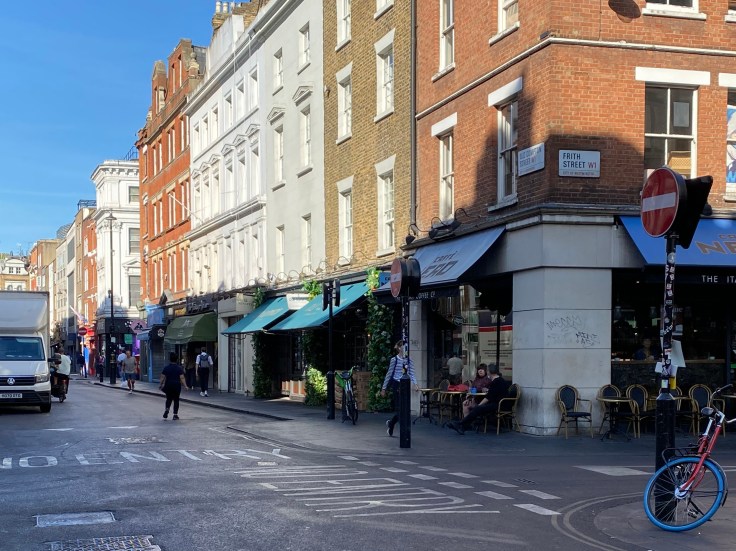
We’re back on the trail of Eddie Boyse – a recently released con whom Regan is convinced took part in a robbery. However, Boyse has a ‘cast iron’ alibi for the time of the job, so Regan has to hunt down any witnesses or information he can find that will tie Eddie to the scene at the time. Here, he goes into a cafe in search of other members of the gang.
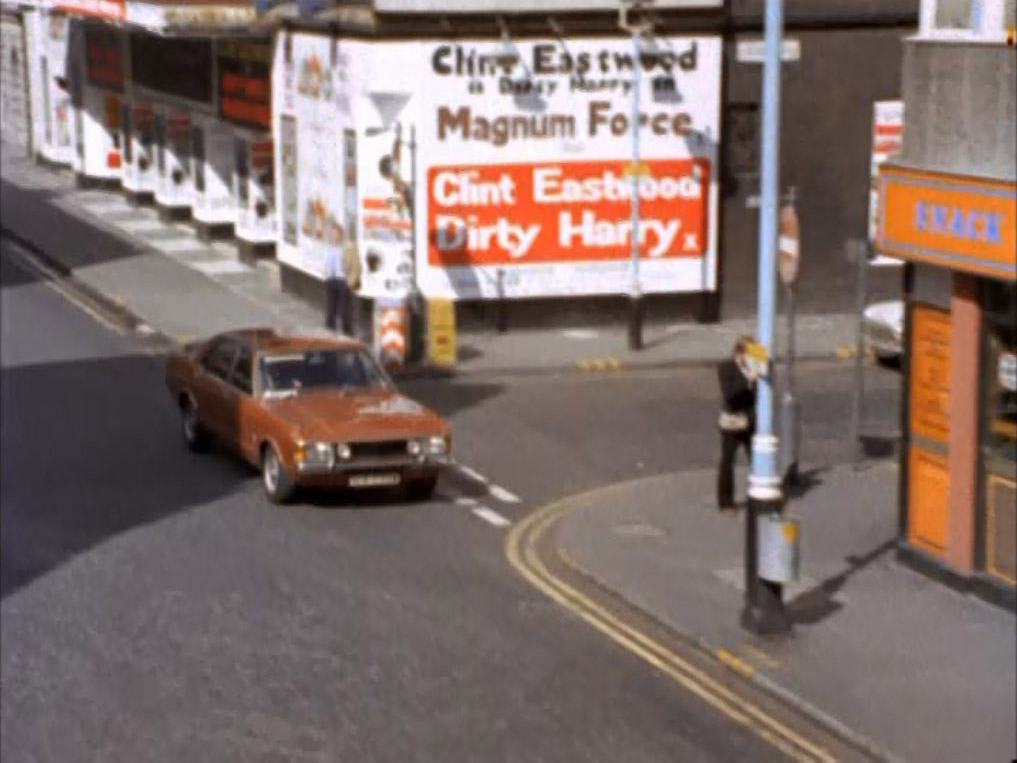
Unsurprised to see that whatever the establishment on the corner used to be, it’s now a chain coffee shop. I like the little cop-nod though of the theater being a cinema that was showing a Dirty Harry double-bill. You’ve got to ask yourself one question: where’s the money, you slag?!
Clearly, the shots were taken from a higher vantage point – crane or building – than I could achieve on-foot; nonetheless you can still see the same basic building structures in place, just – as with so much of London these days – looking a degree more clean and shiny.
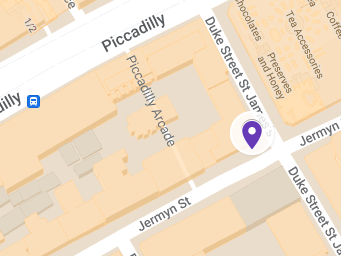
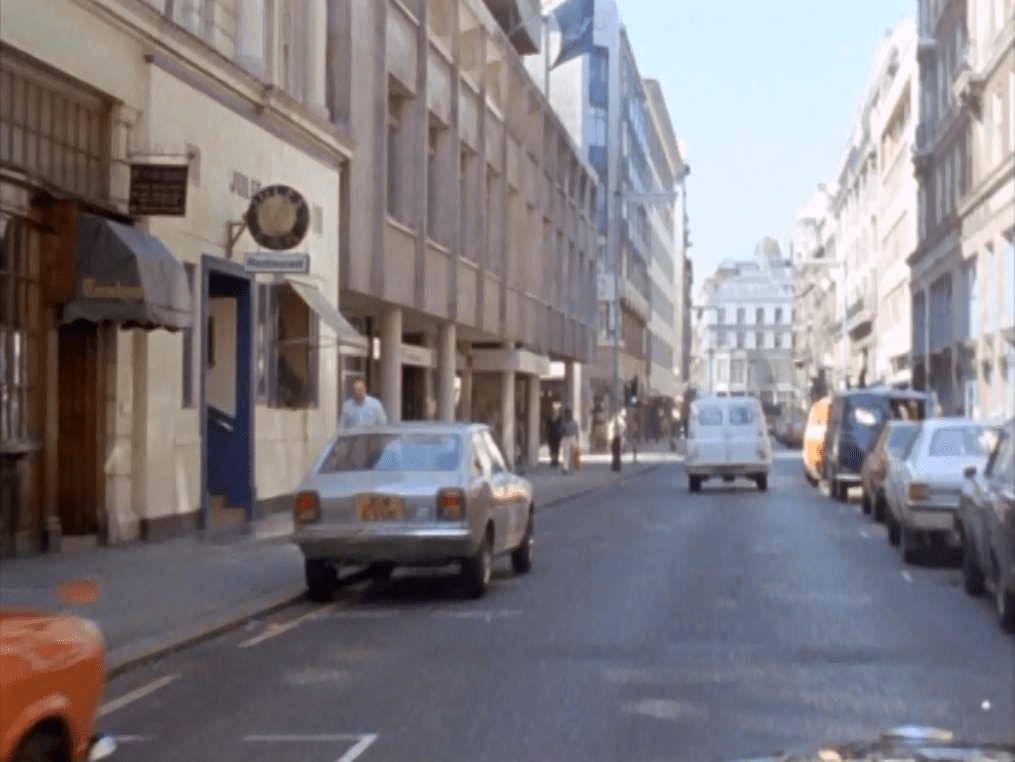
From Old Compton Street it was a little walk on to the next location on Jermyn Street.
Episode Context – S2E03, “Supersnout”
Another mob we’ve been on the trail of before; this time it’s jewel thief Yannos and his gang who are planning to rob a jewelers in St. James’. Quirke – standing in for Haskins who is away in Toronto at a conference – is desperate to capture his ‘great white whale’ Yannos and the fabled ‘Post Office Gang’. However, unbeknownst to Quirke, Regan’s informant Stickley – who is inside on the job – feeds false information to Quirke’s informant who replaces him after the dummy run for the actual job, and as a result the operation is a disaster. Seems Stickley had an old score to settle.
Here we can see the view down Jermyn Street in the direction of St. James’, taken from outside ‘the jewelers’, and then the jewelers itself – now the Alfred Dunhill shop.
After Jermyn Street, the plan was to head to Green Park and from there make a short tube hop to Knighstbridge; however, I was somewhat waylaid by the inconvenience of public conveniences – namely them all being shut. First Green Park station, then Hyde Park Corner – eventually I’d walked pretty much all the way to Knightsbridge anyway still searching in vain. I was pondering going into Harrods – but they didn’t open till 10; in the end a ubiquitous Starbuck’s came to the rescue, after which I wandered another 10 minutes or so for the next location stop of the day.
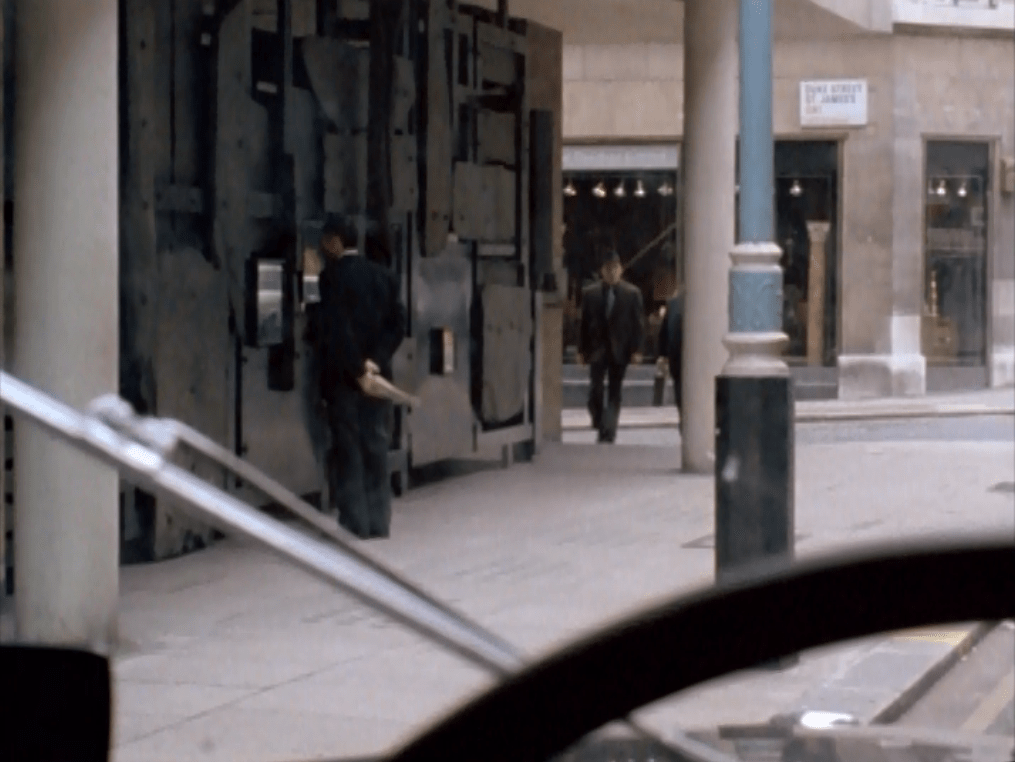
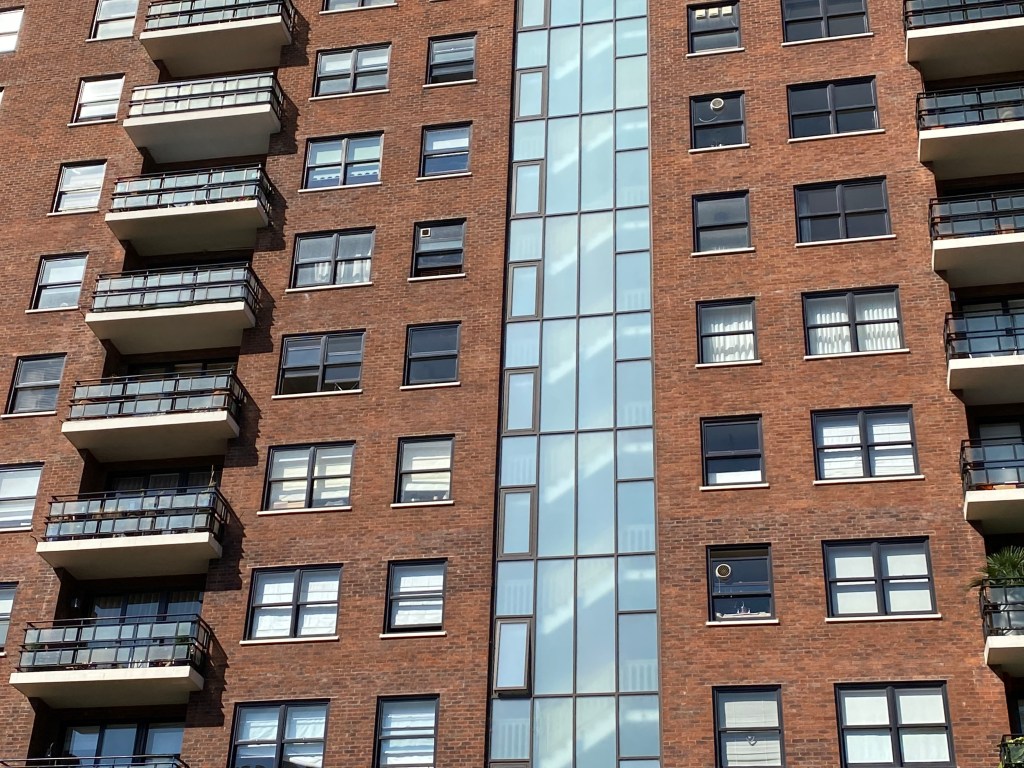
Episode Context – S2E08, “Poppy”
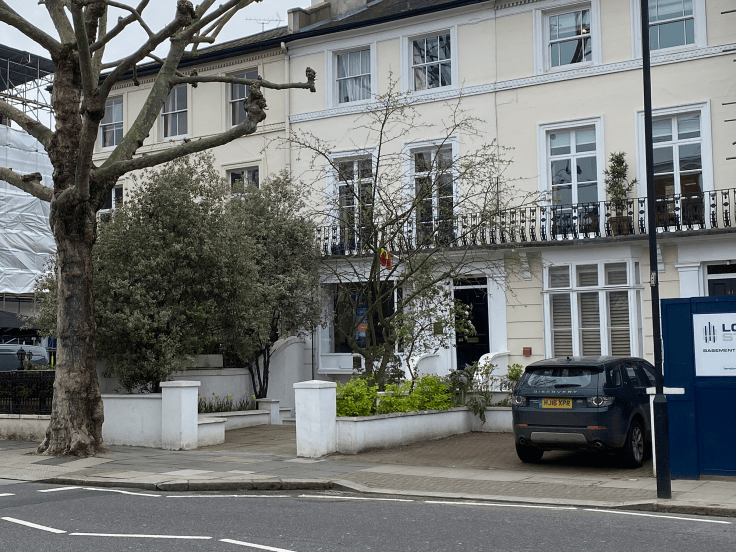
Vic Labbett is back in town, having been holed up in Portugal till the heat from a violent robbery died down a little. Now he wants to recover the stolen loot and trade it for uncut diamonds – in a deal brokered between him and the bank from where the money was stolen by a ‘less than clean’ insurance agent. The bank get their money back on the hush hush, Vic gets the diamonds, everyone’s a winner. However, Regan is tipped off about his return by an informant – and word gets round to Vic’s wife Sally who had no idea he was back in the country. Sally goes round to Vic’s mate Ron’s (1) to see if he knows anything of Vic’s whereabouts. During the investigation, The Squad have the bank manager under surveillance and see the insurance agent, Vane, in talks with him; this leads them to put Vane under surveillance at his flat (2).
The location of Ron’s flat is given as Ennismore Gardens Mews; however, its position looking directly out over the square makes this seem questionable. The mews runs round the back of the main part of Ennismore Gardens, and none of the mews houses is remotely tall enough to see over the 4- and 5-storey houses surrounding the square. Therefore, it’s difficult to pinpoint exactly where they were filming those shots from – especially as it seems there was some kind of school playground in the square back in the 70s; the ‘now’ shot below gives the general sense of the buildings, though.
I struggled with this one – endless Google Street View and then walking round the square in person didn’t really give me a solid hit, hence settling for something a bit general. I don’t usually like to do that, but sometimes it’s the only option.
On a more positive note, the next set of shots from Vane’s apartment building are much more authentic looking:
After the jaunt round Ennismore Gardens, I had a bit of a longer trek to get to the next location; so it was on to a bus and heading West along Kensington High Street, alighting a little before Olympia to walk North to the next point of interest.
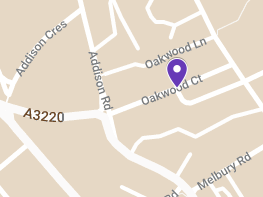
Episode Context – S2E11, “I Want The Man”
“Popeye”, one of Regan’s informants, has gone missing after phoning Regan with information that small-time crook Frankie Little was going to be involved in a diamond theft. Regan pulls Little – but tells him he’ll consider letting the charges drop in exchange for Little leading him to Maynard, the bigger fish. Whilst turning over the flat of Little’s daughter, Sandy, they find a fag packet with a phone number on it that leads them to a block of flats, which they stake out – hoping to discover who answers when the phone in question rings on one of the landings.
This particular location, on Oakwood Court in the Holland Park neck of the woods, is one of those examples of retreading ground already trod – I walked right down this road past the building in question on my Holland Park to Shepherd’s Bush jaunt, 3 years previously. However, as stated in the ‘methodology’ section of my intro to all this – it’s bound to happen. This was just one where I’d been nearby and not realised it was an episode location; later on in the day, I visited some where the exact same spot was used in 2 completely different episodes, just seen from different angles. More on that coming up in part 2.
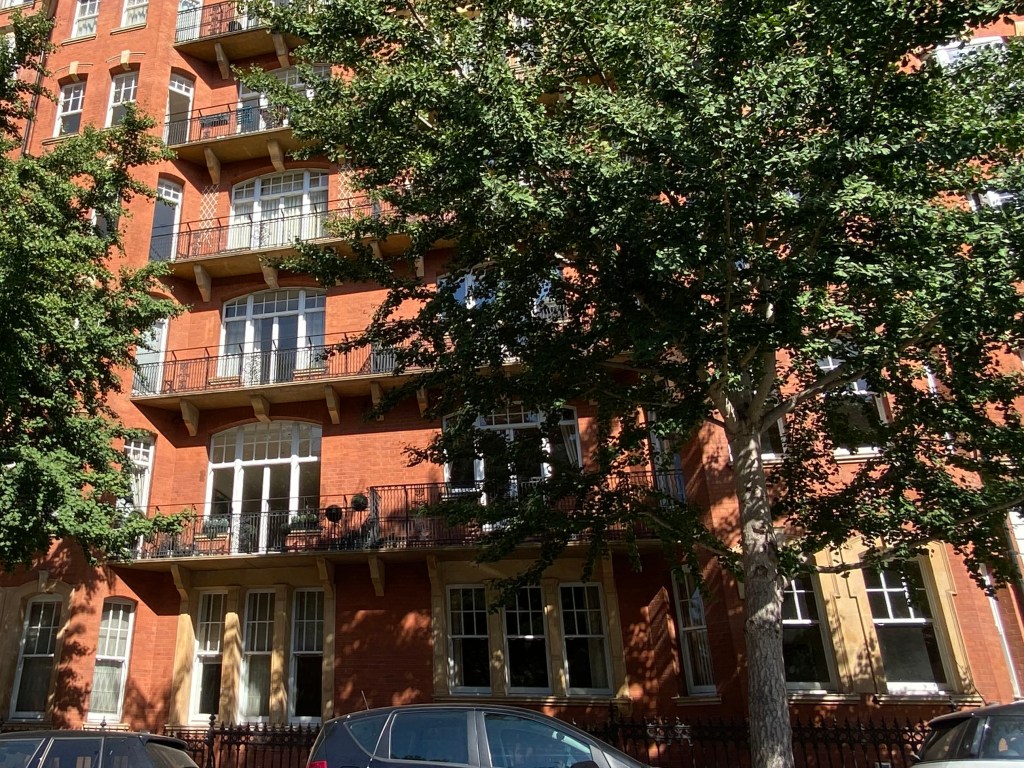
We left ‘Part 1’ at Gloucester Road tube station, having picked up the ‘Supersnout’ (S2E03) location where George picks up Regan’s informant, Stickley. From there I had a bit of a longer – fairly pleasant – walk down through Kensington and Chelsea, over the King’s Road and across Old Father Thames via Battersea Bridge. Heading back down river – along paths I ran many times during work lunchtime runs – the next bridge along is the rather grand Albert Bridge, my next ‘location hit’ of the day.
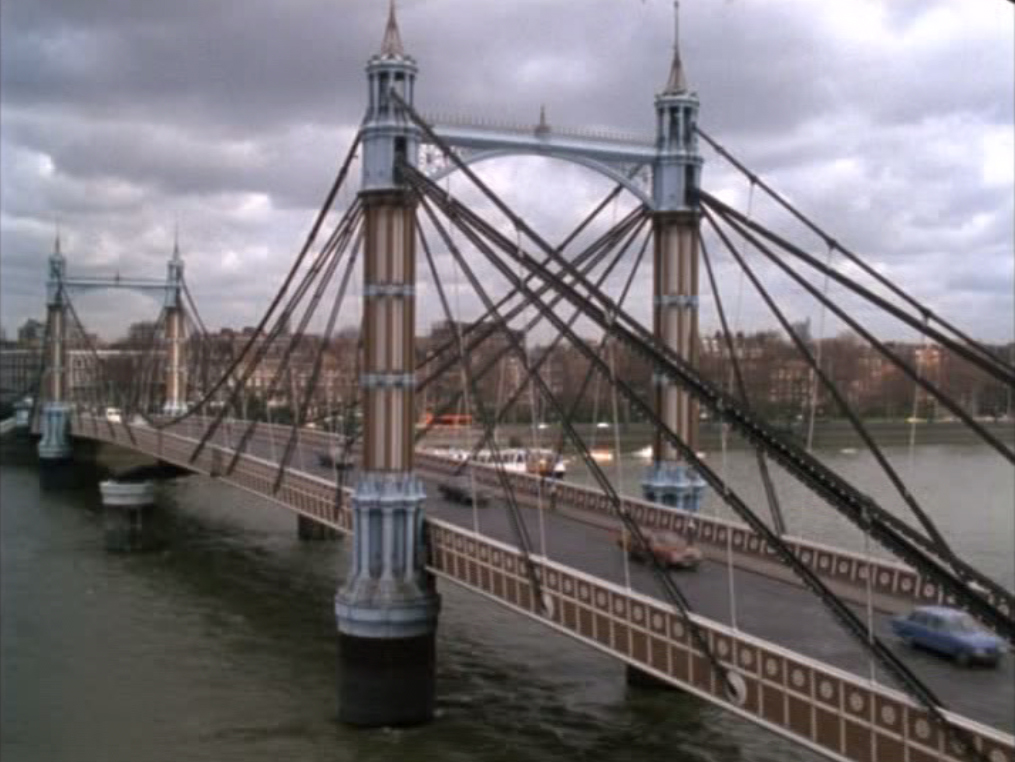
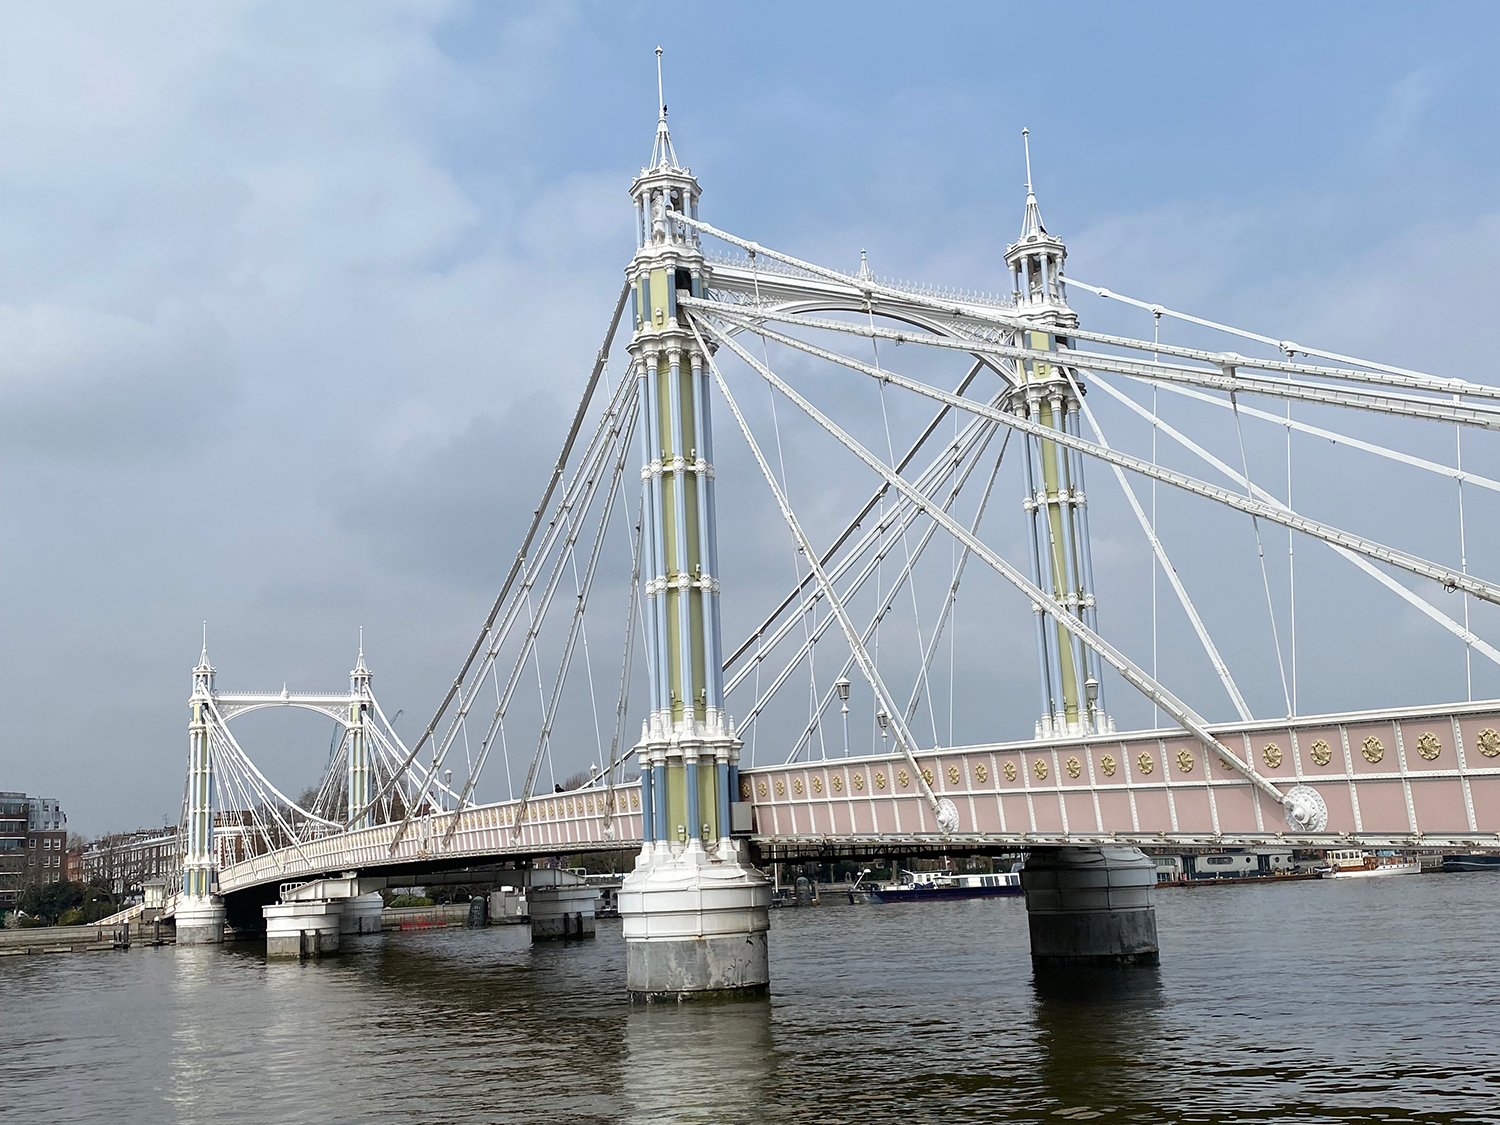
Episode Context – S2E02, “Faces”
Again, no map really necessary here; we’re on the south side of the Thames, looking up at Albert Bridge. The Squad is en route to a ‘dummy run’ robbery being carried out by the gang of robbers led by Tober, whose loot is channeled into funding political / revolutionary objectives. (Quite what those are is only ever really alluded to at best; but likewise, is not really that important in the scheme of the story.) The dummy run – ostensibly to make sure the real job goes to plan – is really aimed at finding out which members of the gang can be trusted, and which might be moles.
The shot of the squad car crossing the bridge seen on the left here was obviously taken from a vantage point up in one of the buildings along the river; I did the best I could from ground level.
Interestingly, a building right in that location – I think it must be the one right on Albert Bridge road – was used as the ‘Data Task’ offices in Season 3 episode, ‘Tomorrow Man’. I took a photo of the building that’s there now, just-in-case (it’s a completely new building) – but haven’t got as far as that episode yet in my planning, so I’m not ready to officially bag it just yet.
At this point in the trek, I had intended to head south-west into the heart of Battersea for a cluster of locations there; however, prevailing circumstances of the day (I was bursting for a Jimmy Riddle) dictated that I head instead into Battersea Park and pick up a few locations around there first. Having changed tack, I decided that I’d reverse the order of some of the other locations and head out to points slightly to the east, before heading back in the other direction.
So, firstly let’s head into the park itself.
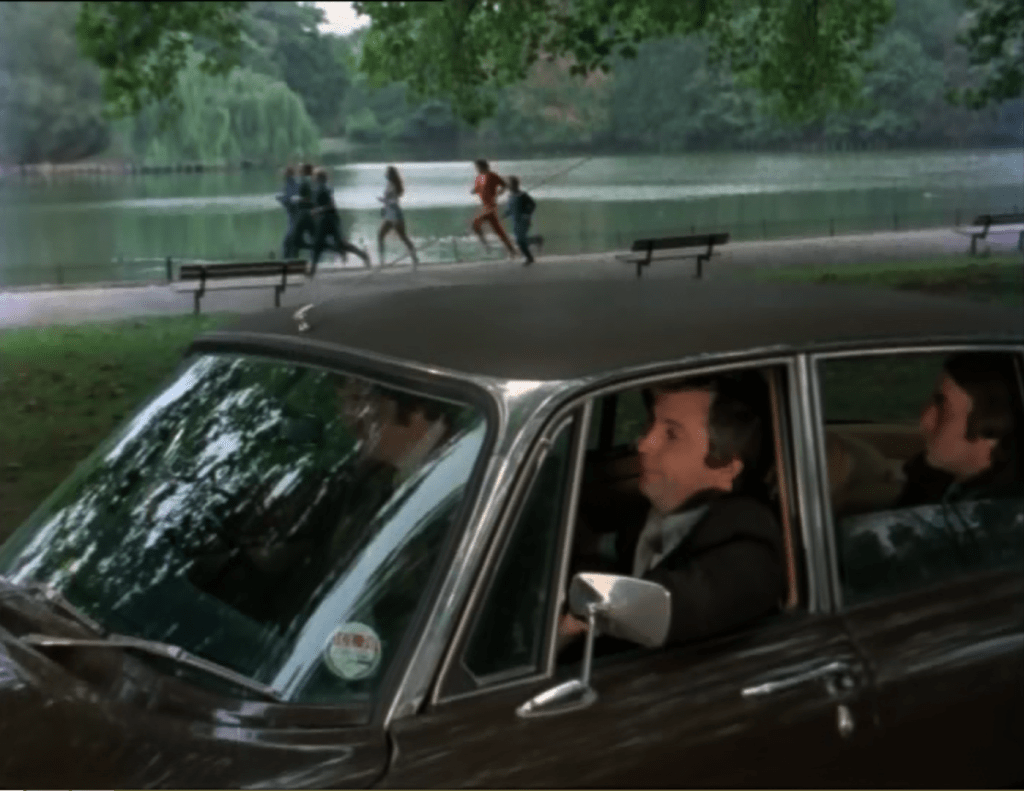
Episode Context – S3E03, “Visiting Firemen”
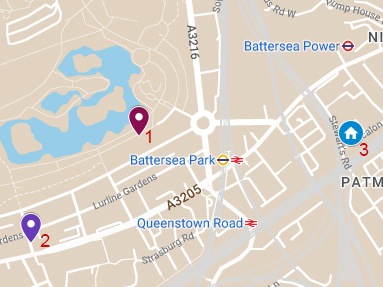
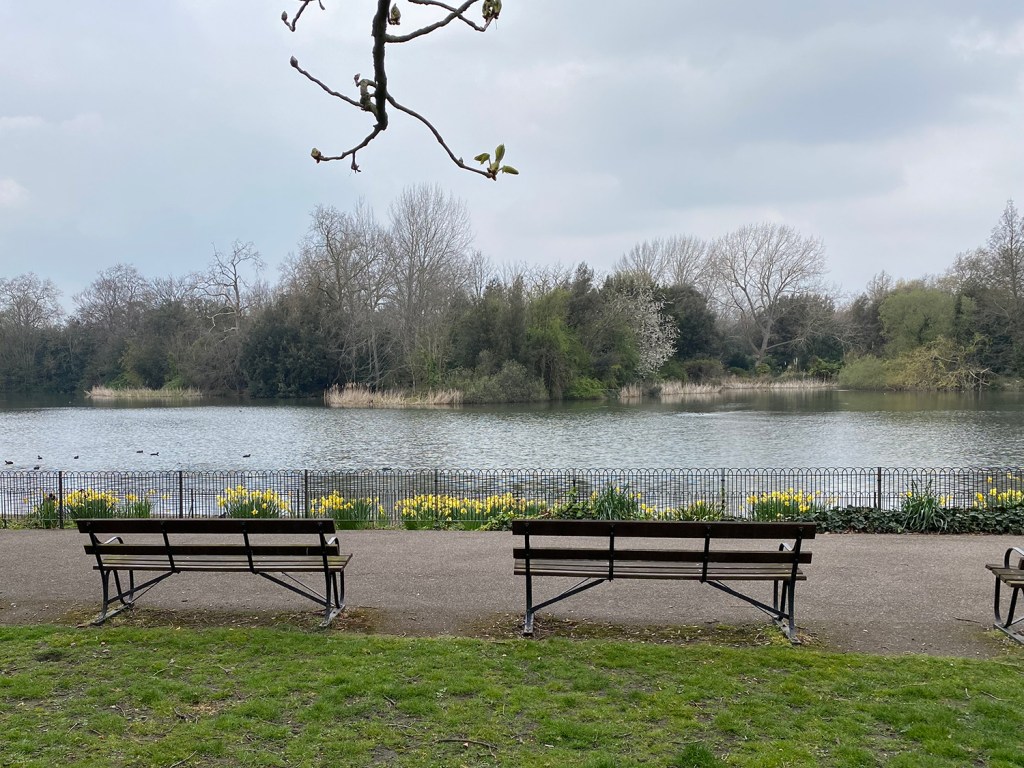
We open this episode with prominent businessman Carew, and his entourage, taking a jog along the lake in Battersea Park (1), where he is intercepted by the robbery squad who suspect him of a job that took place in a diamond merchants in Rotherhithe Square. A chase ensues before a formal charge is made – at which point Carew delivers the return that at the time of the job he was having dinner with Jack Regan.
For all of this group of shots in the park I didn’t have the source images to hand (had clumsily forgotten to transfer them onto my iPad that I take with me on these trips to be able to refer to in order to try and get the best recreations I can); therefore I’ve ‘done the best I could’ from memory. They’re not as exacting as usually I like, but the locations, background architecture etc. are clearly identifiable so they do the job for now. I may or may not ‘correct’ them when I’m next in the park.
We pick up Carew and co jogging along the lake, with the towers of Battersea Power Station visible in the background (and just visible through the trees in the modern day shot – the lake is to the left in this shot too, though heavily hidden by undergrowth):
I think I was a little too far up the path (i.e. I was just about where or behind where the joggers are in the episode shot).
Next we see the robbery squad in their car, observing the group as they jog along by the lake:
The robbery squad races to intercept Carew
Incidentally, you see the tower block in the background of these shots – the one that’s just above the bonnet of the car in the episode shot, and just to the left of centre in the ‘now’ shot? Well let’s head out of the park and nip over there now.
Episode Context – S2E06, “Trap”
Jack is backed into a corner; a reporter called Thomas is out to discredit him by providing evidence that cracking the ‘Golden Maid’ dairy robbery job – a result that led to Regan getting a promotion a few years ago – was only accomplished by Regan having acted outside of the law. Thomas has hidden the informant Regan used for the job. Noah, away somewhere until he can get his article published, and Regan finds himself in a race against time to uncover Noah’s whereabouts. He goes to another of his informants, Hooter, for information. He finds him at work in the basement of a pub, just south of Battersea Park (2).
The pub is long gone, and – even if the ‘cellar’ still exists – there was no way I could get into it to take the comparison shot from below street level 🙂 However, the tower itself still exists, more or less intact from the 70s:
From here I had another longer walk, eastwards in the direction of Nine Elms and the Patmore Estate to pick up one more location before heading back west towards Battersea ‘town’.
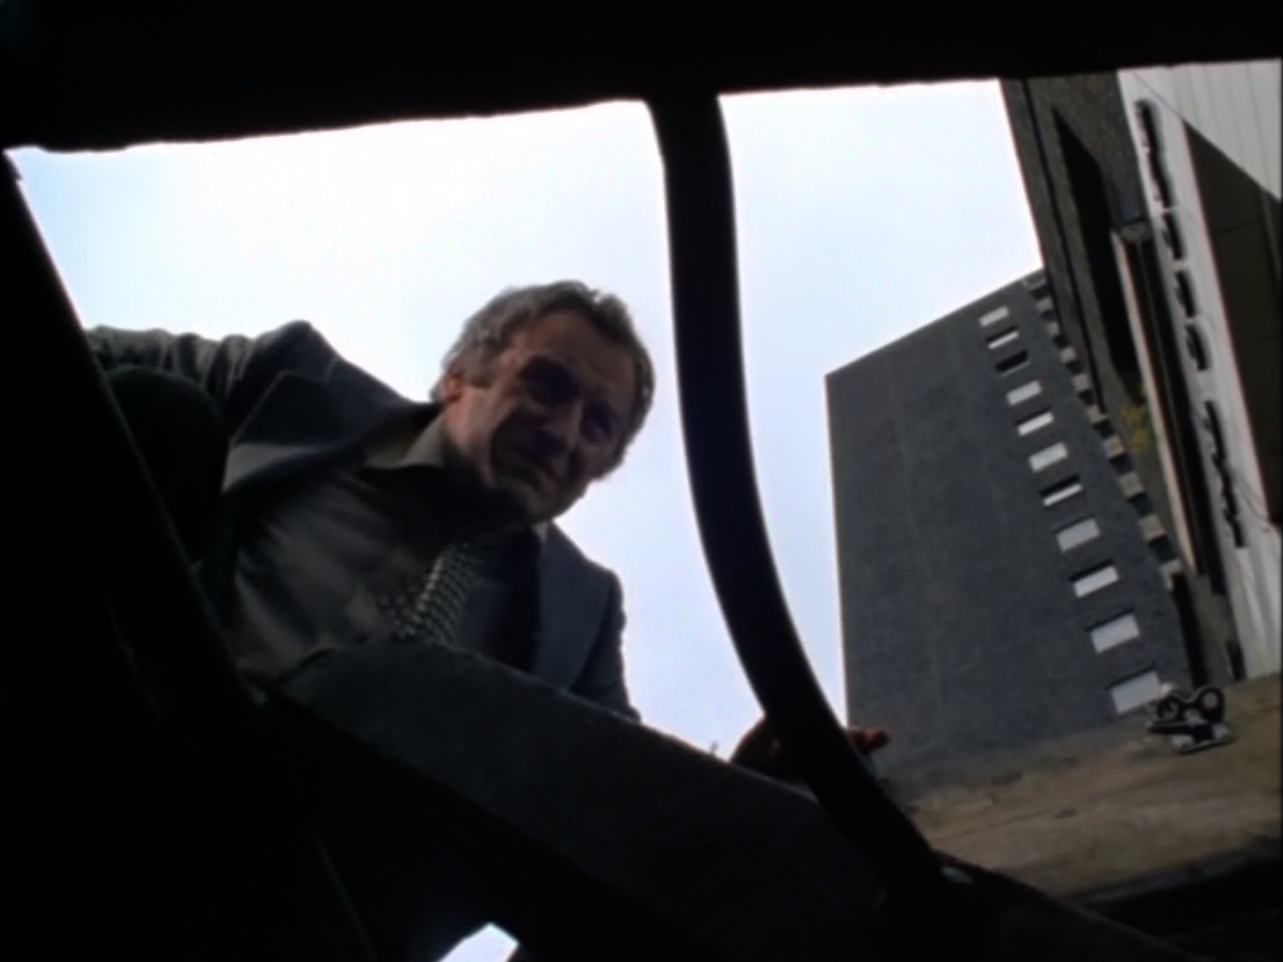
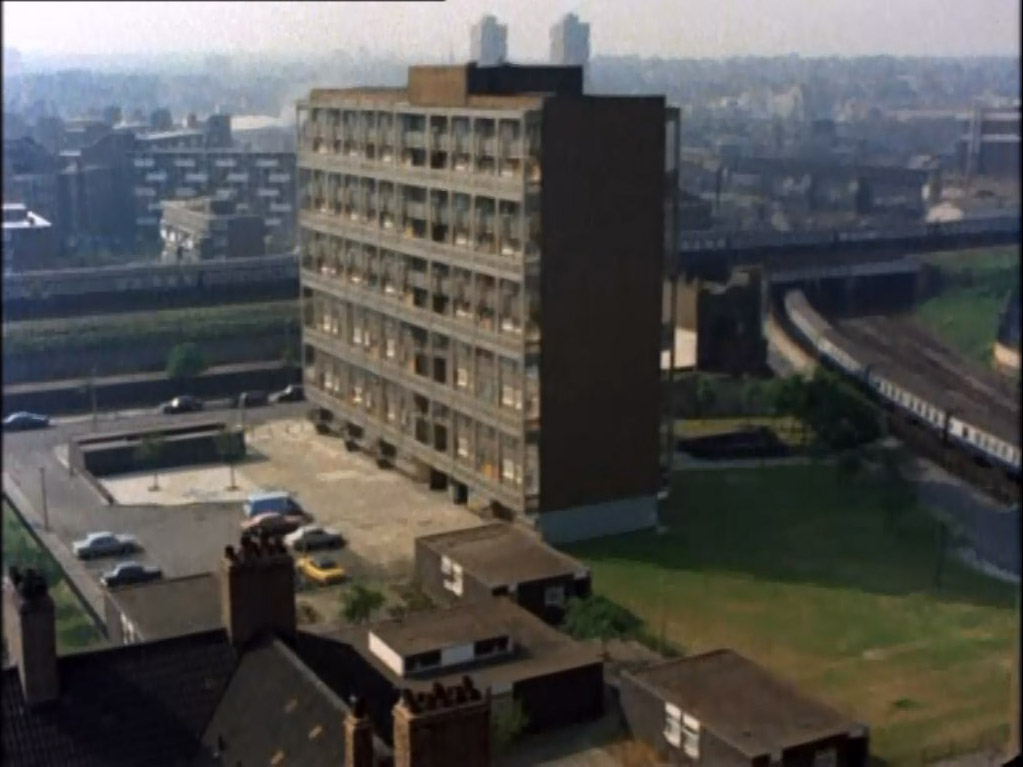
Episode Context – S1E05, “Jigsaw”
We’re back on the trail of Eddie Boyse, a recently-released con whom Regan suspects of being involved in a job where a night watchman was seriously injured. During the course of the investigation, the squad make several visits to Eddie’s flat (3) to look for evidence and obtain information.
Eddie’s flat is in Ascalon Street – though we’re only given a ‘visual hint’ as to its exact whereabouts within a block. Initially we see an aerial establishing shot, including a tower block that no longer exists. Naturally I couldn’t get anything approaching this view; however, a street-level view here shows the elevated railway line crossing another line beneath it, that can seen on the very right-hand side of the episode shot:
In a more close-up street-level view we see Jack and George looking up at Eddie’s flat:
I’ll admit to a slight hesitation, here; the configuration of the chimneys, and positioning of drainpipes is not exactly the same between these then-and-now shots. However, given the layout of the building (i.e. the way you are looking ‘into’ the right-angle between two parts of the block) this was – having walked round the entire estate – the only place that matched up. My conclusion is that either the original block no longer exists (there are some newer developments on the same estate) or that this is the correctl location but it has undergone some remodeling in the intervening 40-50 years. Either way, this is one where I’m vaguely content to say ‘correct location, matching architectural style, if not the exact same place’.
With that little visit to Eddie’s manor taken care of, it was time for another longer walk back past Battersea Park, and down to what would turn out to be the final cluster of locations for the day. (I was headed in the general direction of Wandsworth, and the ‘Le Gothique’ beer festival that evening; had there been time I had earmarked a few locations over there to pick up – as it turned out I found myself hungry and having forgotten to drink anything for hours, so I ended up grabbing some pre-festival food instead. But no matter, back to the quest.)
The final set of hits for the day took me to Battersea ‘town’ (as I’m calling it; don’t know the exact distinction, but it’s called Battersea on a map and it’s where Battersea High Street is – despite being a good few miles away from the power station and the dogs’ and cats’ home). It also took me within a stones throw, again, of the riverside path I’ve run along during countless lunchtimes; as with the Railway Tap / Porchester pub in Part 1 (and a good few other locations) it was only when I came to research the episode in question that I realised that I’d have been close enough to just nip over and take a few pics mid-run.
Episode Context – S2E06, “Trap”
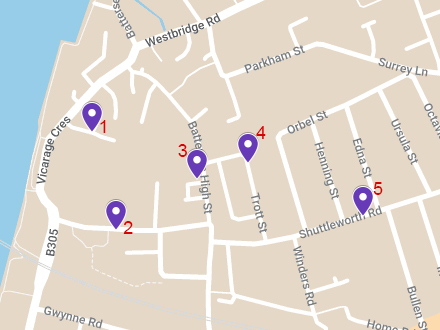
We’re finishing up back on the episode where Regan is attempting to uncover the whereabouts of the former snout, Noah, who is being held in secret by a reporter and pressurised into giving testimony that incriminates Jack. To further complicate matters, the gang who was put away by Noah’s evidence is also now after him in order to make him ‘sing a different song’. Noah’s mother, whom he idolises, is wrapped up in all of this as the reporter has promised to give him money to help her out if he implicates Regan – whilst the gang realise that if they follow Regan long enough, he may lead them to Noah. Thus, both outfits converge on her flat (1).
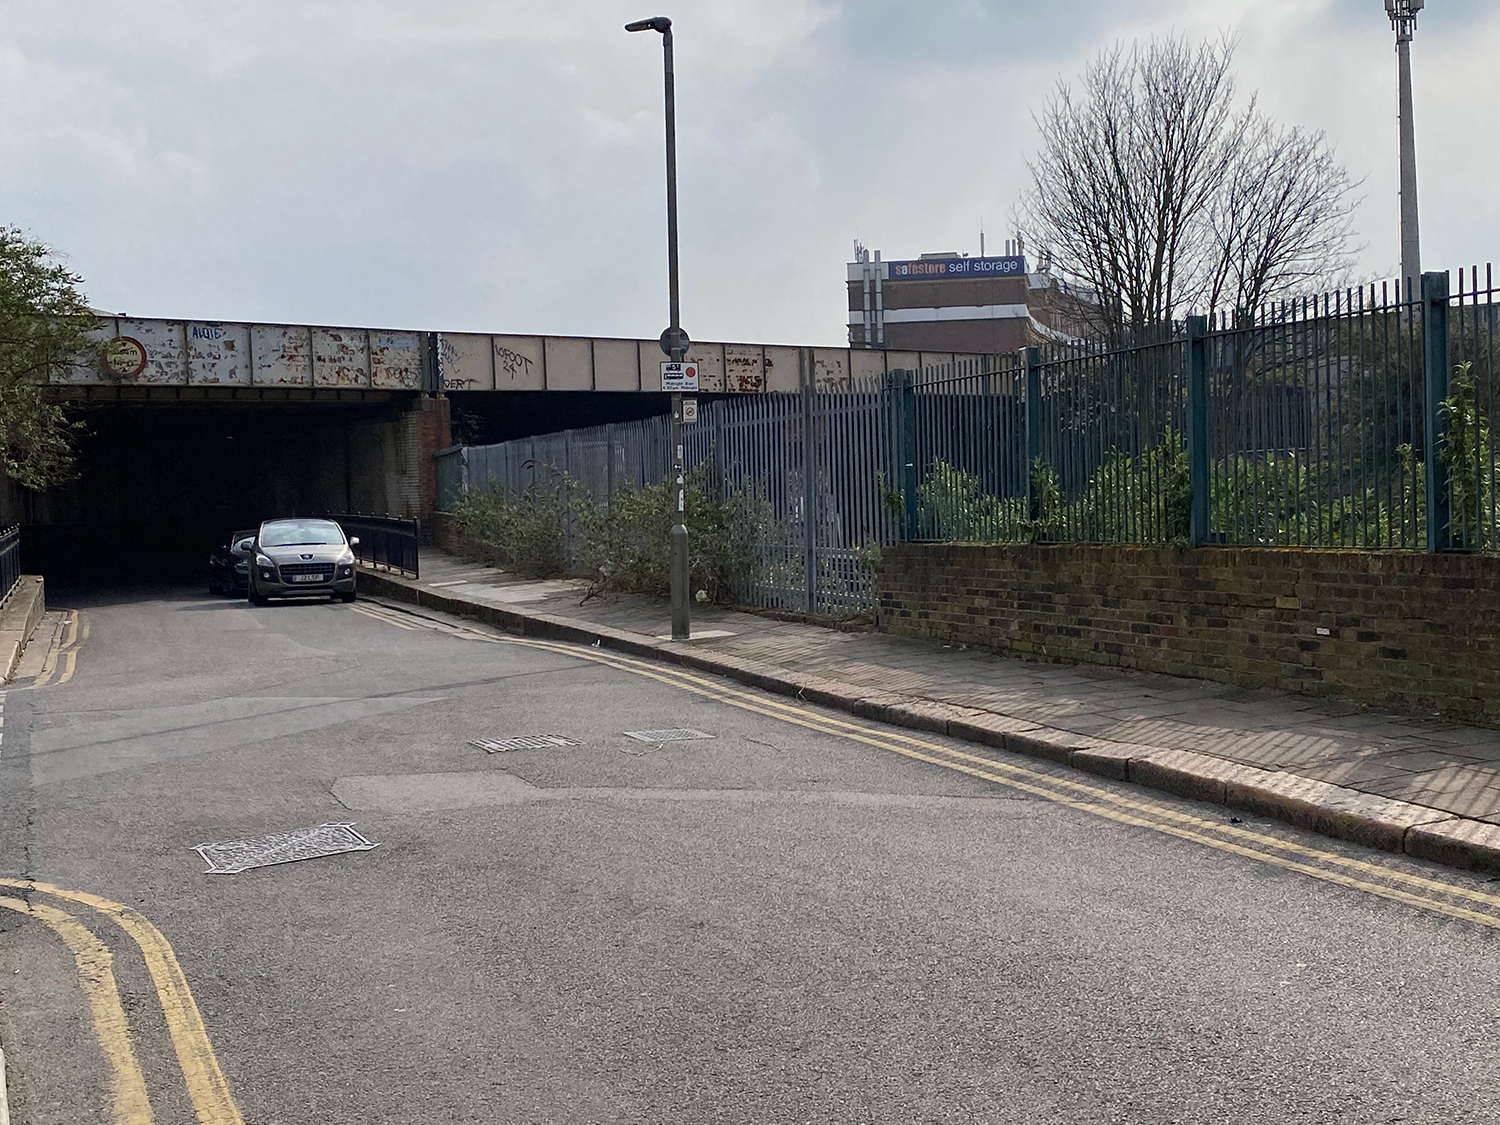
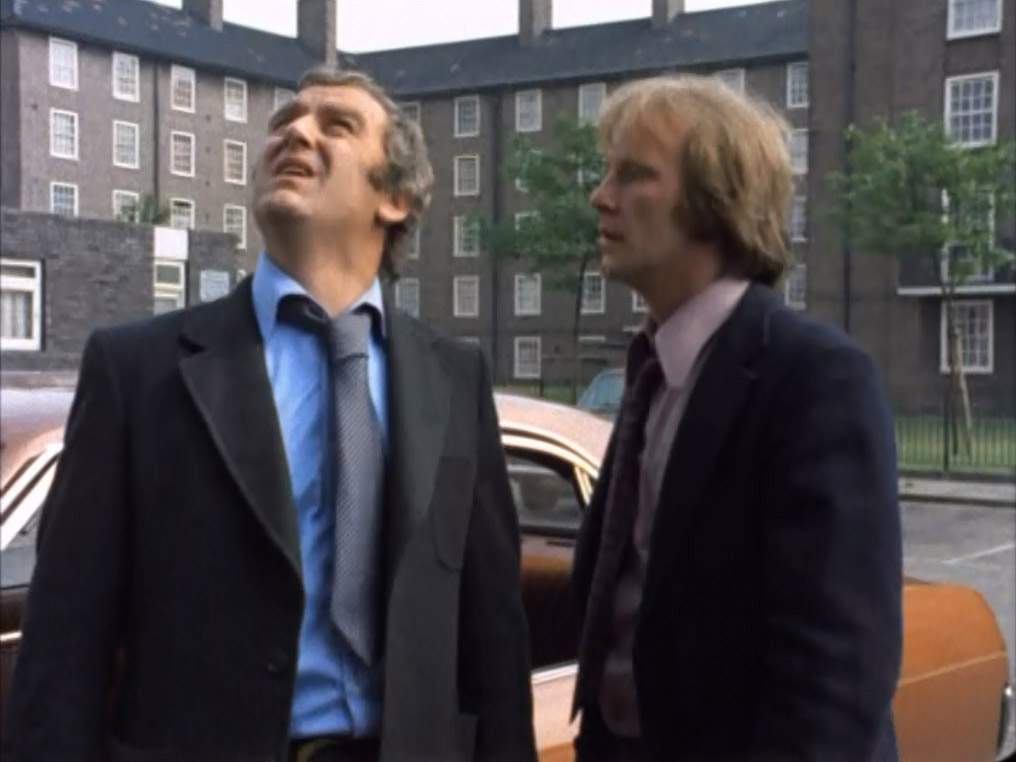
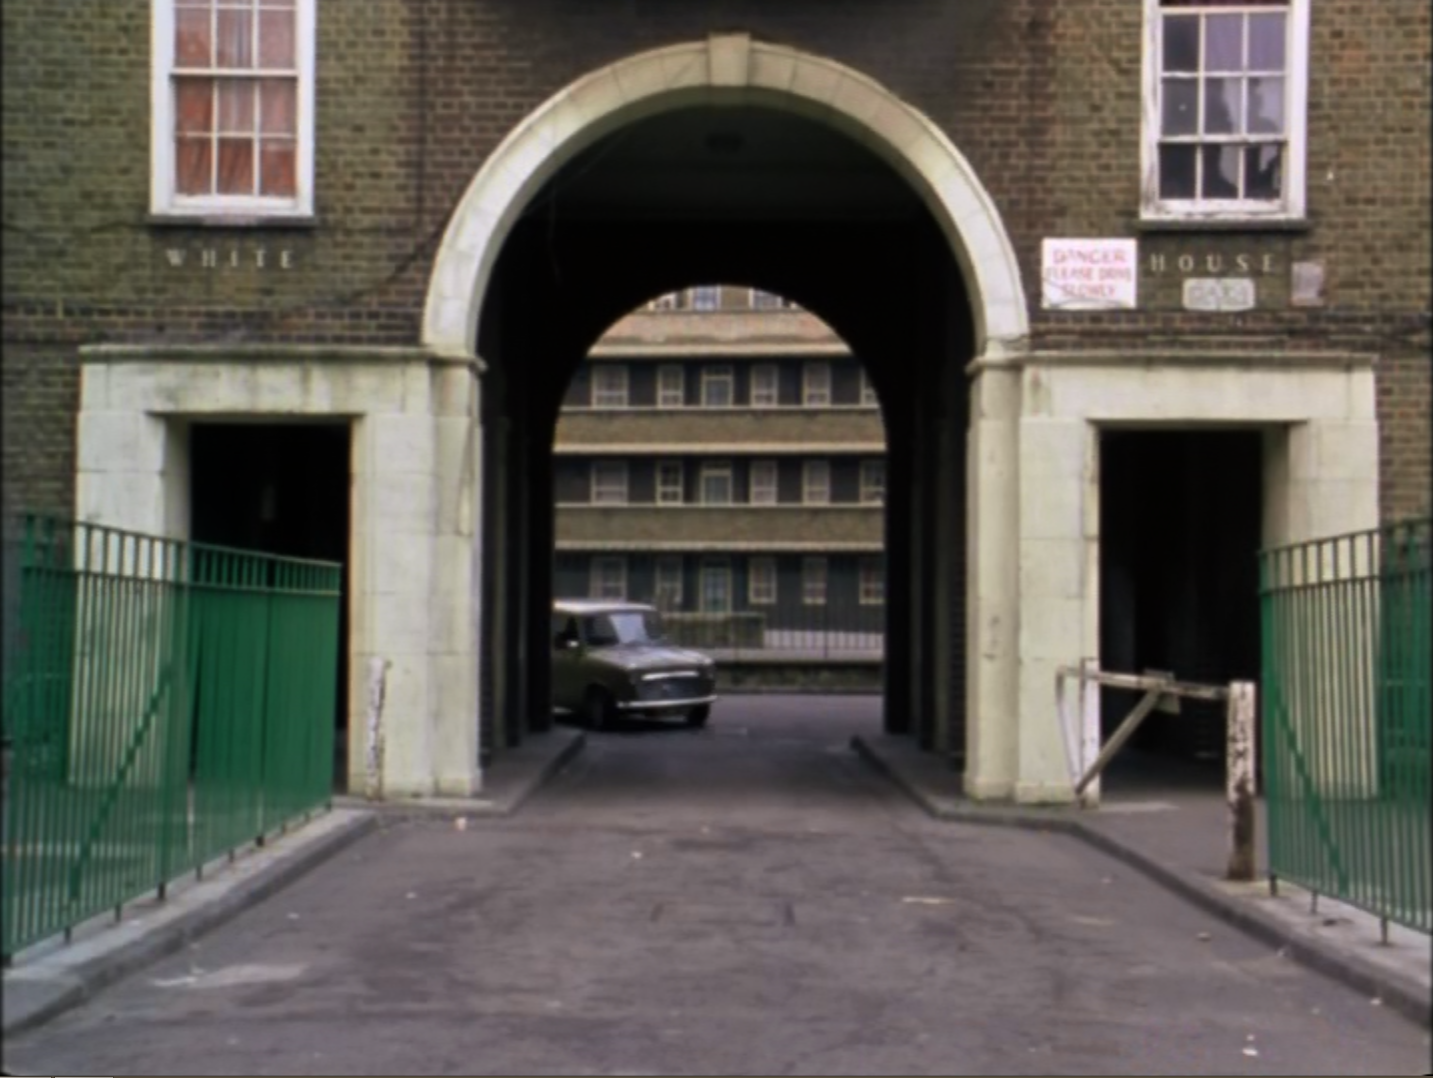
Here we see exterior view of the flats off Vicarage Crescent where Noah’s mother lives:
Realising they’ve been tailed, Regan and Carter (in ‘civvy’ wheels – because all of this is taking place away from the eyes of Haskins and the Fifth-Floor, and is strictly not official squad business) play a game of car cat-and mouse with the gang around the estate, before evading them via one of the estate exits (2)
and speeding away:
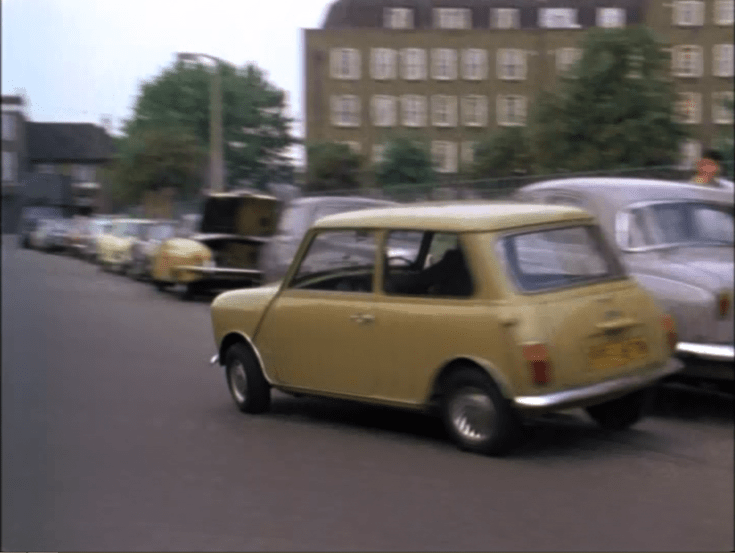
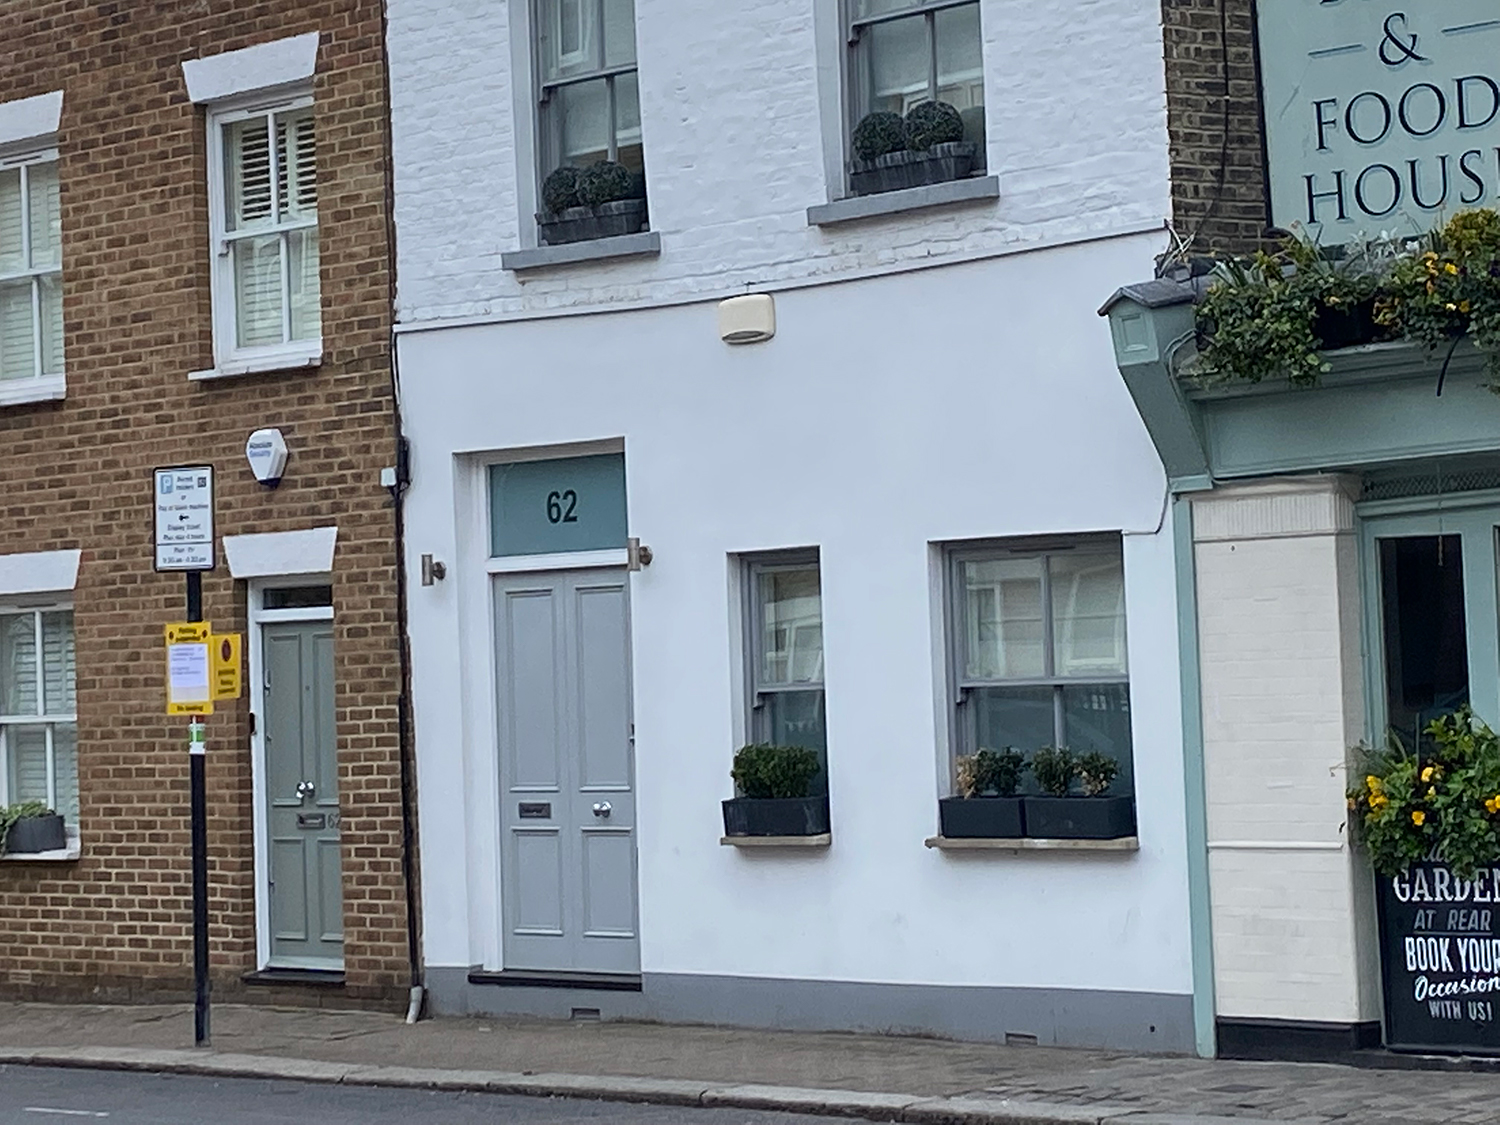
From here I had a short walk round to Battersea High Street, and the location of Manny Bellow’s minicab offices. Manny claims to be a legitimate businessman whose hands are clean; in reality he was involved with the dairy robbery gang, and has been ‘looking after’ their money whilst they were inside. As with Noah’s Mum, both the squad and the robbers decide to pay him a visit.
Here we see the external view of ‘Three Way Minicabs’ (3) on Battersea High Street:
The pub is now ‘The Woodman’ (‘gentrified’); the shop that served as the cab office is now a residential building (number 62), and another has been built next door, in what was previously the yard adjacent to the shop.
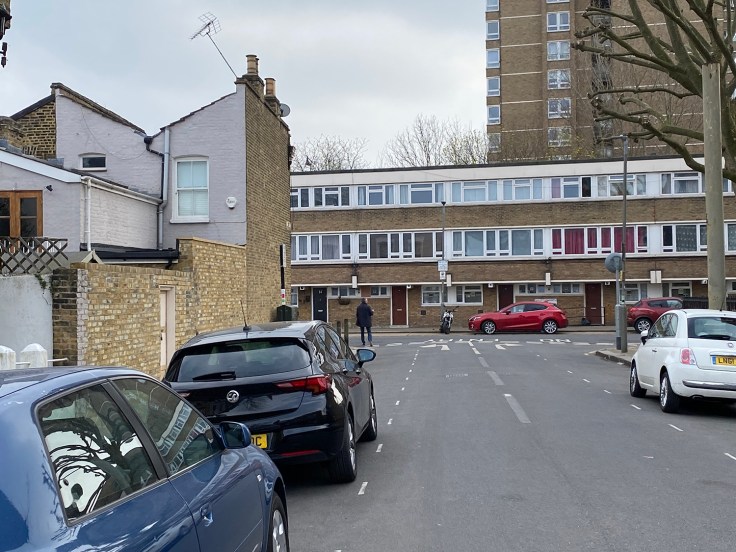
A quick nip round the corner from here took me into Trott St (4), where earlier in the episode Regan talks to Carter on the phone about what’s going on – whilst being watched from a car by two of the gang. This road is now all built-up residential, and more or less unrecognisable from the demolition and clearing going on in the 70s; the phone box Regan is in would be somewhere roughly just ‘this side’ of the pink gate on the left:
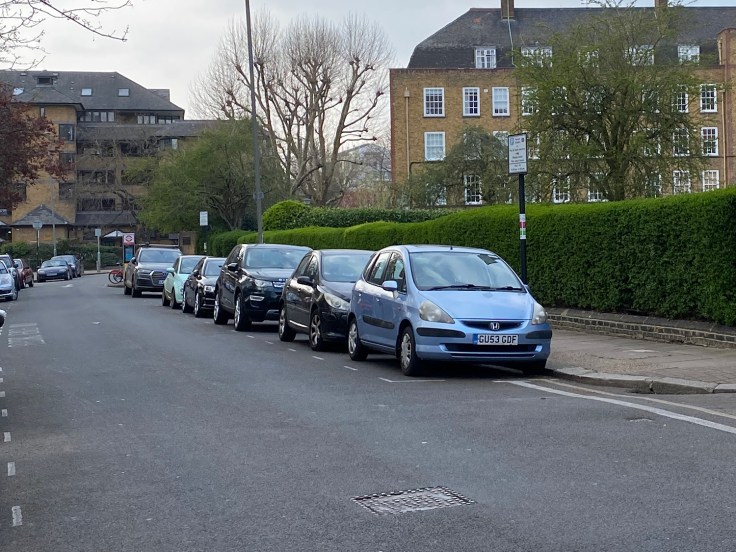
And, so with the sun dipping, and thoughts of food and a beer festival growing, I headed from here to what was to be the final location for the day on Shuttleworth Road (5); here we see a shot of Regan and Carter as they are en-route to Manny’s offices:
A little tricky to get the exact angle I wanted – cars kept coming down the road at me! Still, the building you can see on the right is more or less the same as it was back then – likewise the houses on the left, a lick of paint here or there notwithstanding.
With that, a first epic Sweeney day in several years drew to a close! It remained only to walk (several miles more) to Wandsworth (where, incidentally, I took some shots of the underpasses used in ‘A Clockwork Orange’), grab some food and then head off for the evening’s beer-related shenanigans.
Well, what would Jack and George have made of the last couple of years? Can’t imagine what getting through a pandemic would have been like in the 70s; one thing’s for sure though – it certainly put the brakes on trekking round London in search of The Squad’s old stamping grounds.
The first outing in nearly 3 years was a bit of an epic involving over 15 miles walking, roughly North-to-South but with a lot of back and forth in between, beginning at more or less (‘well the pubs are open’) lunchtime in Maida Vale, having got the train up to Waterloo and then the Bakerloo to Warwick Avenue, followed by a short walk to the first location – appropriately enough, a boozer.
Episode Context – S1E06 , “Night Out”
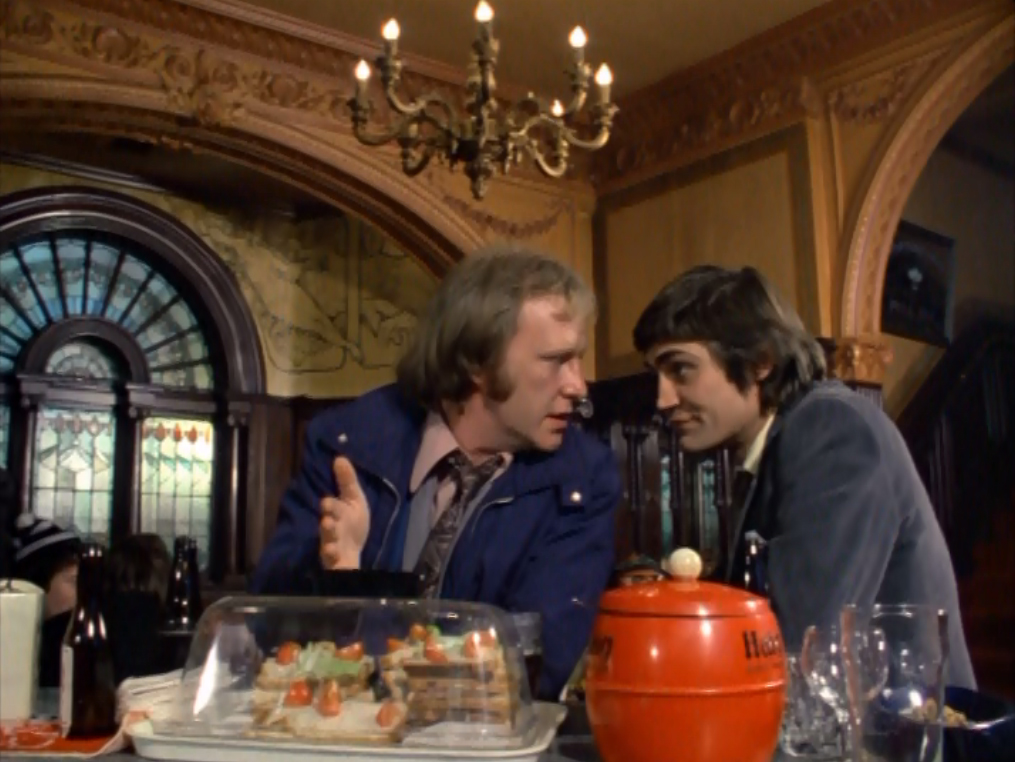
A bank job is in progress on a Saturday, in a branch next door to a boozer; turns out that one of Regan’s old girlfriends lives in one of the rooms upstairs, so Jack is dispatched to pay her a visit and lie in wait to try and catch the robbers in the act. George and other members of the squad also station themselves in the pub for surveillance and backup (and a pint) – and a fair part of the episode is set in and around the bar, including a final confrontation with shooters drawn.
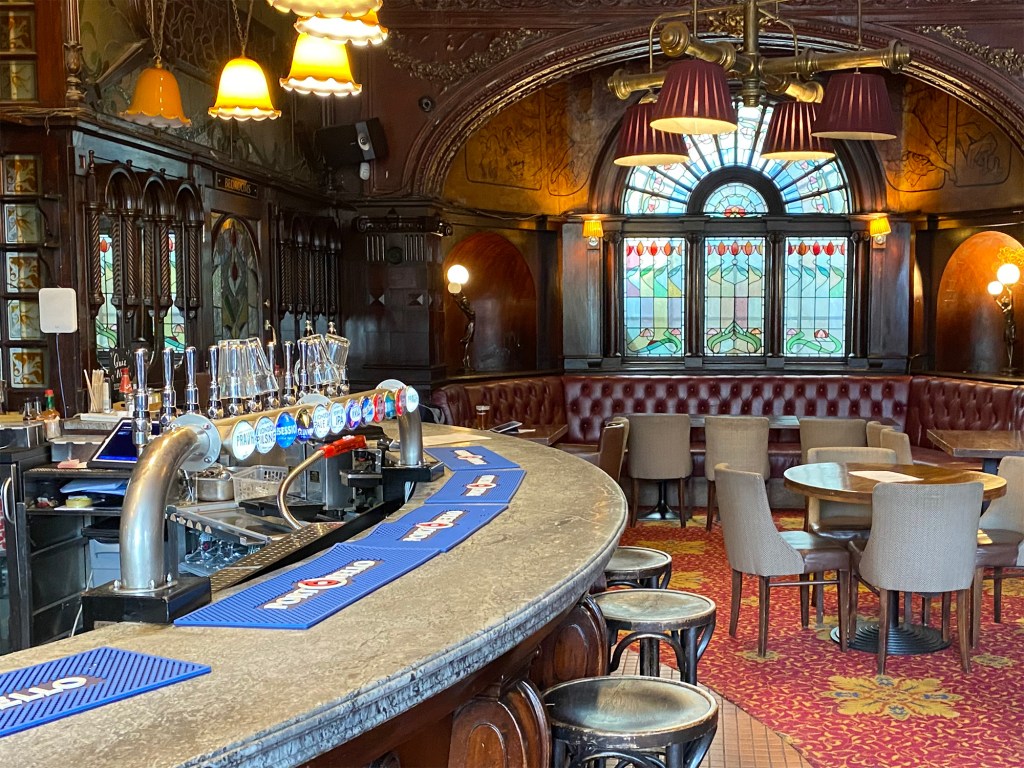
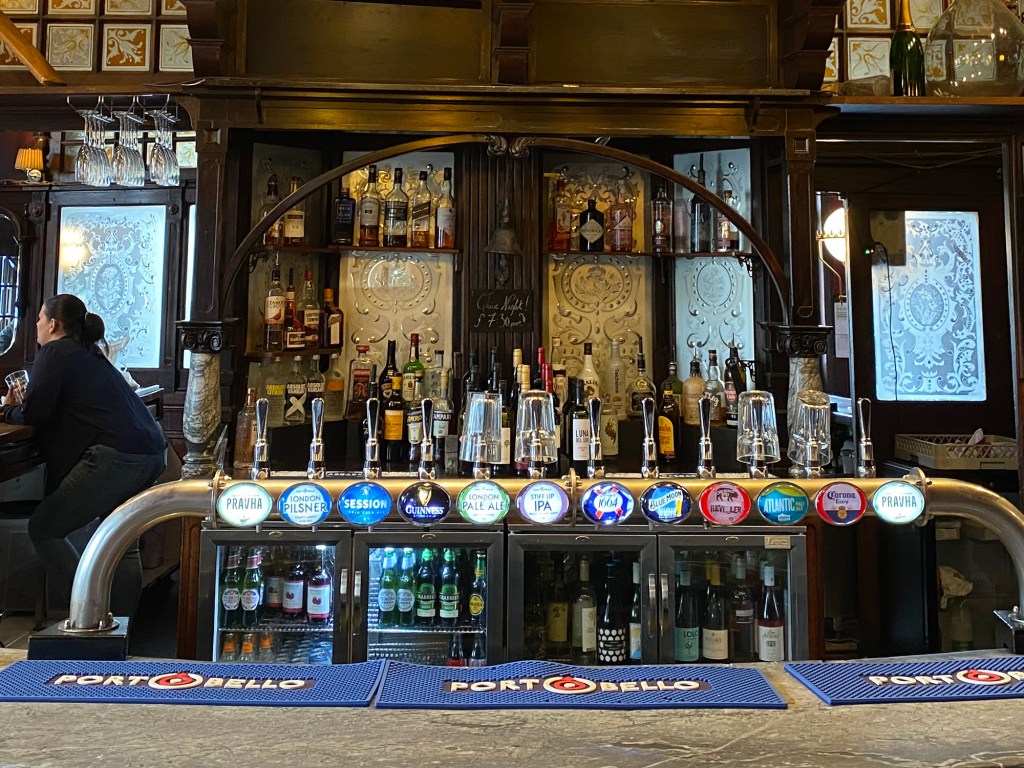
The pub in question is The Warrington Hotel in Maida Vale (1), a majestic proper old school London pub that – thankfully (and remarkably in this day and age) – has changed very little since The Squad assembled there. The building to the left of the pub as you look down Randolph Avenue, that served as a branch of that recurring Sweeney establishment, the ‘National Anglian Bank’, no longer exists in the form seen here on the left. The view in the second picture is what’s actually next to the pub now, so evidently the old building – which looks like some sort of church or assembly hall – got demolished to make way for more flats:
Panning along to the pub, we see Jack approaching from the Randolph Avenue side – more or less unchanged, though (a common trope) the trees have grown up substantially, and there’s now a garden area outside:
Coming round to the front of the pub on Warrington Crescent, we can see that the ornate columned entrance is still the same as it was back then:
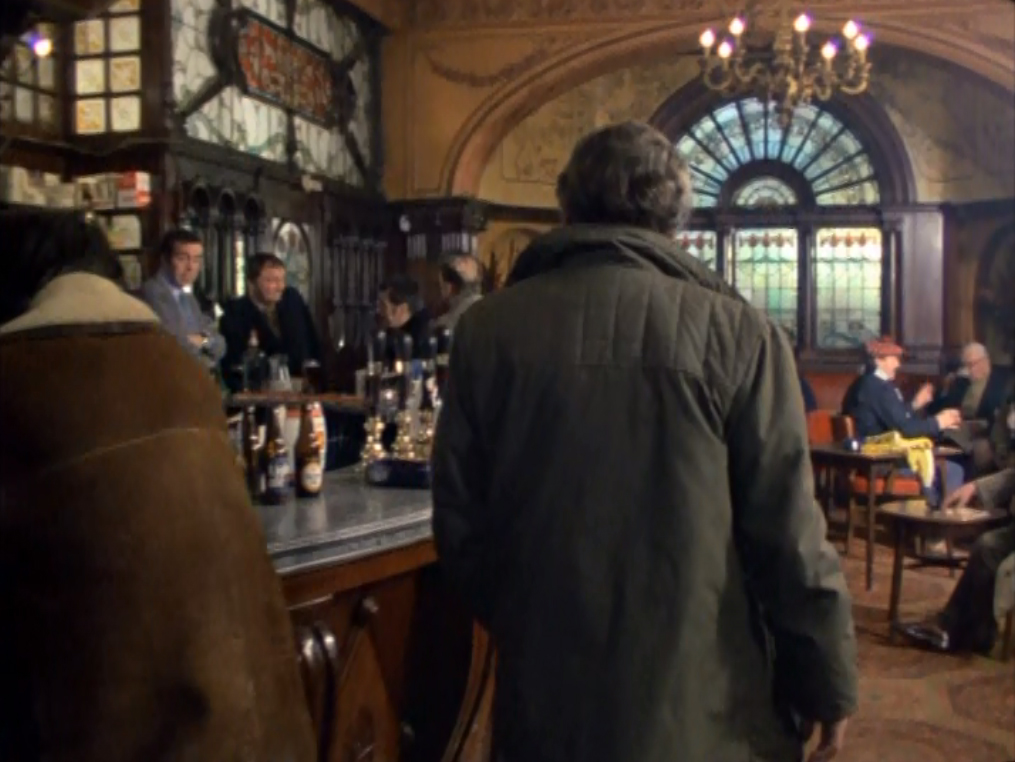
Naturally, as it was opening time, I couldn’t turn down the opportunity to wander inside and see if the interior was similarly true to its 70s form; it didn’t disappoint:
(And neither did the pint of Wandle; though maybe a Courage Light Ale would have been more on point.)
I could have stayed for a lot longer, listening to the echoes of the Sweeney’s heyday; however, a pretty full hit-list of places to visit meant that I was on my way after one pint, walking a short way down Randolph Avenue to the next location.
Episode Context – S1E07, “The Placer”
We’re back to the episode where Regan is undercover as a truck driver. He gives a lift to Fran, an associate of the truck hijacking gang they’re trying to break; the location of her flat is on the SE side of Randolph Avenue, just past the turning into Randolph Close (2). We never get a clear look at which number the flat is, but it’s a garden flat in one of the first buildings after the Randolph Close turning (as seen by the ‘hasty exit’ shot below) – so probably number 59 or 57.
There are a number of shots here as George and Det. Sgt. Kent watch Fran leave her flat and drive away:
After which, George goes to break into the flat to look around for evidence:
Unfortunately, Kent is unable to keep hold of the public phone on the corner to alert George of the approach of Kesey, one of the gang members – and after downing Kesey with some quick fists, George has to make a hasty exit:
Exiting the area myself, I headed for a bit of a longer walk to the next location – down through Little Venice and across the Westway to Bayswater, and a little grouping of shots from very close to where I used to work for a time in the late ‘aughts – but had not location-scouted at the time to realise that they were nearby.
Episode Context – S1E02, “Jackpot”
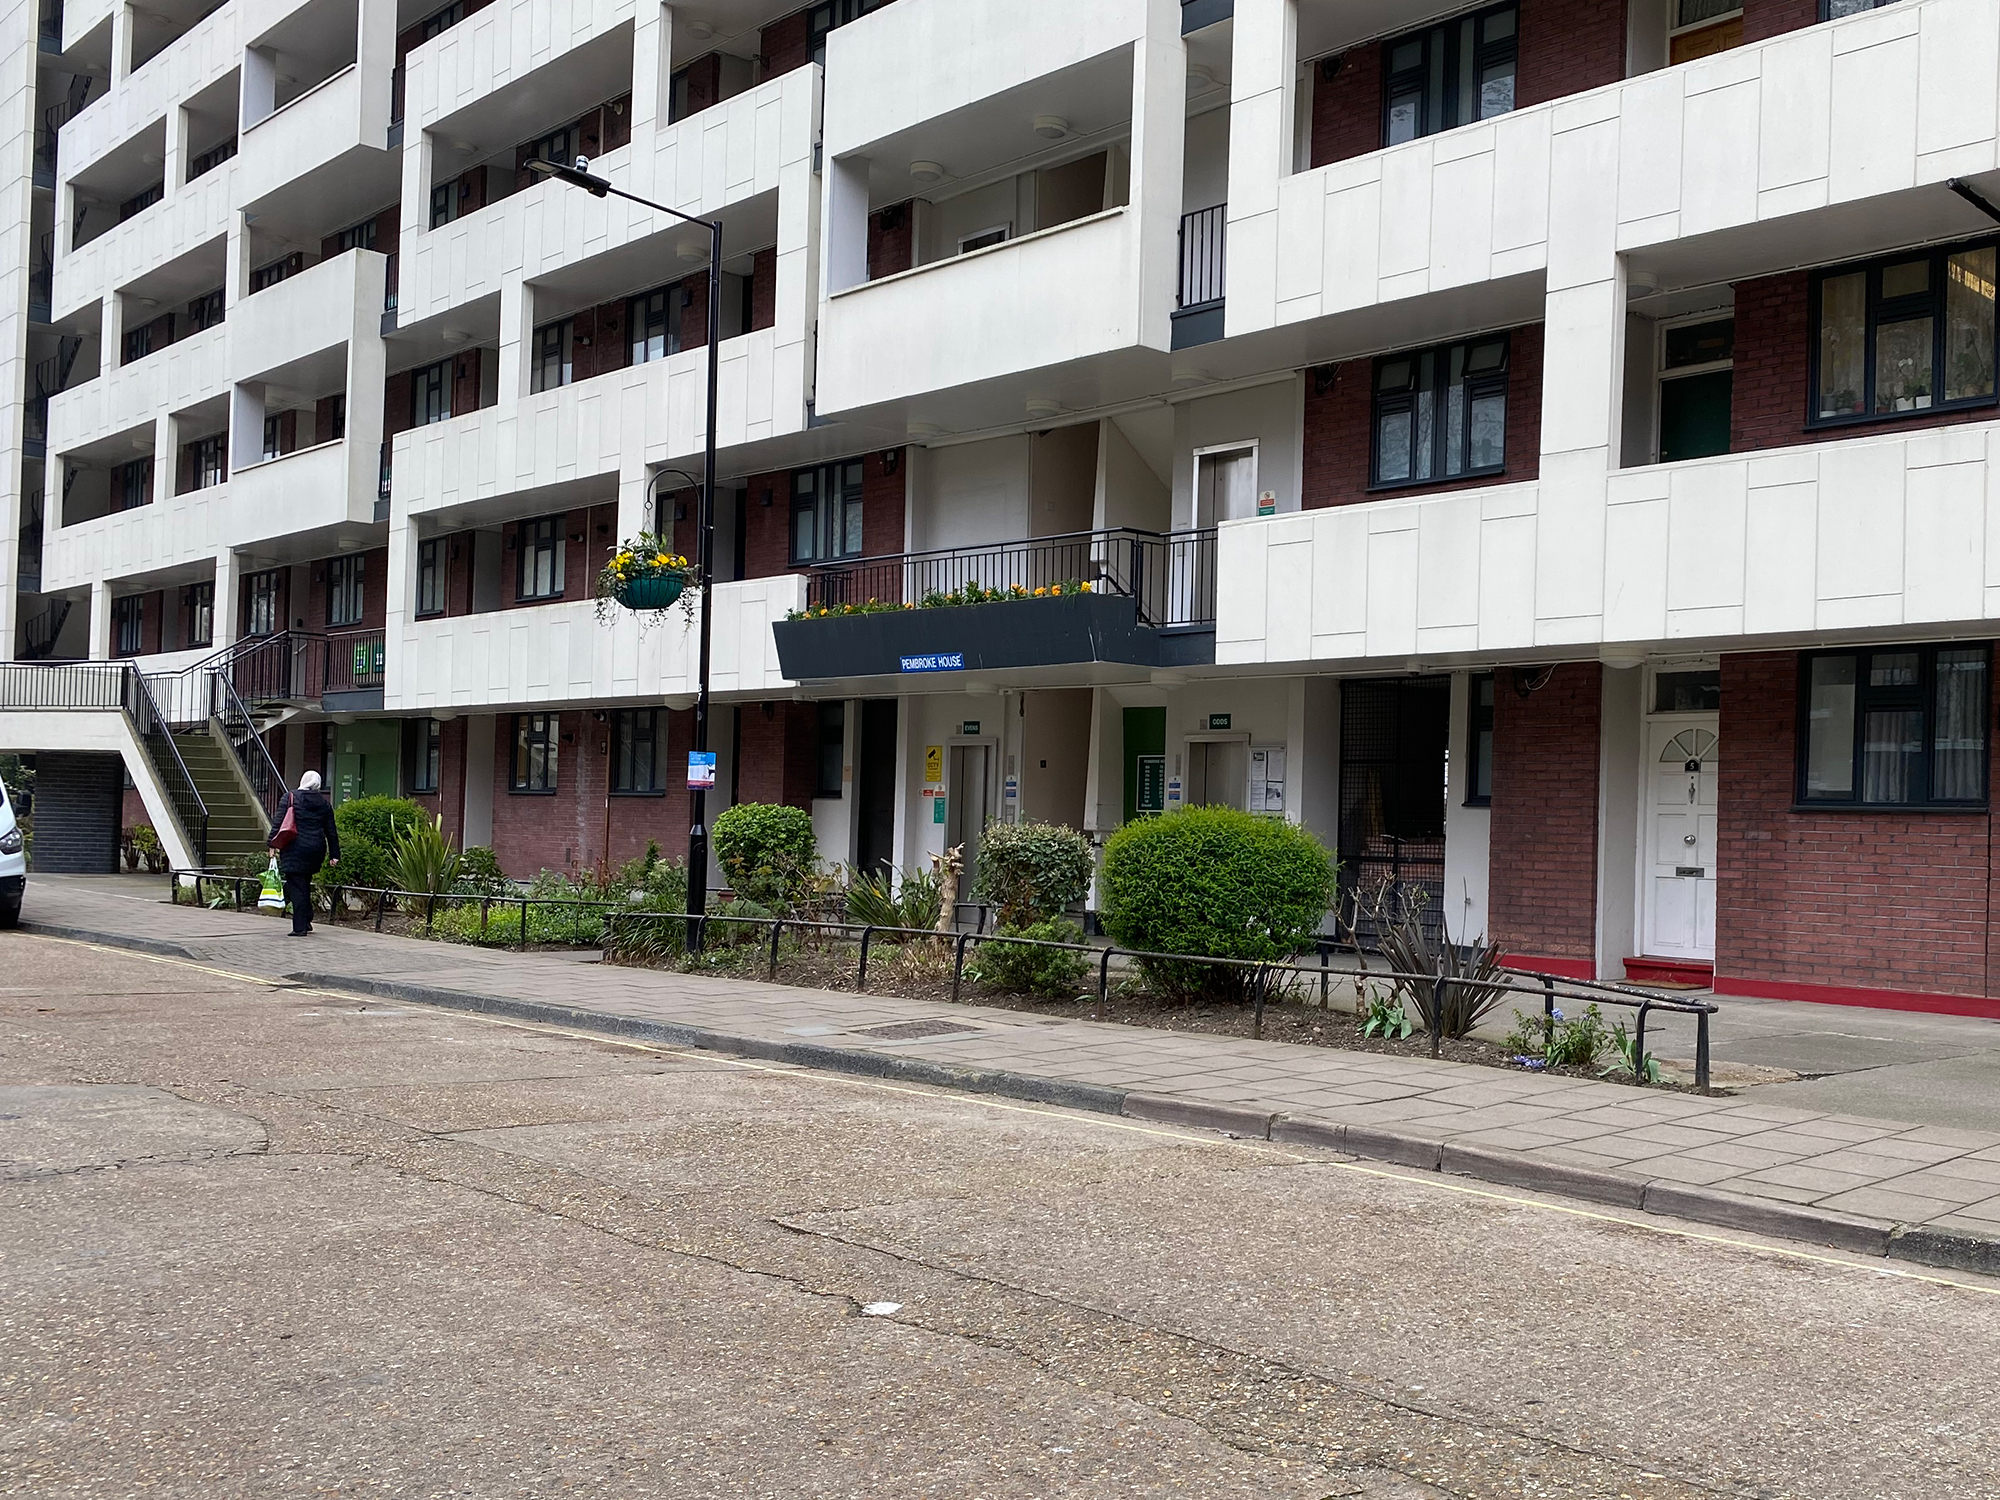
A previous trip bagged the location where The Sweeney ambush a gang of robbers, and in the melee a bag containing 35 grand goes missing. Through filmed evidence (the operation was recorded for training and analysis purposes) and subsequent detective work, Regan learns that one of the gang, Biggleswade, has a sick daughter requiring an expensive operation. During the course of the investigation, he pays a visit to Irene, Biggleswade’s wife, at their flat in Bayswater.
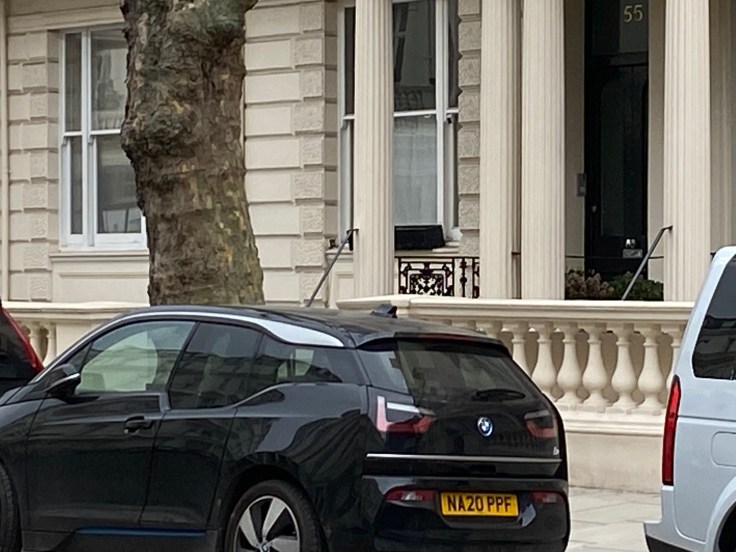
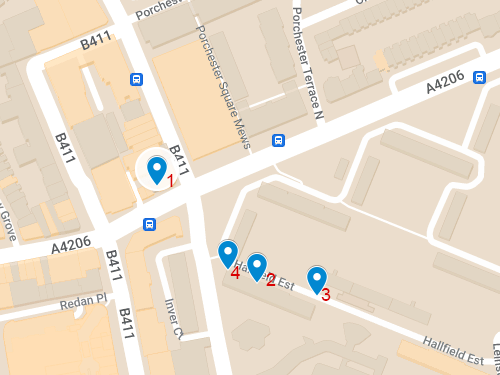
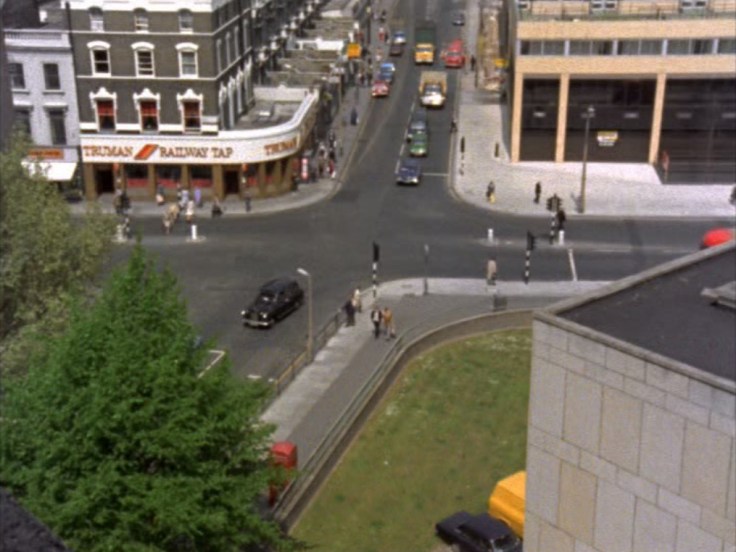
The flat is in Pembroke House, on the Hallfield Estate just south of Bishop’s Bridge Road. In an initial ‘location establishing’ shot, we get a high vantage-point view back to the junction of the A4206 and the B411, with the most notable building in view being the ‘Railway Tap’ pub (1). I didn’t realise it at the time, but I actually drank in there after work a couple of times; sadly, this is one example of a pub that is now spruced up and bearing little resemblance to its 70s self:
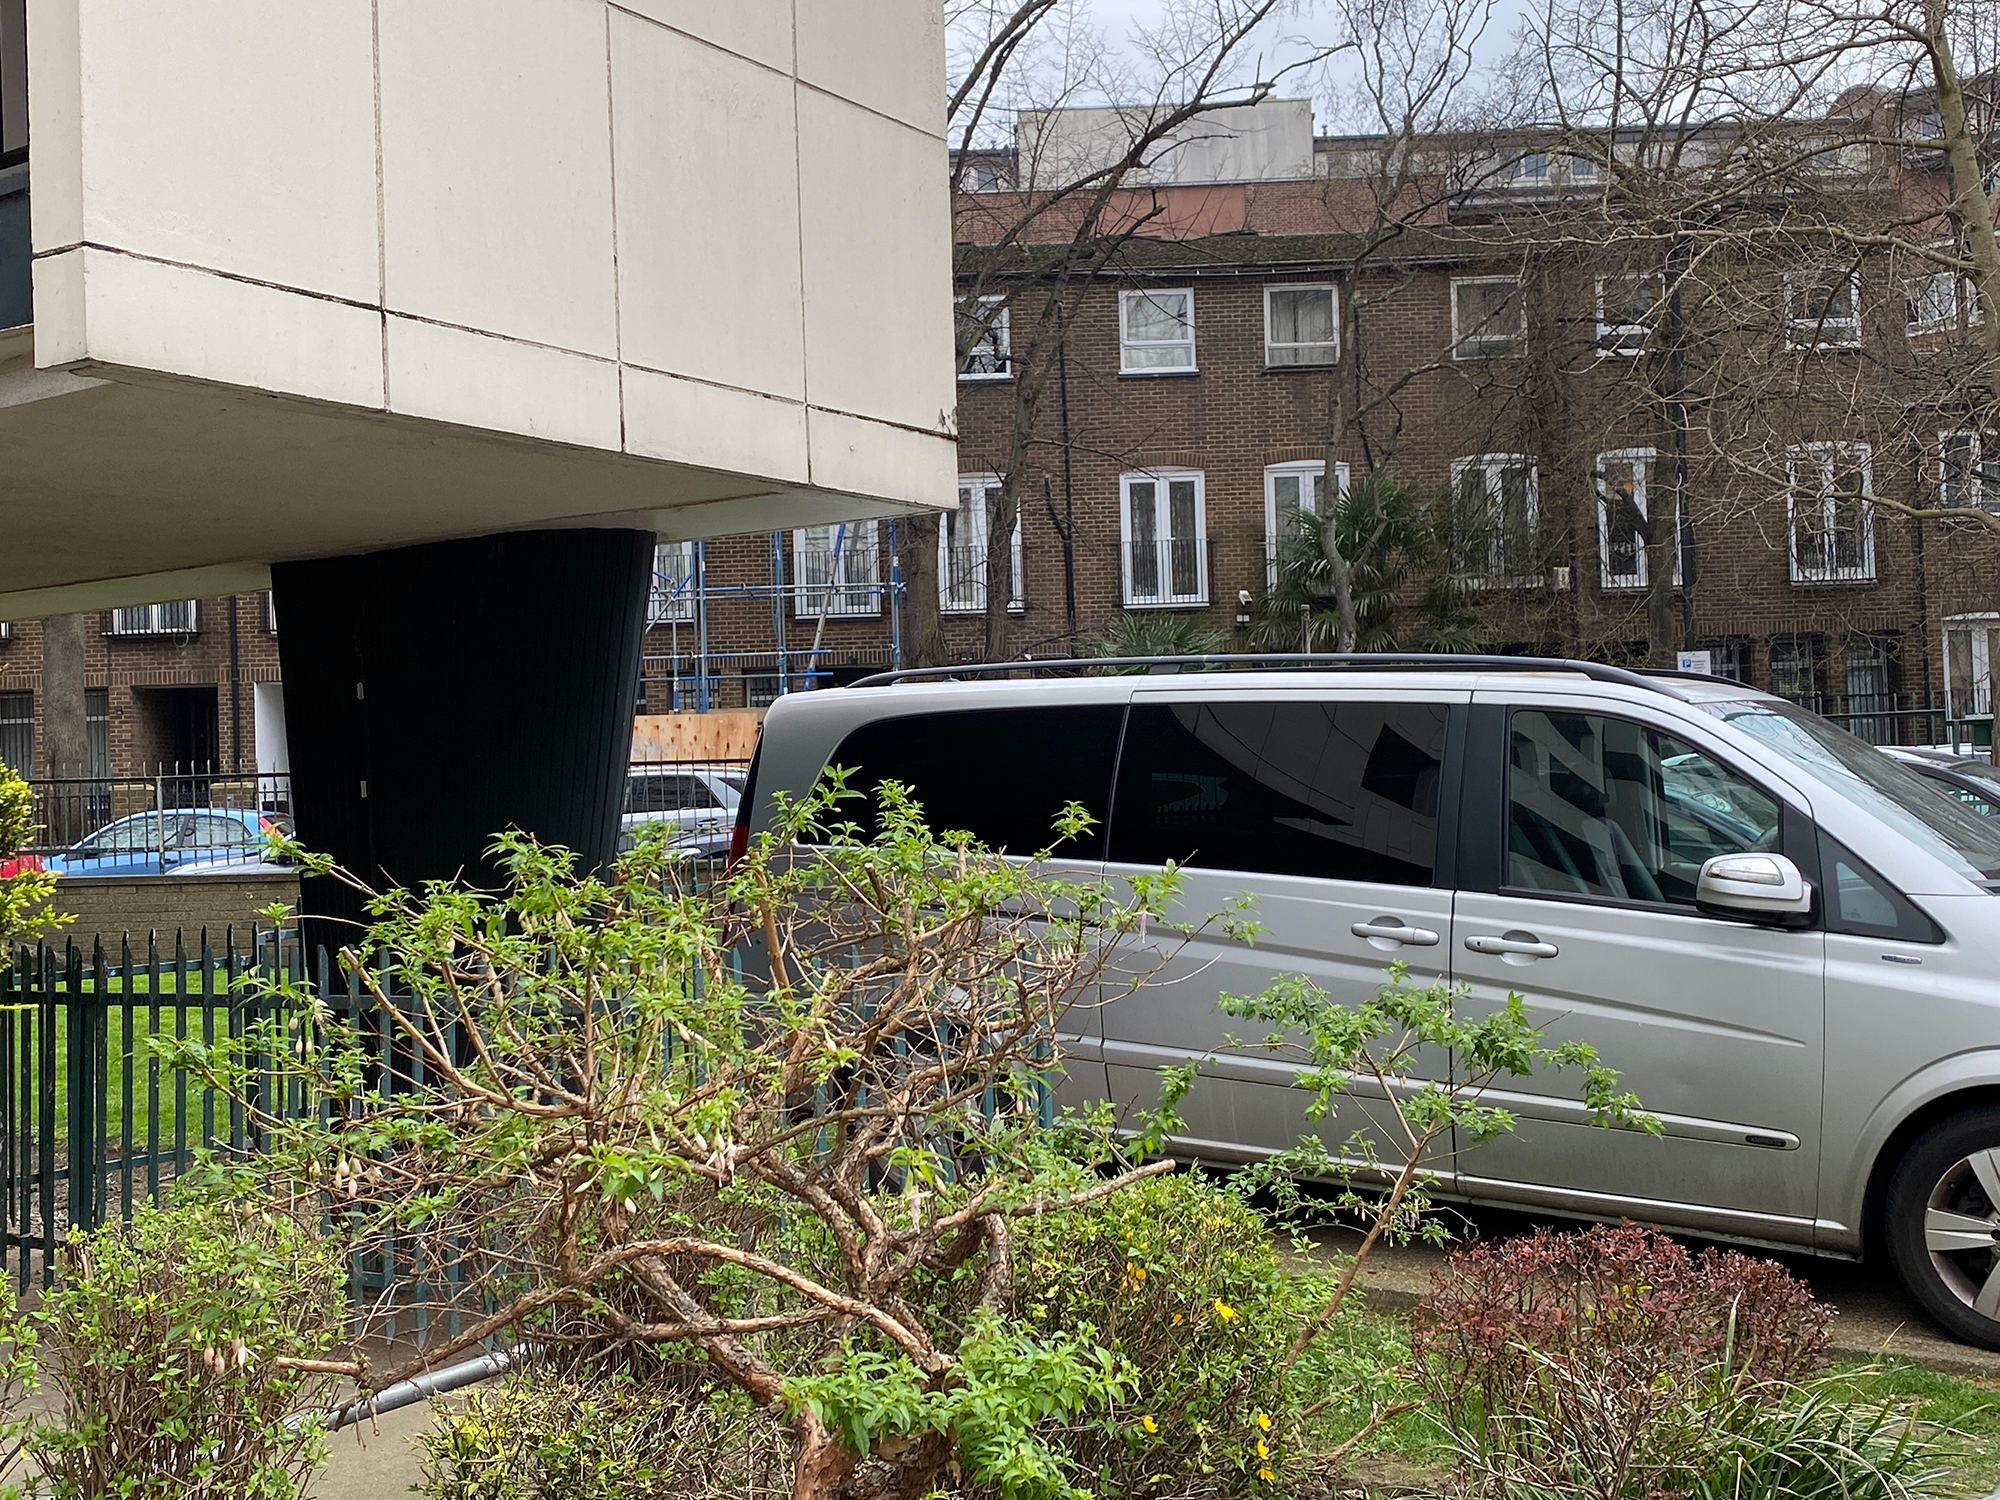
To get the ‘now’ shot, I was really keen to get up high and give as faithful a recreation as I could, rather than taking it at ground level; this involved a little bit of front (these types of flats tend to be those where everyone knows nearly everyone else, and a stranger stands out) and a bit of leg-grunt up six floors or so. I think the result was worth it, though. (I think the original must have been shot actually on the roof of the building. That was a little step further than I was prepared to attempt!)
The other shots we have in this location are of The Squad arriving at the flats (2), (3):
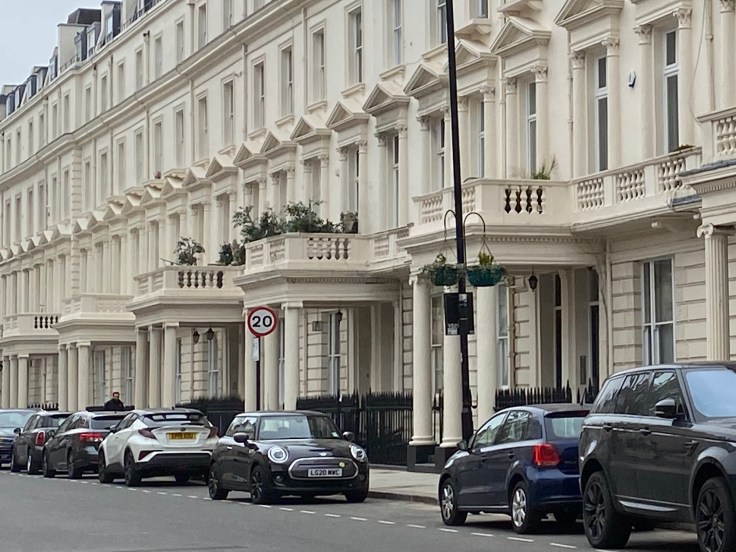
And, at the end of the episode, Regan and Irene discuss Sheba, walking in the shadow of the flats (4):
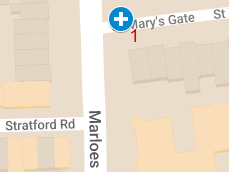
After bagging the flats and aerial shot, it was time for a quick tube ride from Bayswater to High Street Kensington, a hastily grabbed lunch, and then a walk south down Wright’s Lane and Marloe’s Road to the next location at St. Mary’s Gate.
Episode Context – S1E05, “Jigsaw”
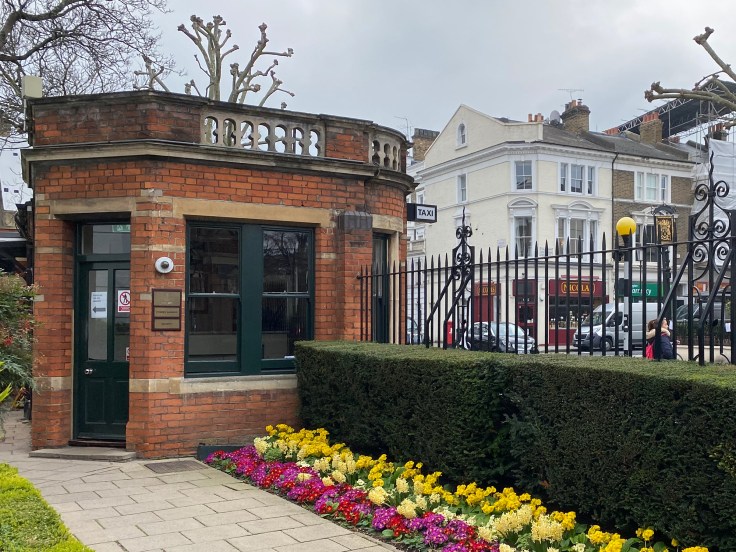
In this episode, Regan is certain that Eddie Boyse – a recently released criminal – is responsible for a robbery that has just taken place in which a night watchman was badly beaten; Boyse, however, has a ‘cast iron’ alibi for the time of the job. During the investigation, Jack and George visit the night watchman Fred Steadman in hospital to get a statement. The exterior shots for this scene were taken at St. Mary’s Gate, site of the now demolished St. Mary Abbott’s hospital (1).
It was a bit difficult to get into the correct positions to recreate some of these shots, as the area is now gated flats and the gatehouse is now the site security office; however, you can still see that the basic architecture of the gatehouse, walls, gates etc. are the same, as are the buildings across the street visible in the final shot.
From here it was a bit of a longer walk to the next location at Gloucester Road tube station.
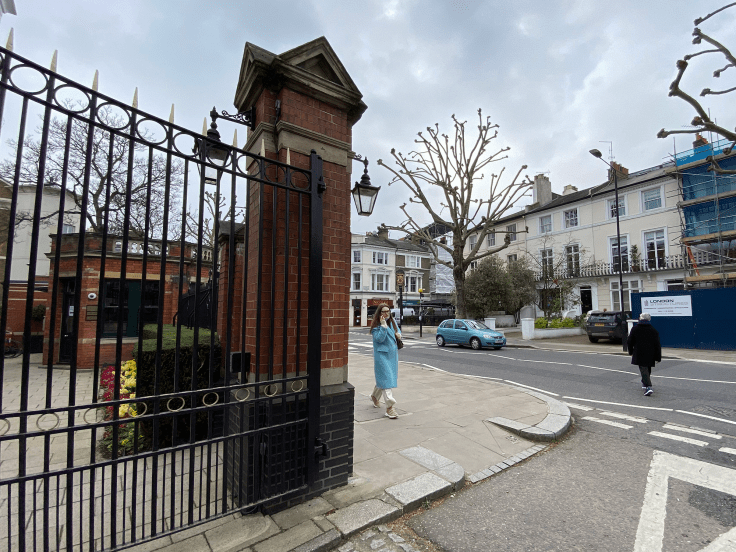
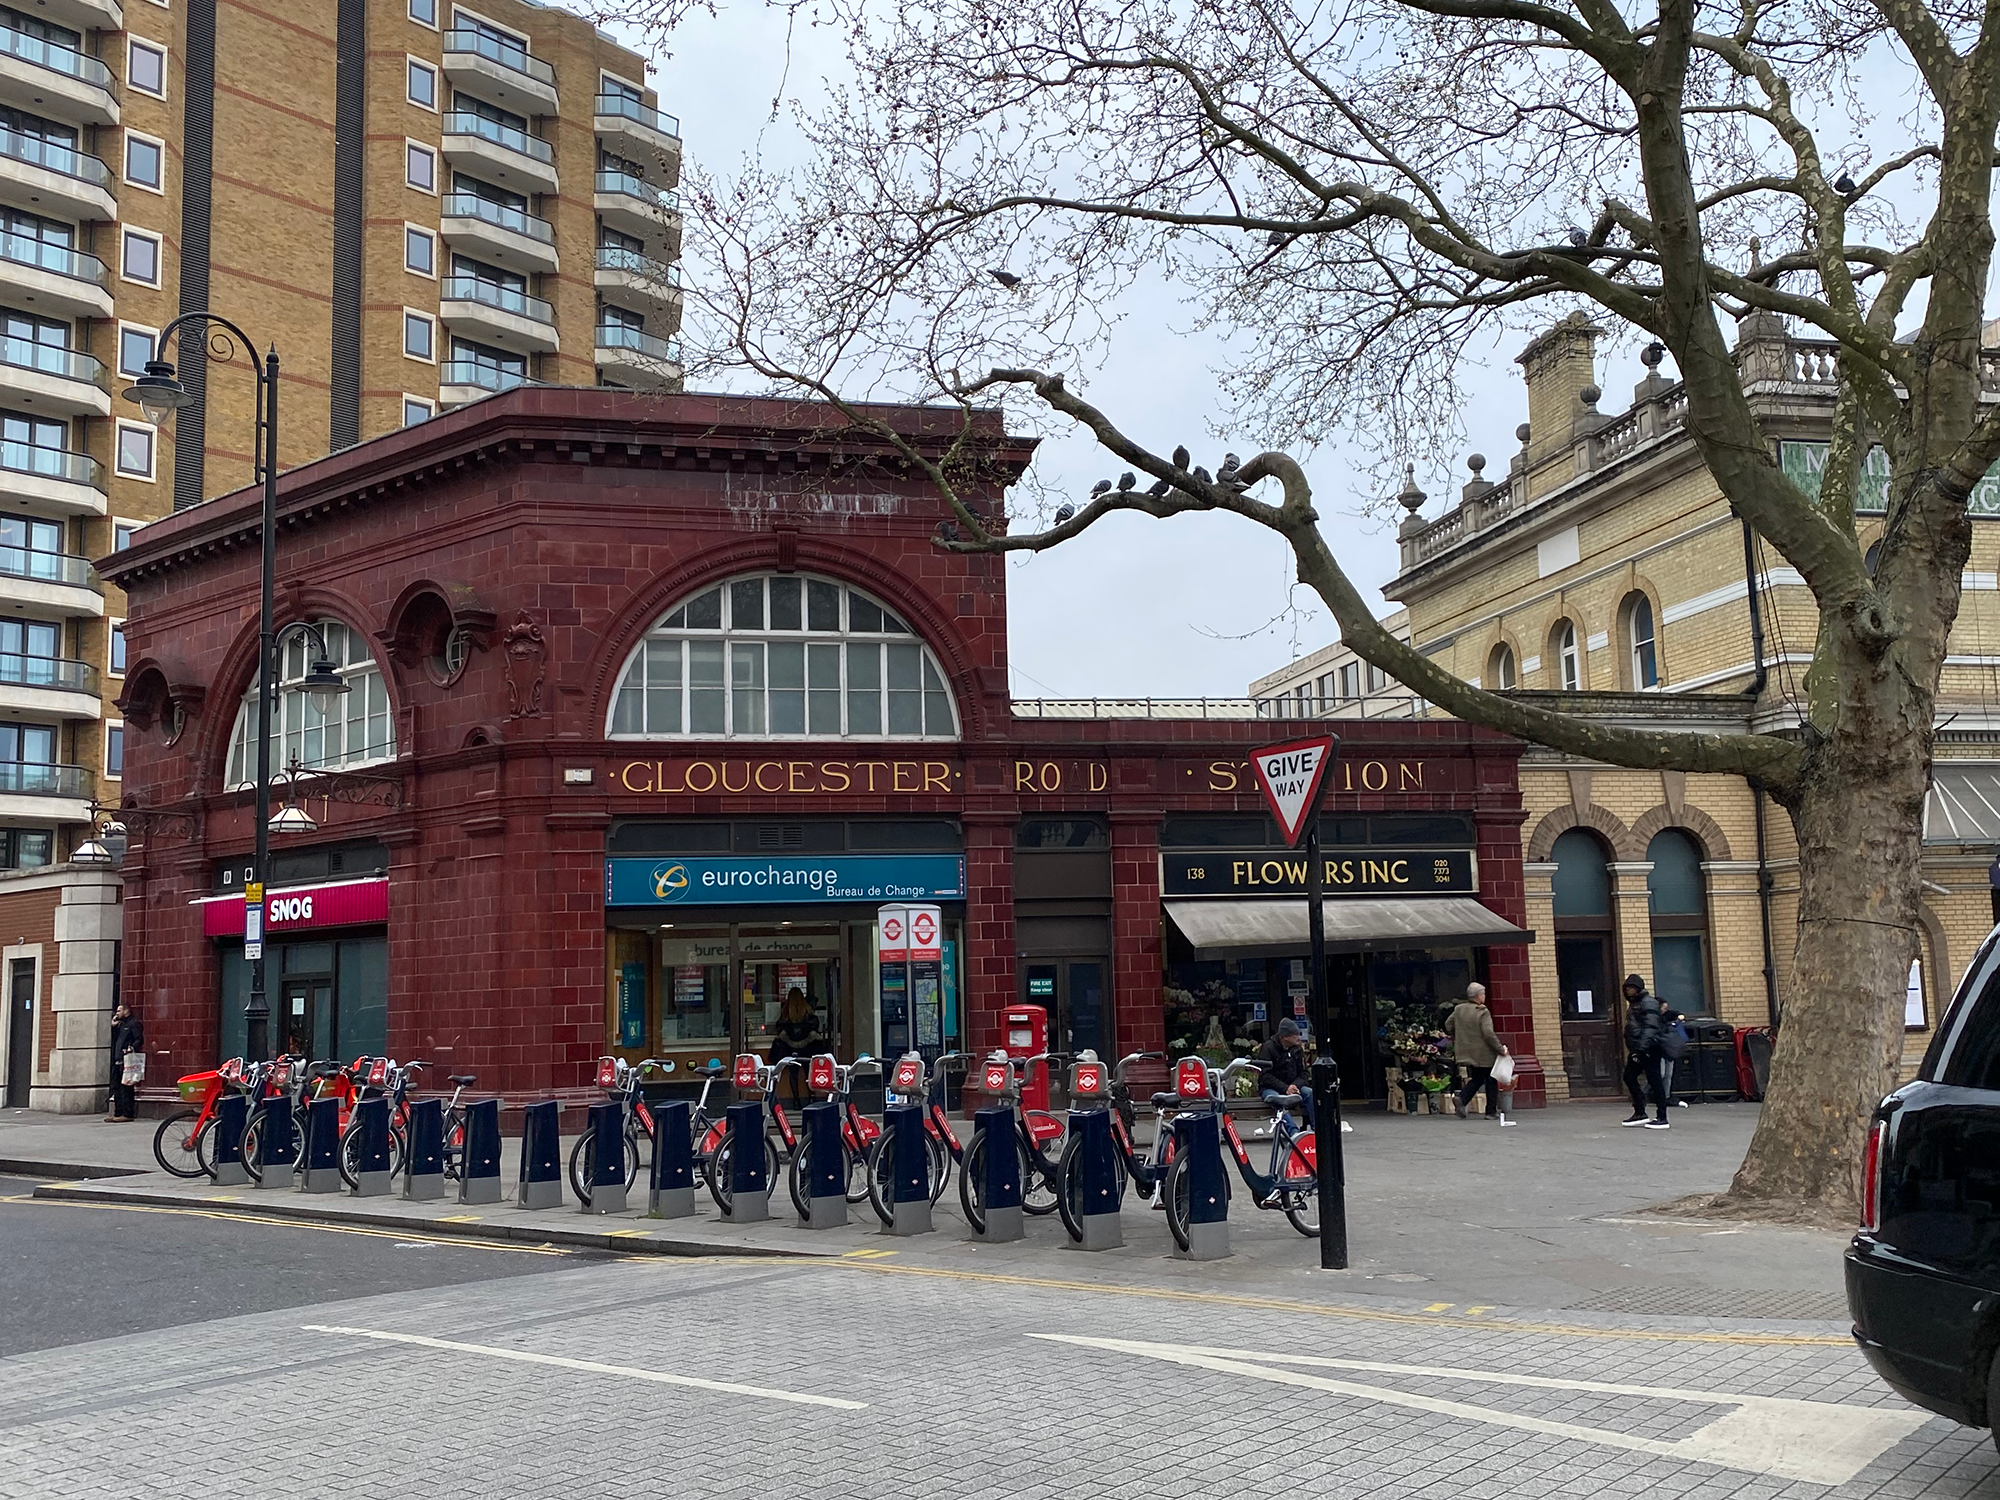
Episode Context – S2E03, “Supersnout”
I don’t really need to provide a map showing the location of Gloucester Road tube station, eh? Anyway, we’re revisiting the episode where a gang of jewel thieves led by Yannos is planning a raid on a city jewellers. Haskins is away at a conference, and his stand-in, Quirk, is obsessed with capturing the one that got away, the so-called ‘Post Office Gang’. Regan’s informant, Stickley, is a member of the gang and George goes undercover as a cab driver to collect him from the tube station for the ‘dummy run’ of the job.
The establishing shots for the scene were obviously taken from a higher vantage point – either a cherry picker or possibly a building on the East side of Gloucester Road; however, the general view of the (mostly unchanged) station front is still pretty obvious.
After the tube station, I had a long (and reasonably pleasant) walk down through Chelsea, across the river to Battersea Park; as this post is already pretty long itself, I’m going to split the journey here and pick up ‘saaf of the river’ in a separate post.
August 12th promised to be – weather wise, at least – somewhat less than “glorious”; however, being my birthday and a Monday off work, what better way to pass a late morning and afternoon than on a quest to unearth some more of Jack and George’s old haunts.
For this trip, I decided to try and hit a cluster of map-pins around the Holland Park and Shepherd’s Bush area – taking in a NW(ish) corner of Kensington on the way. This choice was partly because there were a nice number of locations within a walkable distance, partly because it was just south of my previous set of locations, and there were a few ‘pick up shots’ I wanted to try and get – and partly because there’s a Brew Dog in Shepherd’s Bush, and I get a free beer in their bars on my birthday. (Well, why not.) So as usual, it was Travelcard in hand and up to Waterloo, this time getting the Jubilee then Central Lines to Holland Park.
Episode Context – S1E07, “The Placer”
Regan has gone undercover as a driver to get to a gang of hijackers who are taking lorries. By posing as ‘bait’, Regan becomes known to the gang as being fairly handy, so when Carter arrests Chris Kesey, the driver for the gang’s mastermind Harry Poole, Regan is asked to fill in on driving duty and thus places himself at the heart of the gang.
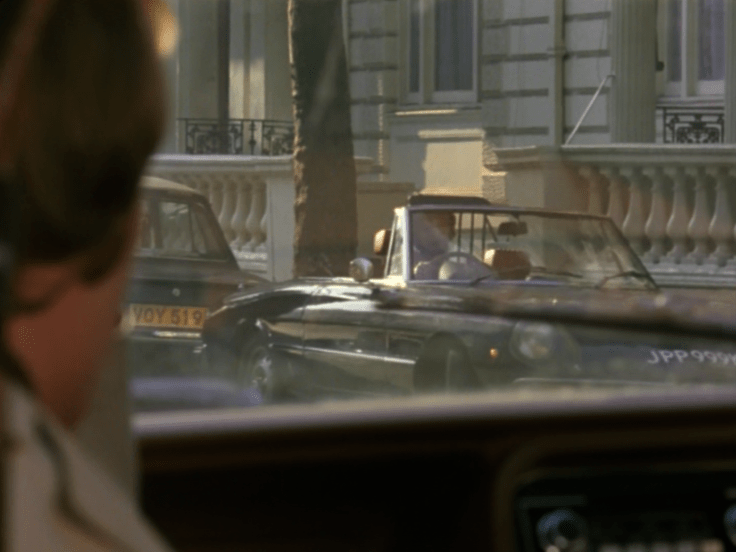
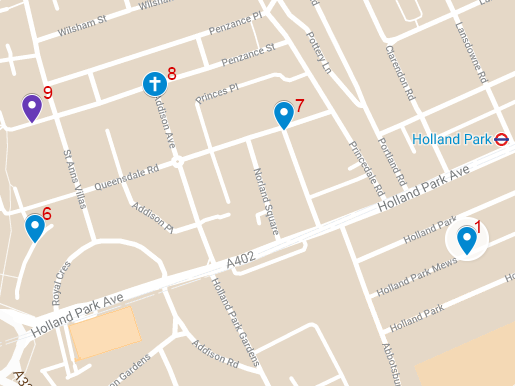
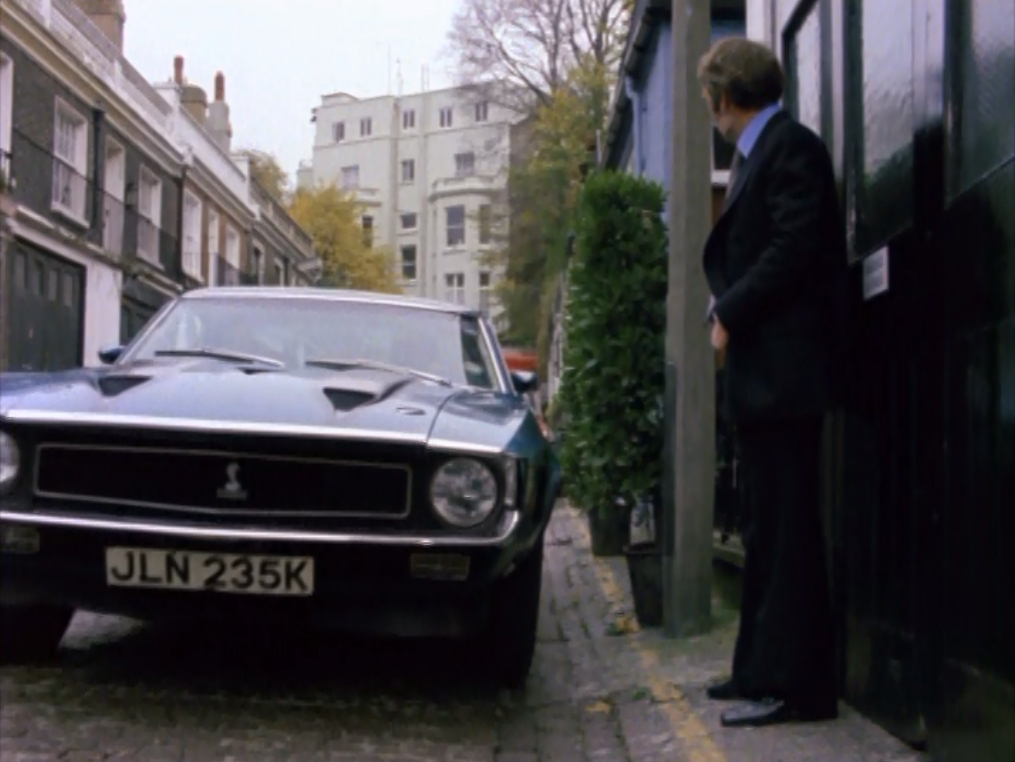
Poole’s pad is in Holland Park Mews (1); it is here that Carter takes Kesey in, and where Poole subsequently asks Jack to fill in. We see external shots of the Mews with conversations around the car, but although we get an impression that the house is somewhere in the middle or perhaps towards the ‘top’ end closer to Holland Park itself, it’s not really clear which exact house it is:
As you can see (and as is often the case) apart from a bit of face-lifting and sprucing, the Mews houses look much the same. The above shots are looking NE towards Holland Park; the large white building (36 Holland Park) still dominates this end of the Mews. In the shots below, however, the motor seems to be parked on the other side of the Mews and we’re looking more SW, towards where Holland Park (the road) becomes Abbotsbury Road.
Again, you can see that there’s not much change in the buildings, they’re just a little less grimy (and probably 10x as costly).
Walking out of the Mews under the arch, I turned left along Abbotsbury Road and alongside the Western edge of the park itself, before heading SW into a corner of Kensington, and back to an episode in Season 2 that we’ve previously encountered.
Episode Context – S2E02, “Faces”
Our old friends, Tober and ‘Evil’ Willie run a gang of politically motivated robbers out of a junk shop on Goldborne Road, North Kensington. Carter suspects that local snout Albert Milligan may have some information that would help the squad, and goes to find him at a bookies where they frequently meet. However, something (or indeed, someone) has clearly put the wind up Milligan, and he has it away on his toes to try and avoid speaking to George.
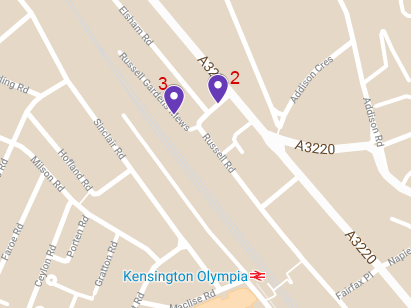
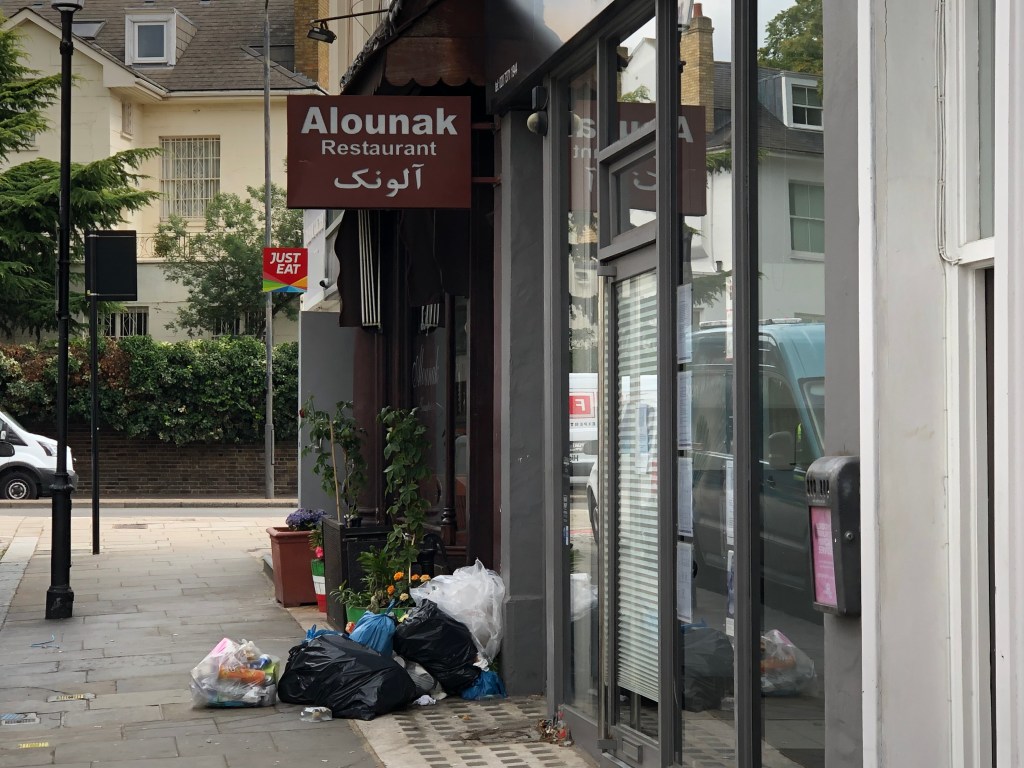
The ‘bookies’ is on Russell Gardens (2), in what appears to be currently a vacant shop (the white-fronted one right in the edge of this shot – I couldn’t quite manage to take it from further back due to parked vans and people loading / unloading ‘behind’ me here):
Some of the shop fronts have been changed in the intervening years; the ‘Alounak’ restaurant (as it is now) looks fairly similar though, from what I can glean from the episode angle. Switching our POV, we follow George as he exits the bookies and heads in pursuit of Milligan, who has disappeared round the corner into Russell Park Mews:
The large building he runs past is yet another example of what was in the past clearly a pub, and is sadly now no longer so. As ever, ‘progress’ dictates that it is now some kind of blandly modern set of commercial and/or residential units; far more economically viable, but far less appealing (IMO, at least).
The final shots in this chase sequence are taken around the corner in the Mews (3), where Milligan (no match for our George in the athletic stakes) is caught:
I’ve occasionally wondered when (as much as ‘if’) someone would wonder what I was up to, particularly when taking photos of fairly secluded / residential areas; as it turns out, the answer was ‘on a Monday in Russell Gardens Mews’. I got chatting with ‘Q’, who’d asked me who I was looking for (a not unreasonable question of someone wandering into your road and then gazing up and down thoughtfully); it turns out that his house – one that features in the above shots – used to be owned by Michael Crawford, amongst others, and there have also been segments of ‘Some Mothers…’ filmed nearby. After arranging to email him some stills from the episode that show Sgt. Carter in action outside his house, I departed for ‘The Bush’ and the next set of locations.
Episode Context – S1E02, “Jackpot”
During an ambush on a gang of armed robbers returning from a cash heist, the squad apprehend the villains but in the melees and punch-ups a bag containing £35,000 goes missing. Digging into the minds and motivations (beyond the obvious) of the suspects involved, Regan learns that one of the gang, Biggleswade, has a daughter with a serious medical condition. He goes to meet with a doctor to find out more about the child’s illness and whether it plays a part in the unfolding story.
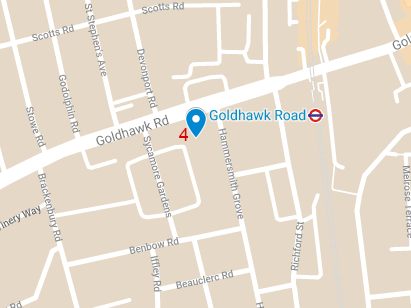
Regan meets the doctor outside Verulam House (4), in Hammersmith Grove just off Goldhawk Road. (As an aside, if I ever do a series on ‘Quadrophenia’ locations, I’d likely be coming back to this neck of the woods.)
As you can see, the frontage of the building is much the same, a slight lick of paint here or there aside. It doesn’t look as if cars park in the small forecourt area nowadays (it’s kind of fenced off), but otherwise Jack could pretty much be on his way round the corner. For my part, I was away just up the road to the market.
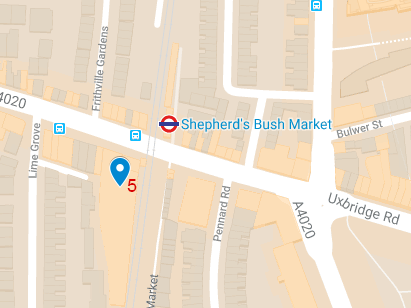
Episode Context – S1E04, “Queen’s Pawn”
Johnny Lyons, along with his fellow flash criminals Budd and Clarke, are acquitted on robbery changes despite the Squad being certain of their guilt. Unable to get to them via direct means, they pursue other angles of approach, including leaning on what they see as the ‘weakest link’ in the chain, Budd – or moreover, his wife – in an effort to make them crack and turn on the rest of the gang to save themselves. Looking for information that will assist them, Regan and Carter head to Shepherd’s Bush Market to meet Ronnie, a local with his ‘ear to the ground’.
The conversation with Ronnie at his stall is somewhere indoors / under cover, that is not really possible to pinpoint exactly. Regan and Carter walk through the main outdoor part of the market (5), however, and discuss the case as they go:
You can just about glimpse enough of a building in the 2nd episode shot to tell that it was near the ‘North’ end of the market facing out onto Uxbridge Road; besides that, there is general market ambiance that could have been at any point along the stalls. The market layout itself hasn’t changed much; the stalls themselves are now less household wares and typical old London traders, and more Asian fabrics and foods, but the character is still vaguely similar.
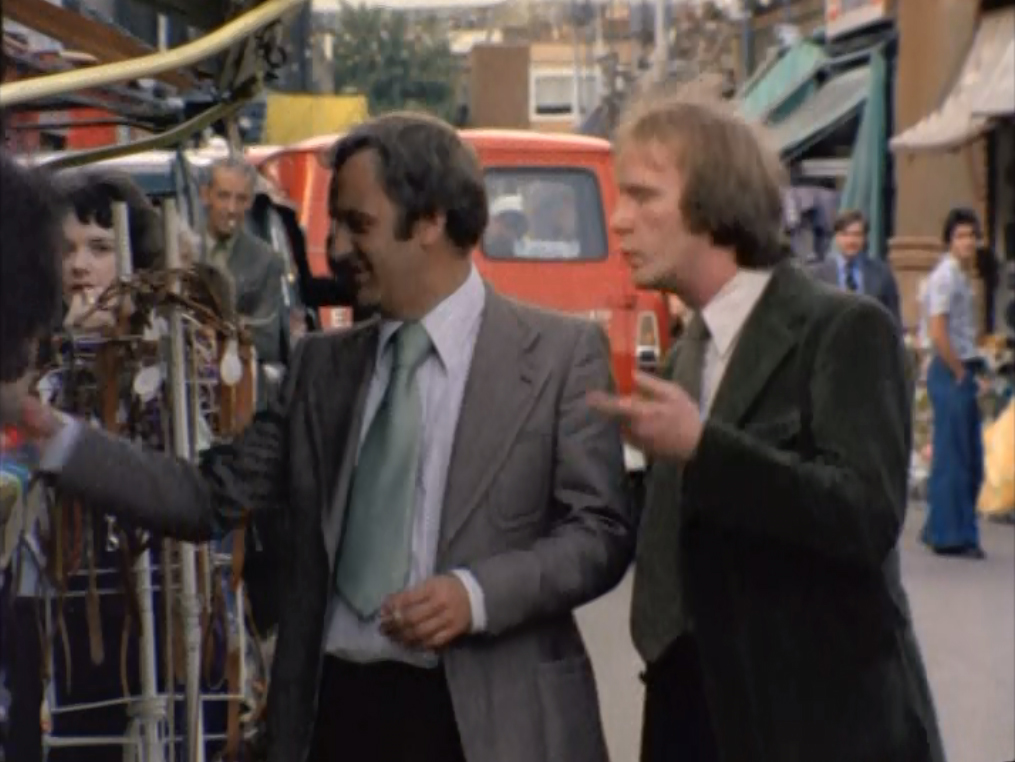
After wandering up and back down the market, it was pushing lunchtime – and more to the point starting to rain heavily – so I took that as my cue to duck into Brew Dog and procure my free birthday beer (OK, and a couple of friends to join it) and wait out the weather with some lunch. Not sure what Jack and George would make of craft beer bars as opposed to grubby boozers, but I enjoyed having the place as my own private bar for a while!
Once the weather cleared up (and the bar had got too crowded – 3 other people in there) I moved on to the next little cluster of locations slightly to the East of Shepherd’s Bush and back into Holland Park.
Episode Context – S1E02, “Jackpot”
First up, we return to the exploits of Biggleswade and his gang, and the location where the Squad ambush them after their cash raid. This takes place in Royal Crescent Mews (6 – first map) – a scene that we replay many times during the episode, including in slow-motion detail, as The Sweeney revisit film footage of the ambush and try to piece together what happened to the missing cash.
The most noticeable thing when walking through the Mews in general, is that the old green garages – against which many a copper and villain was flung during countless individual battles – are no longer quite so prevalent (though a few remain, as can be seen in the lower-right of the second pair of photos); otherwise, the general look of the houses and such is pretty much the same. As with the other Mews (I do love a good Mews…) we’ve visited on this jaunt, I daresay the price bracket is the thing that has changed the most.
Walking up and along Queensdale Road, I next tried to find one of the ‘establishing shots’ showing The Sweeney en-route to the ambush; however, try as I might I couldn’t – at least on this occasion – be 100% sure I was looking in the right place. Either the roads and layout have changed sufficiently to throw me, or the reported location (this is one that was listed in IMDB) is not quite correct. I may do some more Google-research; but for now, this is as close as I think I can get, in the general area (7):
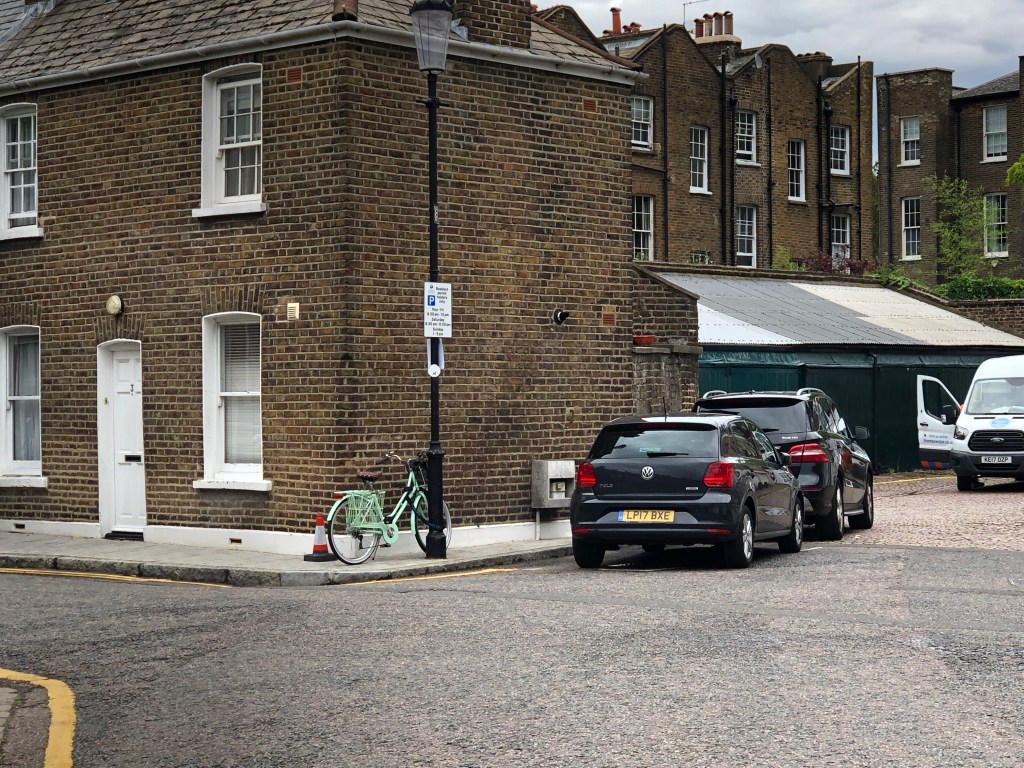
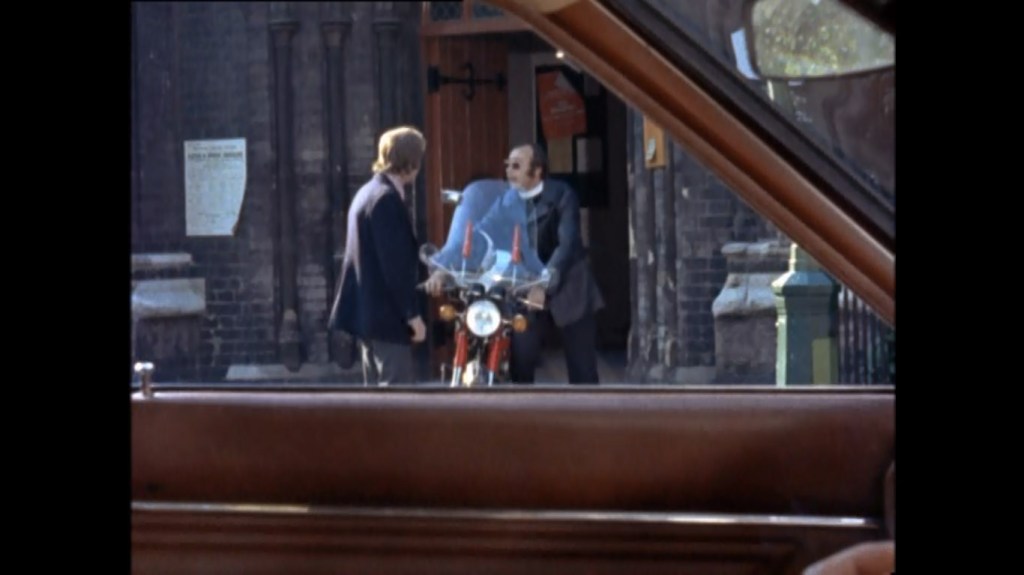
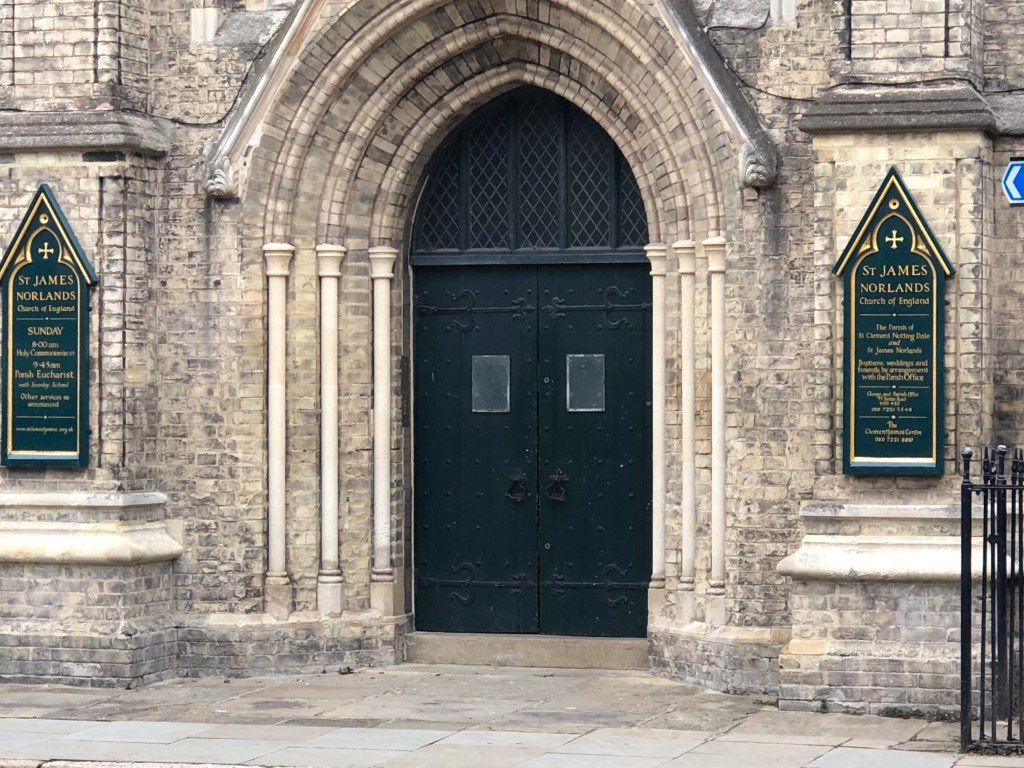
Episode Context – S1E05, “Jigsaw”
Eddie Boyse is a recently paroled ‘wireman’, who is now working in a local electronics factory during his day release. A job goes down that Regan is convinced has Eddie’s trademark all over it; the only slight problem being, that Eddie has a seemingly cast-iron alibi for when the robbery occurred. Attempting to verify this, Carter is dispatched to a nearby church to confirm with its motorcycle-riding vicar whether or not Eddie is telling the truth.
The church in question is St. James’s, appropriately enough in St. James’s Gardens (8), just back and North a little from the walk up Queensdale Road. The church – as would be expected moreso perhaps than pubs or residential buildings – is largely unchanged:
Episode Context – S2E05, “Hit and Run”
George’s wife, Alison Carter, is mown down and killed in an apparently targeted hit and run attack. It comes to light later on that the intended target was Judy Grinden – a fellow teacher at Alison’s school, who had lent Alison her coat to wear out to the shops. It becomes clear that Judy is involved with a smuggling operation facilitated by her frequent school trips to France, but had told the gang involved that she wasn’t prepared to play her part any more.
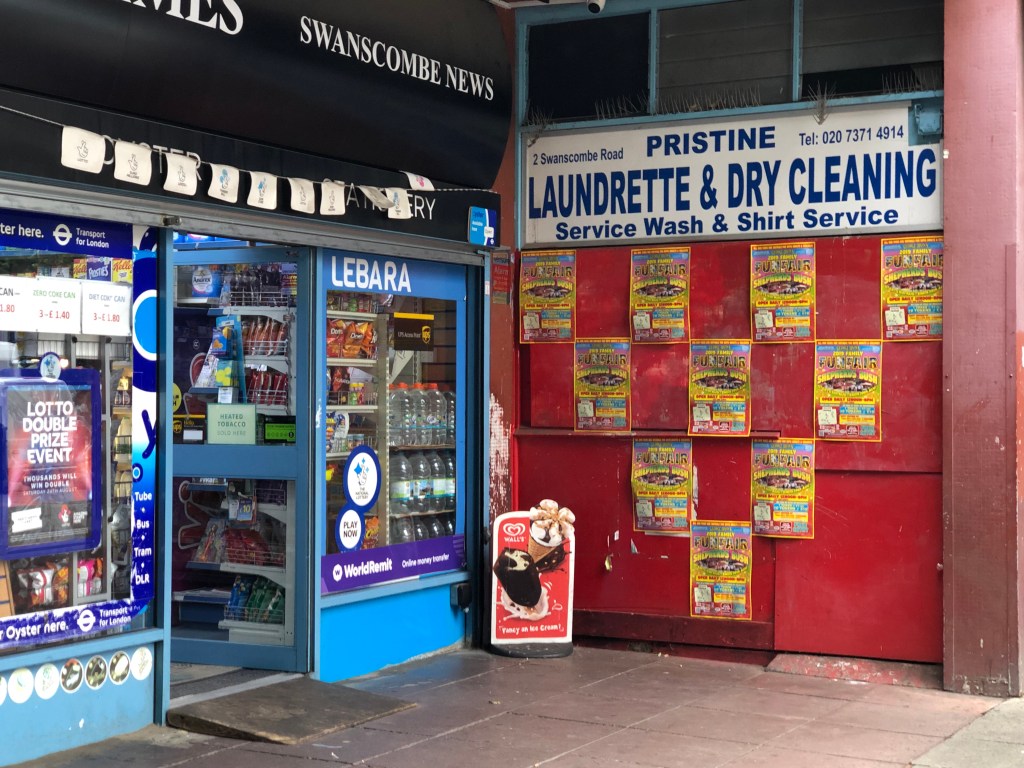
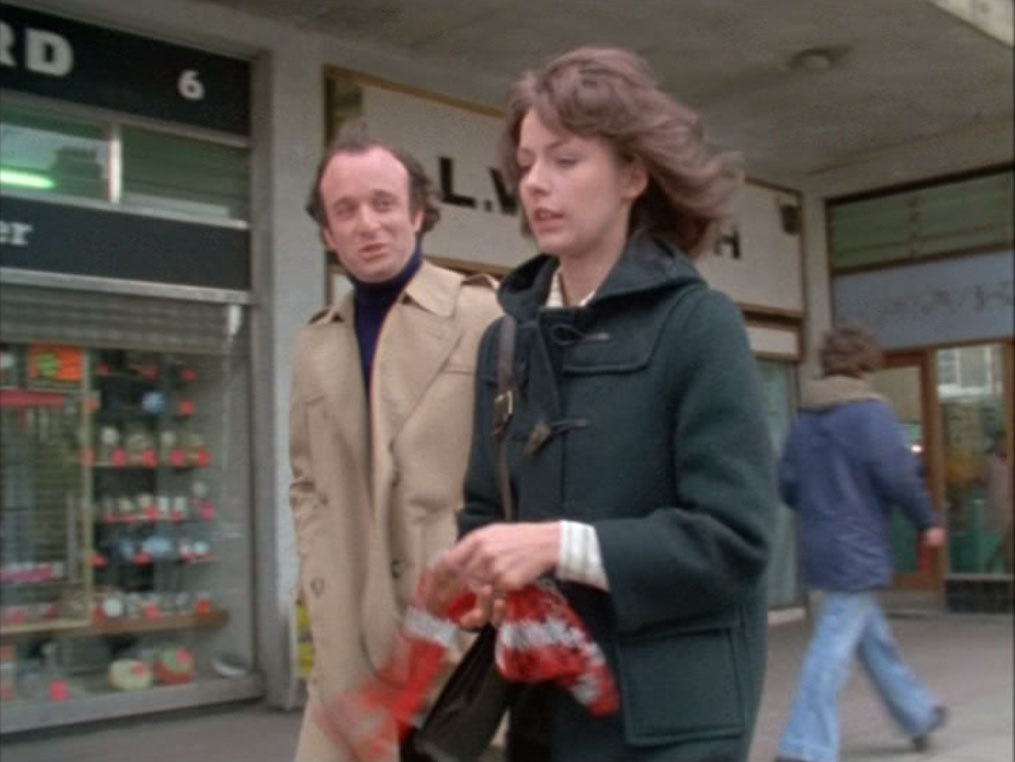
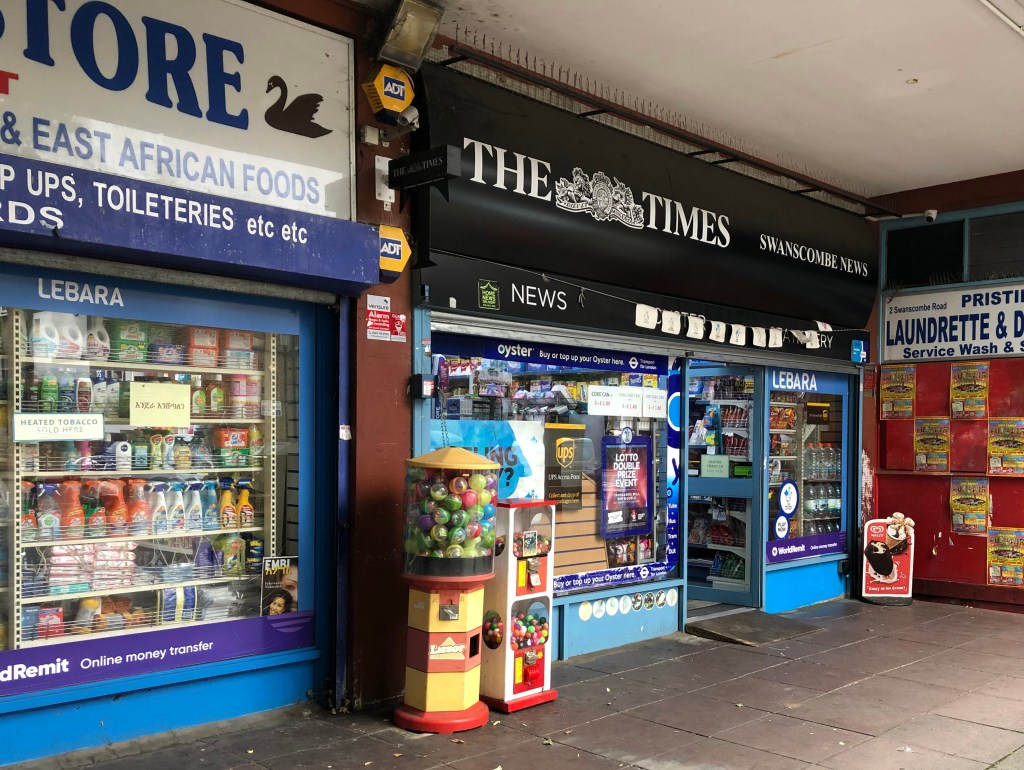
We pick up the trail of this episode a short way from the church, on Swanscombe Road (9) at a parade of shops where Judy is followed by Alan Fowler, the boss of the gang (Gary Waldhorn, better known to most for his turn as David on ‘The Vicar of Dibley’ – or to me as Lionel on ‘Brush Strokes’) who tries to persuade her to do one last job:
Somewhat remarkably, the two stores in shot – a newsagent and a launderette – are still serving their same respective purposes today, albeit likely under new ownership. Indeed, the whole parade of shops does feel like it probably hasn’t changed a great deal, archaeologically or socioeconomically speaking, in a good many decades.
Episode Context – S2E04, “Big Brother”
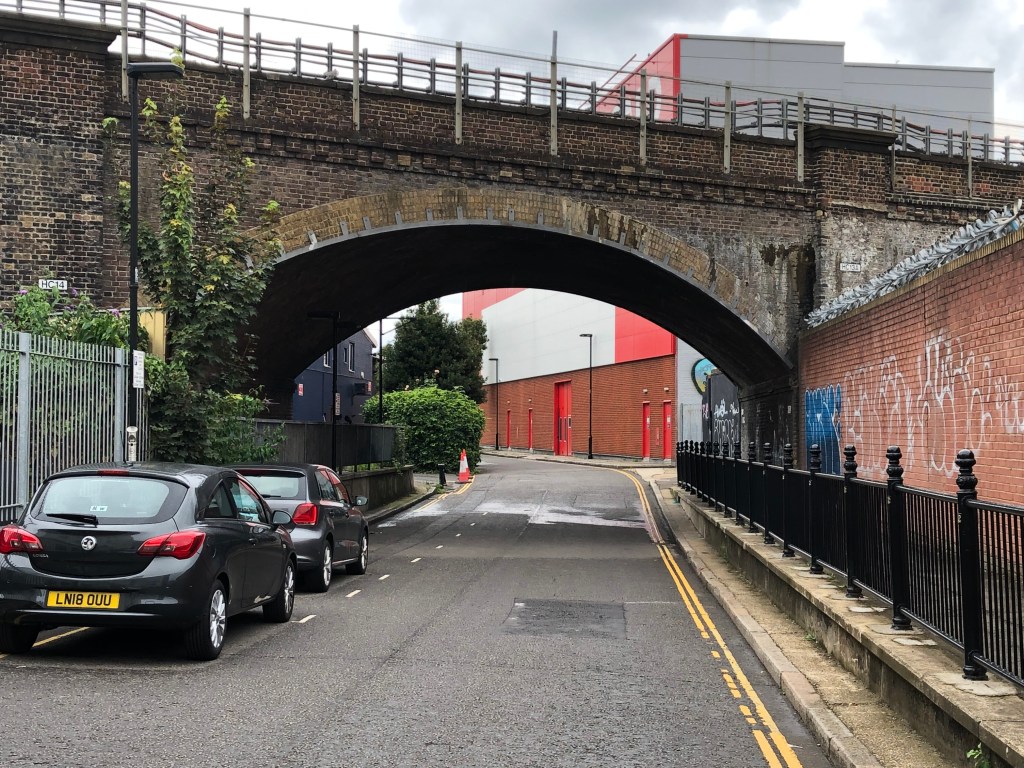
Finally, heading back towards Latimer Road to catch the tube back to Waterloo, I detoured into Bard Road for the first of two ‘pick ups’. (I daresay there will be countless times that I realise I either missed a shot from an episode I was tracing, or else that a different episode I’d not researched yet had locations right nearby that I could have visited at the same time. As said elsewhere, no matter.)
This first pick up was from where the armed gang ambush a security van; in the episode we see a shot initially from the South side of the bridge, which I’d missed:
Episode Context – S2E05, “Hit and Run”
The second pick up is an episode that we’ve only just encountered – but with a location that could also have been snagged on my previous jaunt. This time it’s on Freston Road, on which I’d already taken a number of photos; here we see the squad car stop so that Regan can use a public phone.
In the background of the shots, you can see the school building that features in a number of shots from the previous location visit. Although many of the buildings alongside where I stood to take the photos are long since torn down and replaced (or are entirely new on ground that was previously empty), looking in this direction the view has changed surprisingly little.
And with that, another Sweeney mission drew to a close! Till next time.
A blustery and somewhat wet (in fact, chucking down hailstones) afternoon in amongst bright patches on a Bank Holiday Saturday gave me my overdue next opportunity for some Sweenealogical wandering. After a bit of deliberation the previous evening, I’d chosen to begin in the shadow of the Westway, and the even darker one of Grenfell Tower, for some Season 2 action.
Thus after arriving at Waterloo, I took the Jubilee Line to Baker St followed by the Circle to Latimer Road. I chose to ‘come in from the top’ of the location set to the west of the station and work downwards, so walked North up Bramley Road and then turned into Darfield Way, weaving between the tower blocks and the Westway overpass to arrive at the end of a slight cul–de–sac and the first spot on the itinerary.
Episode Context – S2E04, “Big Brother”
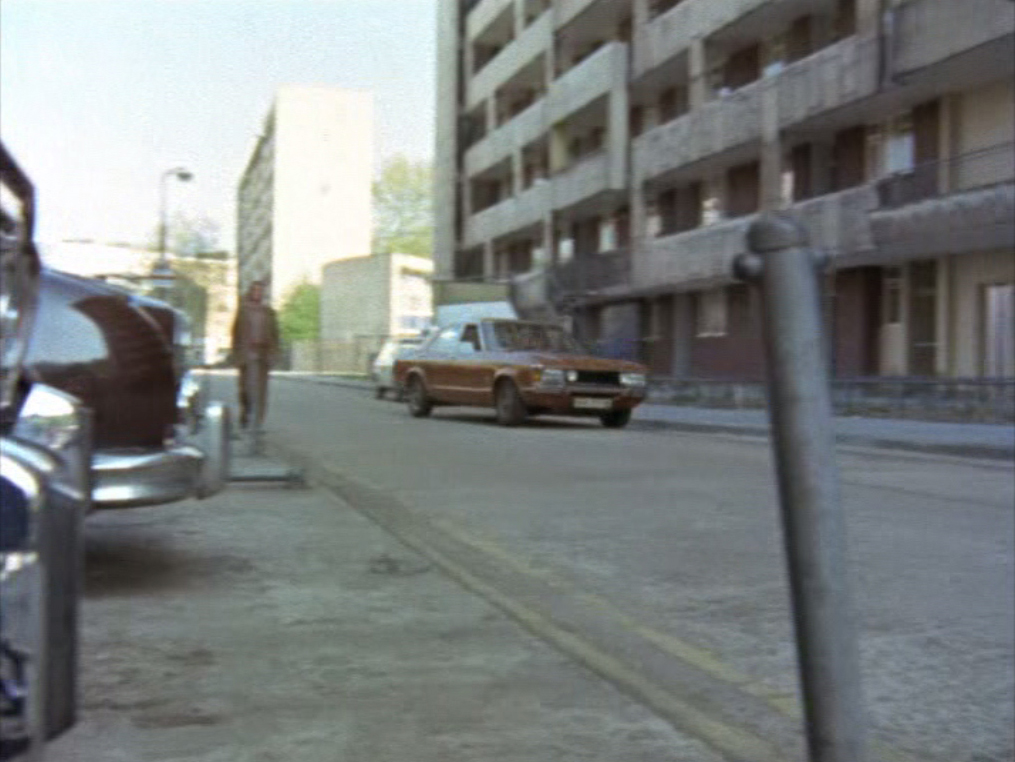
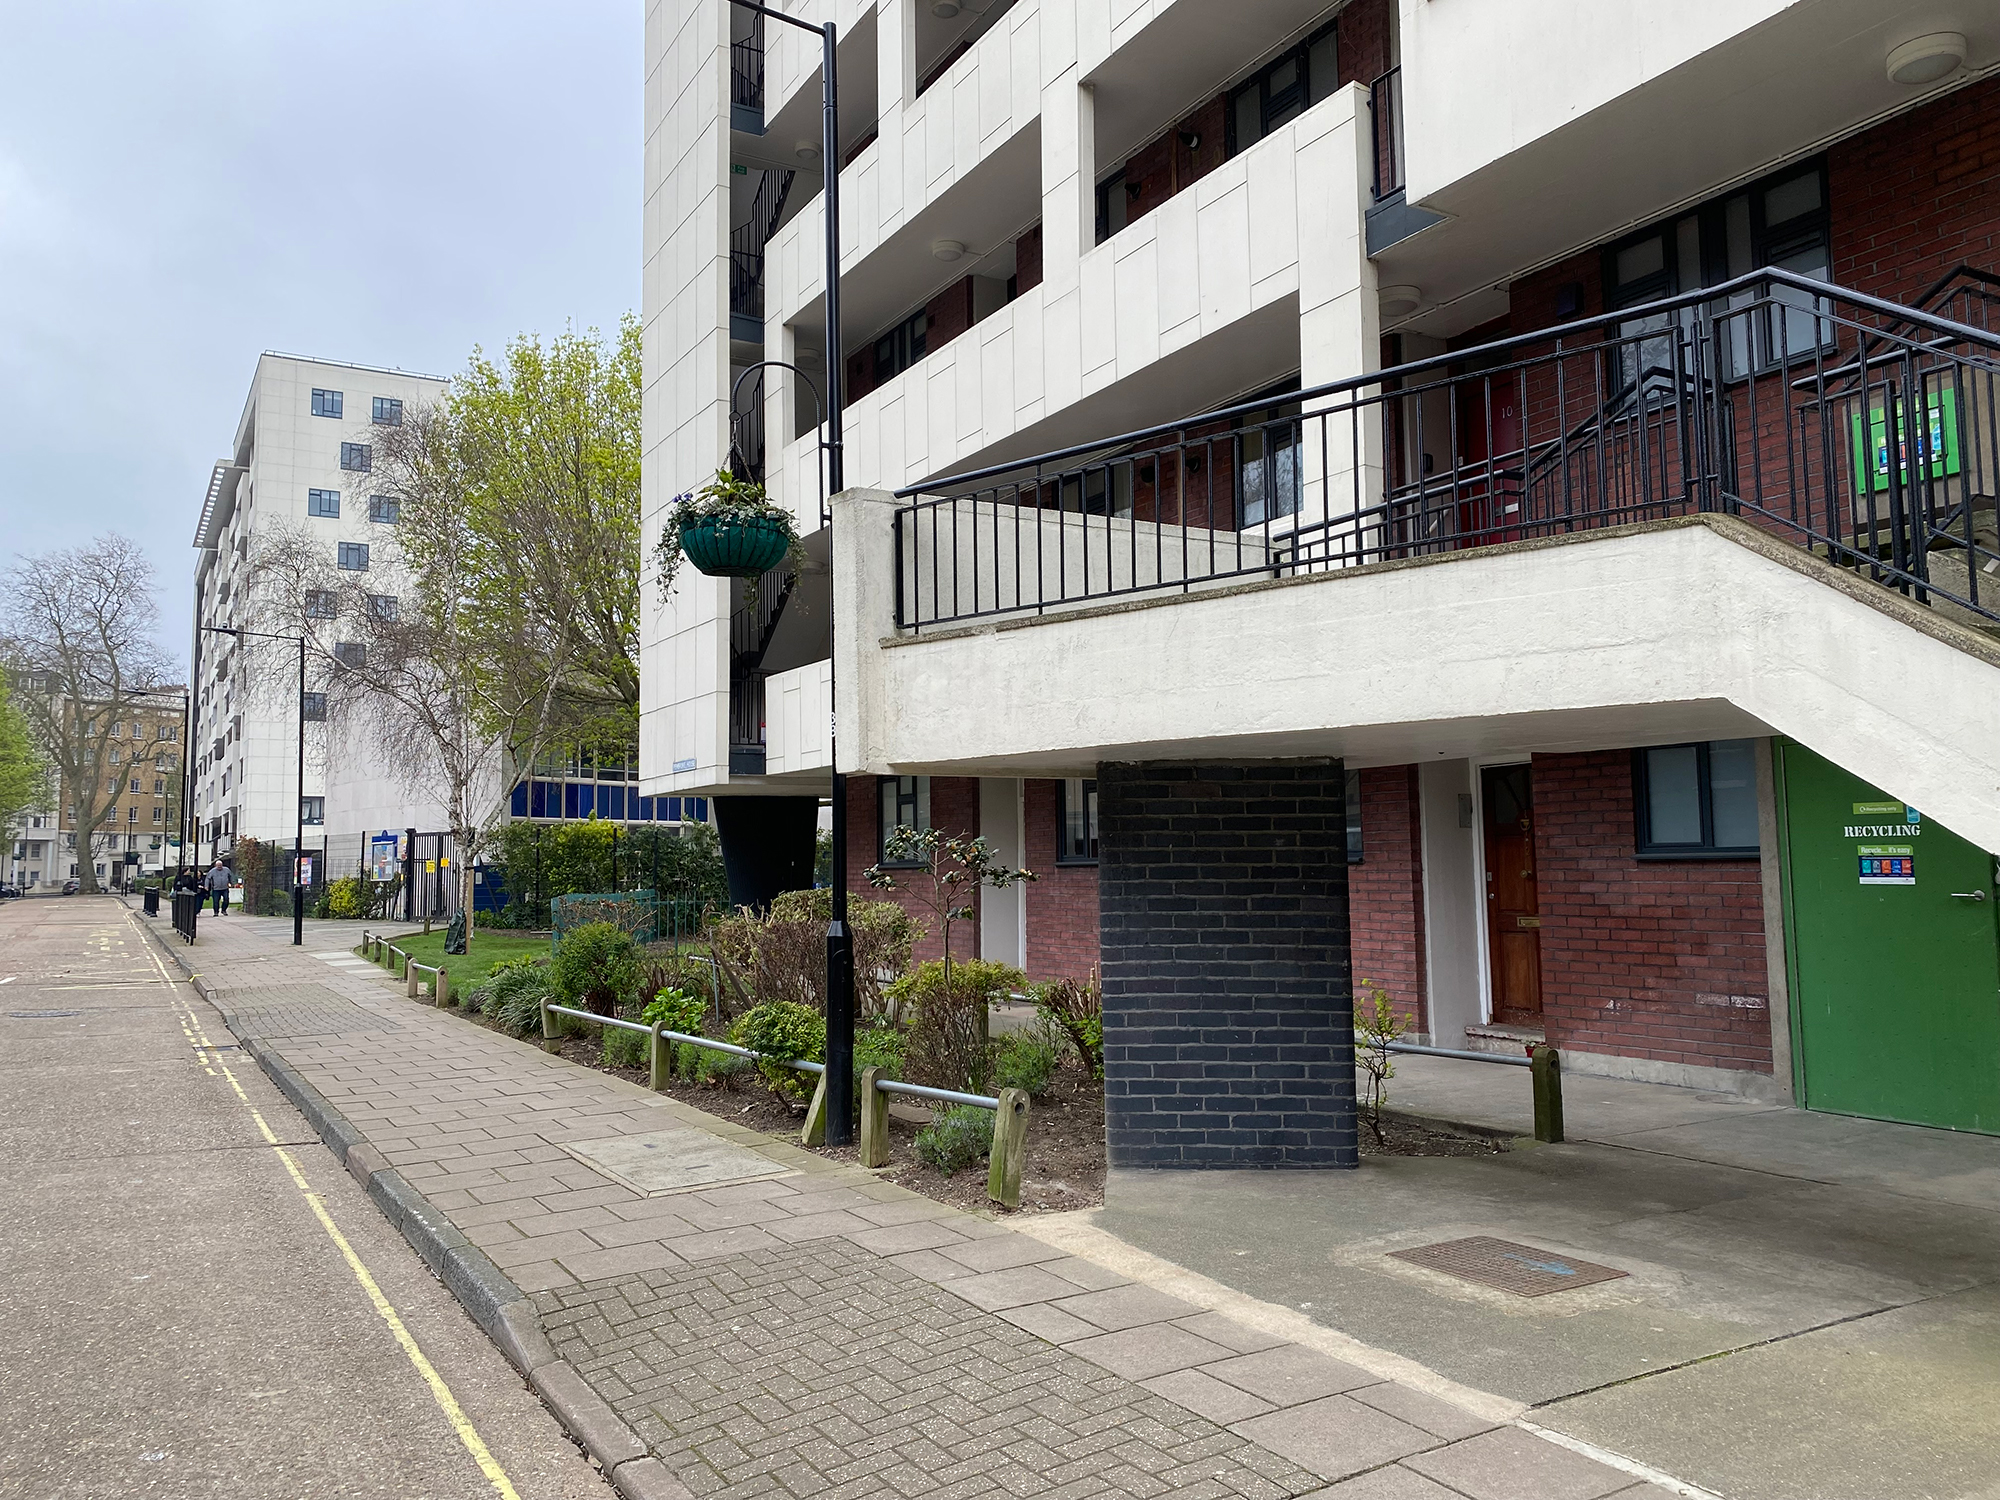
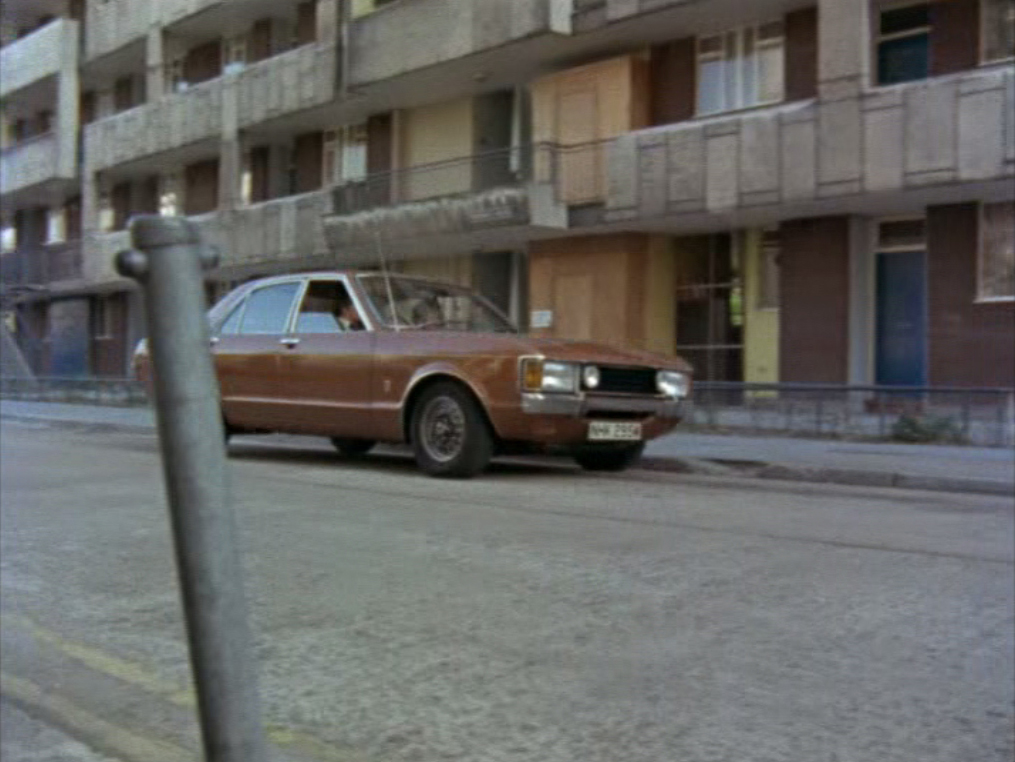
A gang of armed robbers has beaten and kidnapped a security guard during a raid; they haul him into the back of their van and tear away from the scene, whilst using bolt cutters to separate him from his briefcase. We see the getaway van in a medium shot coming round a corner in front of some low–level flats, with a tower block in the distance (1).
As you can clearly see, during the 70s this was filmed from an area of muddy, derelict waste ground that sits in and around where the A3220 ‘W Cross Route’ joins the Westway, and there was little to no foliage around at the time. If you look closely at the 2nd picture (taken during one of the sunnier intervals), you can see the tower block sitting behind the lower–level flats (there’s a few blocks of these, which seem to have been modelled on American motels). The buildings themselves have changed very little, compared to the surrounding area.
Turning around slightly and heading underneath the A3220 ramps (2), is where the robbers’ van did some archetypal ‘doughnutting around in the mud on waste ground’, so beloved of Sweeney car chases, before dumping the security guard out of the back. First we see a shot looking into the waste ground as the van enters:
The area between the ramps is now a given over to a mixture of leisure (football pitches and tennis courts) and various light industrial and mechanical businesses, as well – as you can see – one of the plethora of Grenfell memorials that proliferate in this area.
Flipping the POV, we then look outward from between the ramps as the van comes towards us:
Due to the pitches, businesses etc. (and the wall hosting the previously seen Grenfell memorial), I couldn’t get quite far enough in underneath the ramps to recreate the shot accurately; but the gist is fairly apparent. The roadways and tower blocks are the dominant features that still remain, whilst the area itself looks at least a little tidier.
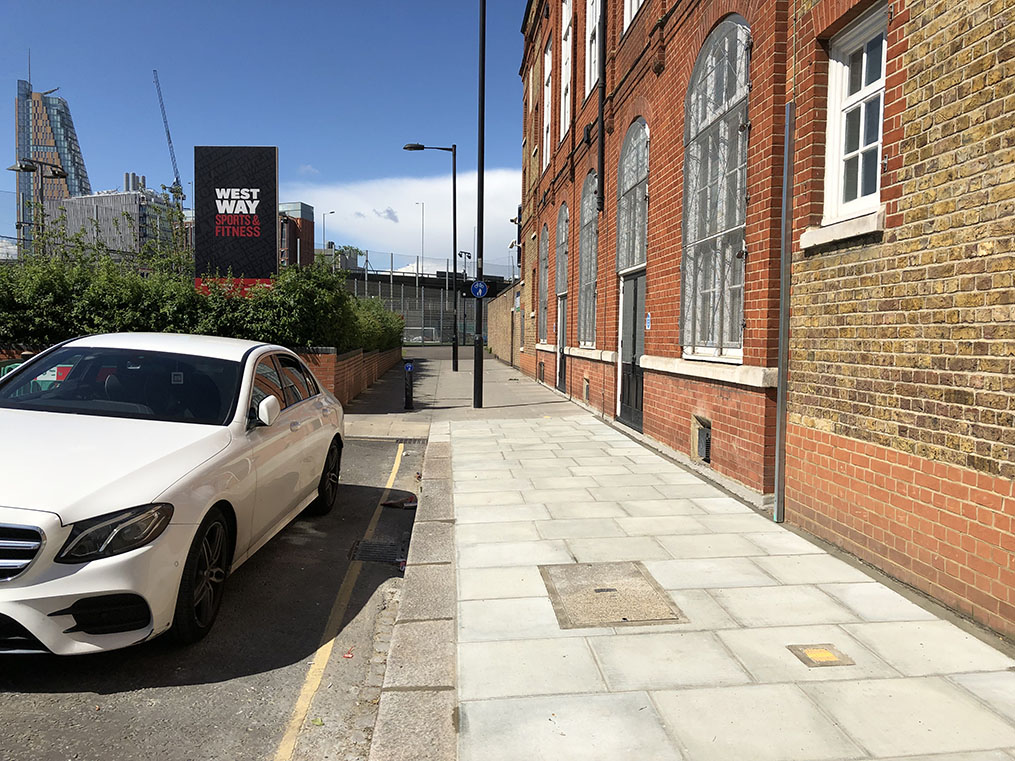
Nipping back out towards Freston Road, the next spot (3) is where, later in the episode, Regan and Carter pick up Angela, an ‘associate’ of one of the episode’s suspects (though not actually a suspect of the robbery) and bring her in for questioning. We first see them walking towards the top of Freston Road, only a short distance from where we saw the robbers’ van heading for the waste ground. (This turns out to be quite common, where several shots from an episode will all be filmed in a small area but from different directions, angles, “just round the corner” etc. to make them look like different places. A natural economy of filming, as it means you don’t have to up the entire cast and crew and relocate them quite so often and thus cost your production more time and money.)
Again, I couldn’t get quite far back enough to frame the shot more as in the original (tennis court in the way) but the general view is the same. The tower hasn’t changed, though I believe the wall in front has been rebuilt. There’s a new garage block or something at the left of the wall nowadays, and the general impression as with most areas of London is that there is ‘more stuff’ around, even where the older elements still persist.
We track Jack, George and Angela along the wall, past a school on their left (on the right of these pictures):
Clearly the school building is little changed, just perhaps ‘cleaned up’ a bit. Finally, they get into the trusty Ford Consul that is parked at the end of Freston Road:
(Alas I only got a boring Merc.) It looks as if nowadays the road ends slightly sooner, with the raised planter type affair blocking the way; in the 70s shot, the car is parked further ‘into’ the 2nd picture, near the lower wall you can see in the middle distance that provides access to the school grounds.
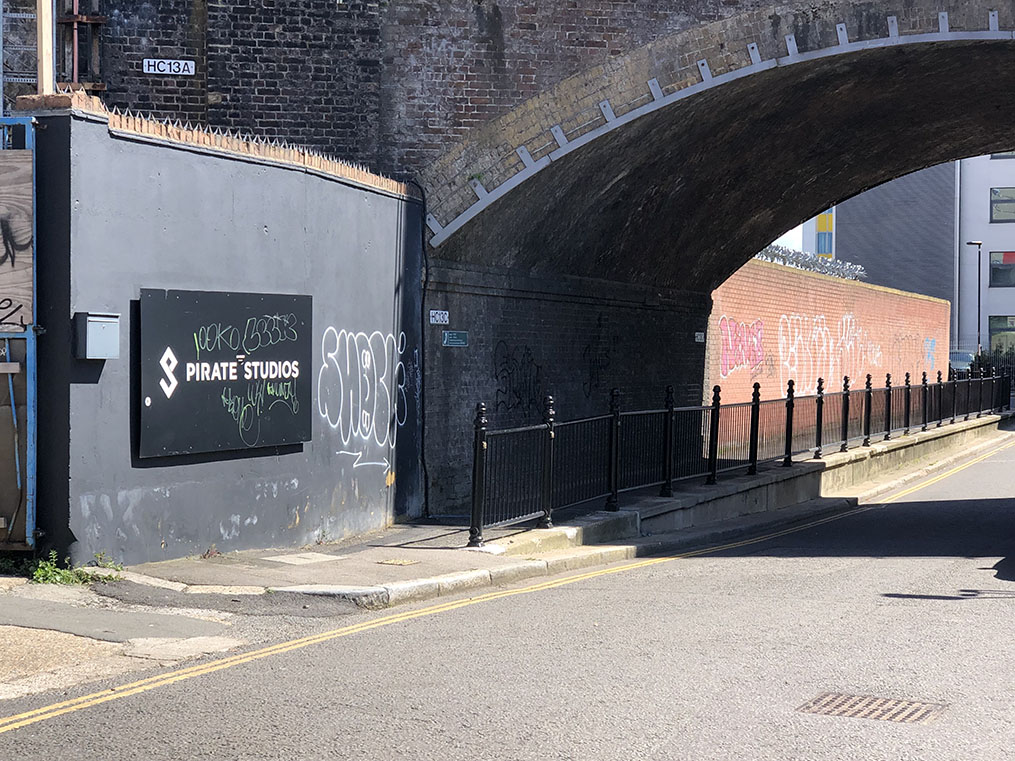
After this, they drive away down Freston Road:
Two obvious features still exist today, namely the railway bridge and the building behind it. You can see though how much new building has taken place along the road in the intervening years, and it all now feels a lot more ‘closed in’.
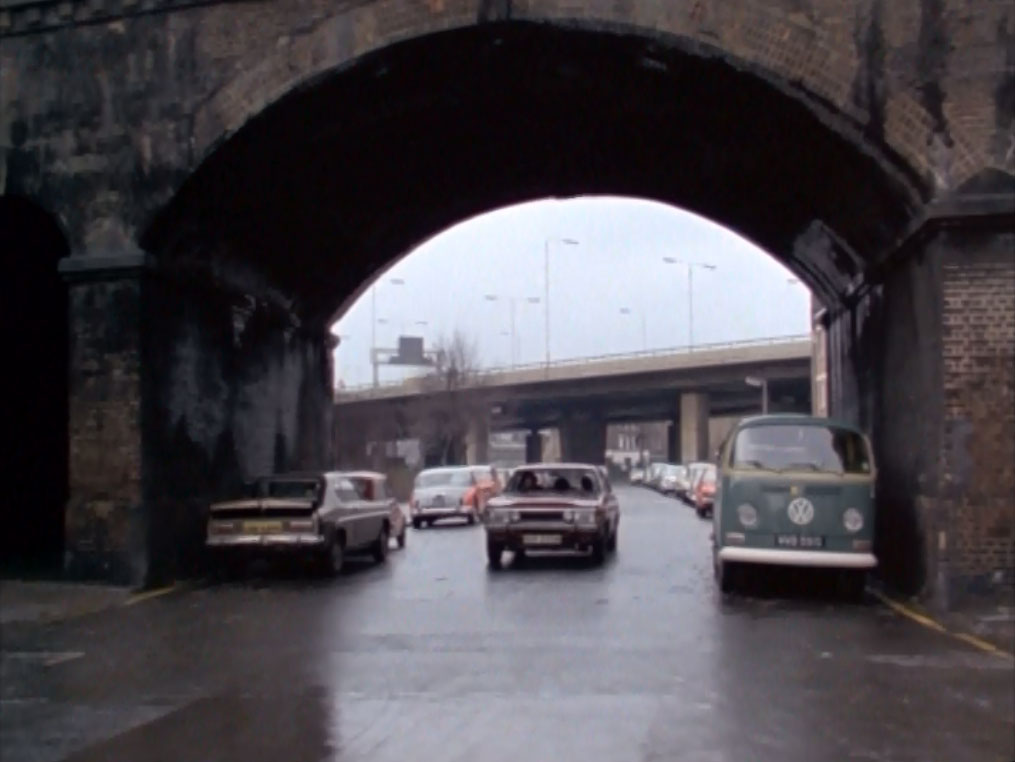
Walking SE (in the direction of Consul travel) back down Freston Road, we can pick up another shot from earlier in the episode (4), this time looking NW back up the road from the other side of the bridge. This was used for a medium to long range view of the armed gang (the two principals of which were named Lee and Deacon) escaping the scene in their blue van:
The episode shot was obviously taken from a slightly higher vantage point than “person on foot with phone”, and so affords a greater view of some of the buildings that were the other side of the bridge at the time. One or two of them are still just recognisable from their features in the right-hand shot; as with much of the area though, you can see that the majority of the buildings along the road are either new or have been rebuilt.
Working backwards in the episode’s timeline, we can wander round the corner from here into Bard Road (5) where the ambush on the security guards took place. On the left here, the van is approaching the ambush site:
The railings have obviously been replaced, and there are now new buildings in the background. Along the side of the road there are now a lot more industrial units, studios etc. where previously there were either empty lots or different buildings. Walking back under the railway to the corner of Bard Road, towards where it turns into Freston Road, we see a POV shot as the gang is escaping:
This gives a clearer view of how many new buildings are now in the area; the higher wall has been built on the left, and you can no longer see the tower block in the middle distance.
From here, it was a little walk back up past Latimer Road station, and slightly to the North East (even closer to the looming reminder of Grenfell Tower) where, in amidst trying to shelter as best I could from a hailstorm, I collected two shots the location for which were pinned down via some painstaking Google Map pondering. As with several we’ve encountered already, this is a case of two scenes from separate parts of the episode being filmed in the same location. They’re on Kingsdown Close at yet another railway bridge, with the Westway lurking in the background. Firstly we see Regan and Carter in the Ford, as they are bringing Angela back to the factory for questioning; later on, we see them chasing Linbert Rea, the previously mentioned ‘associate’ of Angela’s, and whom it turns out was actually responsible for the beating imparted on Andy Deacon that initially, Deacon’s older brother suspects Regan of having dished out whilst Andy was in custody.
The railway bridge is obviously unchanged; and in the top-left shot of the episode with the Consul headed towards us, you can clearly see the Westway behind the bridge. (To find the location I shifted the Google Map around till I could find somewhere with a bridge through which you ought to be able to see the Westway close behind, and then went into Streetview to confirm.) The bottom-left picture had me confused for a while; there’s an almost identical bridge on Silchester Road, a longer residential street, and I thought it might have been taken there. However, if you zoom the shot in a bit, you can actually see the Westway through the bridge as in the other two; this is more or less the only railway bridge in the area where that would be the case, hence I’m fairly certain the two shots were just taken at two points on the same road. Here again, the road and rail architecture is more or less unchanged, whilst the majority of the residential buildings have long since been demolished and new ones built in their place.
With that, I was done with ‘Big Brother’ for the time being; heading up under the Westway and a short distance East, we come across a location from the previous episode in Season 2.
Episode Context – S2E03, “Supersnout”
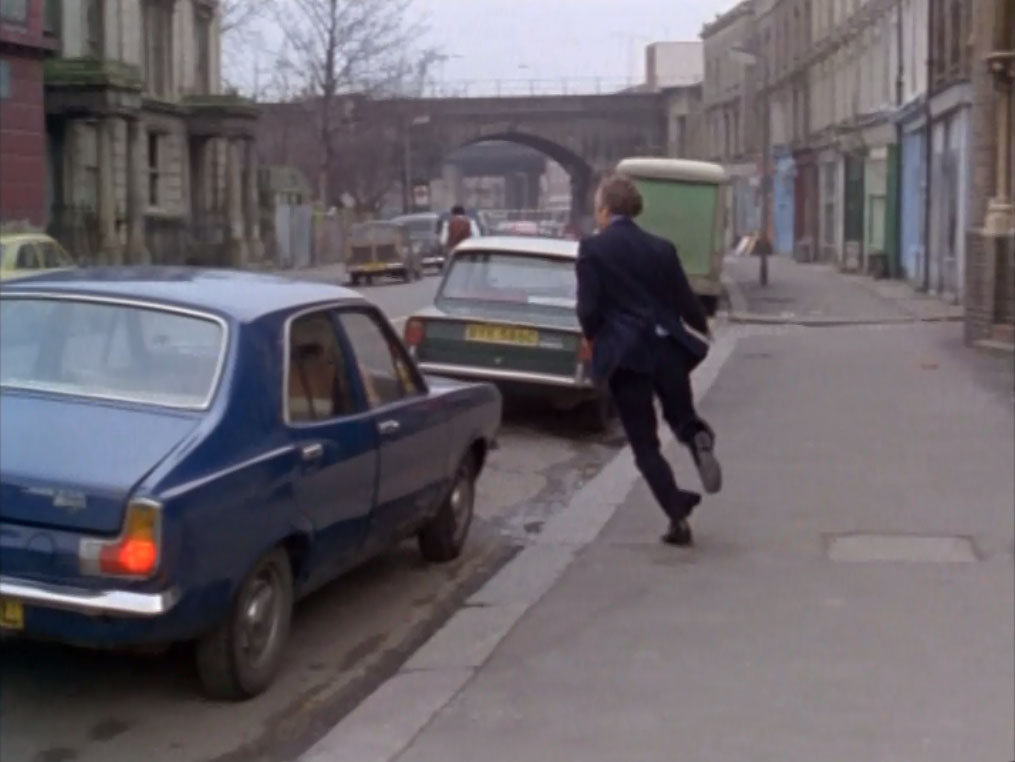
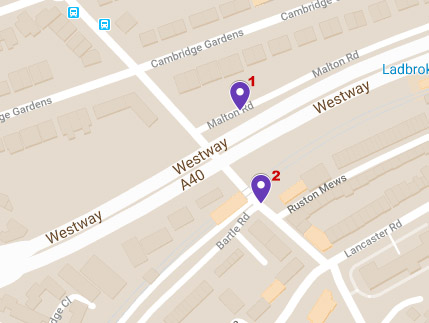
With DCI Haskins away at a conference in Toronto, The Squad is temporarily under the command of Quirk, a blustering ex-military type who seems obsessed with capturing a mythical “Post Office Gang”. The episode contains many references to ‘Moby Dick’, and it is Quirk’s “Great White Whale”, Yanos, for whom Regan and his team are instructed to go full-steam-ahead. We see them set off on this pursuit from Malton Road (1), right under the Northern edge of the Westway:
Not much has changed here, obviously, besides the style of the cars and a little growth in foliage. (Oh, and the fact that I was unable to get a rag n bone horse to wander into my shot for me on this particular Saturday afternoon.)
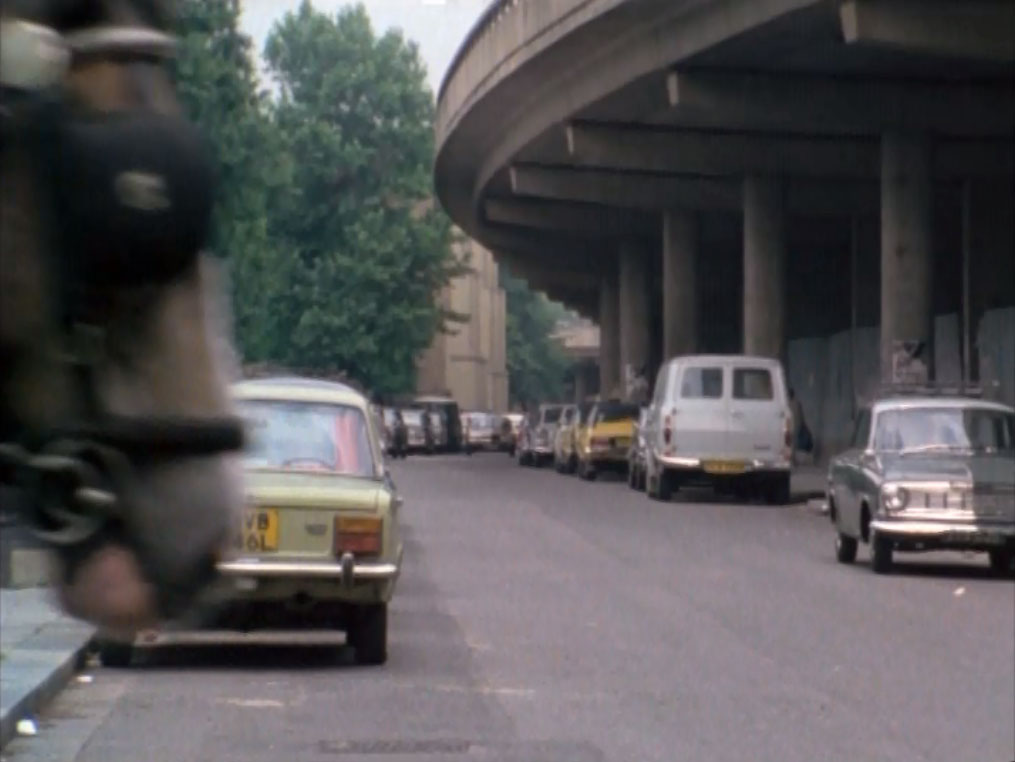
As we look ‘into’ the shot above, the squad car comes towards us and turns left (our right) down St. Marks Road, under the Westway and the railway (2):
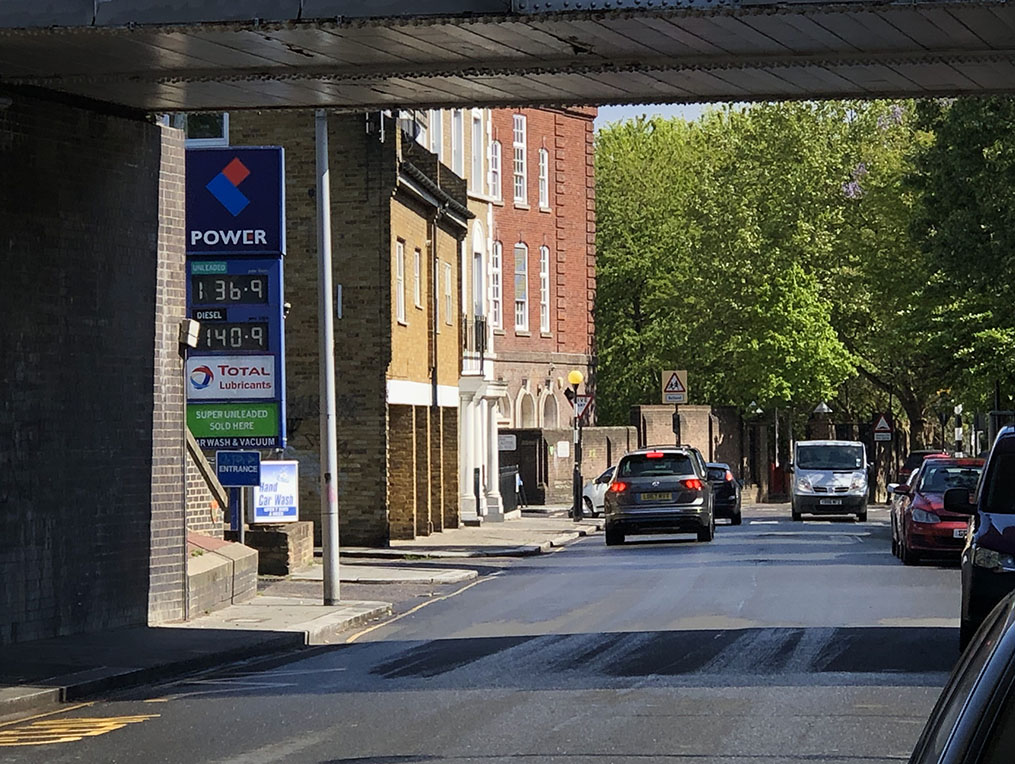
Quite unexpectedly, for current times, the petrol station is still there on the left – though no longer a Shell; the buildings beyond on the left, and then the low brick wall are still there also and unchanged (though, in a far less unexpected turn of events, have been cleansed of the ubiquitous 70s grime present on the episode shot). The increase in tree cover prevents us seeing much beyond this now, although the buildings further down the road are also mostly still there.
From these two shots – both of which were also ‘Google scouted’ by looking on the map for anywhere that could match up to what I’d seen on screen – we about-turn and head up along Portabello Road, through the bustling market and street food stalls – and back one more episode – for the last few locations of the day.
Episode Context – S2E02, “Faces”
Tober and ‘Evil Wille’, two members of a gang with… ‘questionable’ political views, run their operation from out of Tober’s junk shop on Goldborne Road. Carter breaks in to try and scope them out, but is nearly caught in the act and has to scarper out the back extremely quickly. (Tober’s gang have enough at stake that they wouldn’t think twice about eliminating anyone who was a threat, police or otherwise). Having walked East from Portobello Market along Raddington Road, turning left into Blagrove Road we shortly come across the first of this excursion’s locations from this episode, the former ‘Bevington Arms’ pub from which we see Tober and Willie returning one evening (1):
Predictably, it’s no longer a pub and instead is a private dwelling; the architecture however, apart from the expected spit-shine, is as can be seen more or less unchanged. The narrow strip of open land between the pub and the next row of houses is still there, now sporting a lump of topiary; almost a surprise these days to see a postage stamp of London earth that hasn’t been sold off and built on.
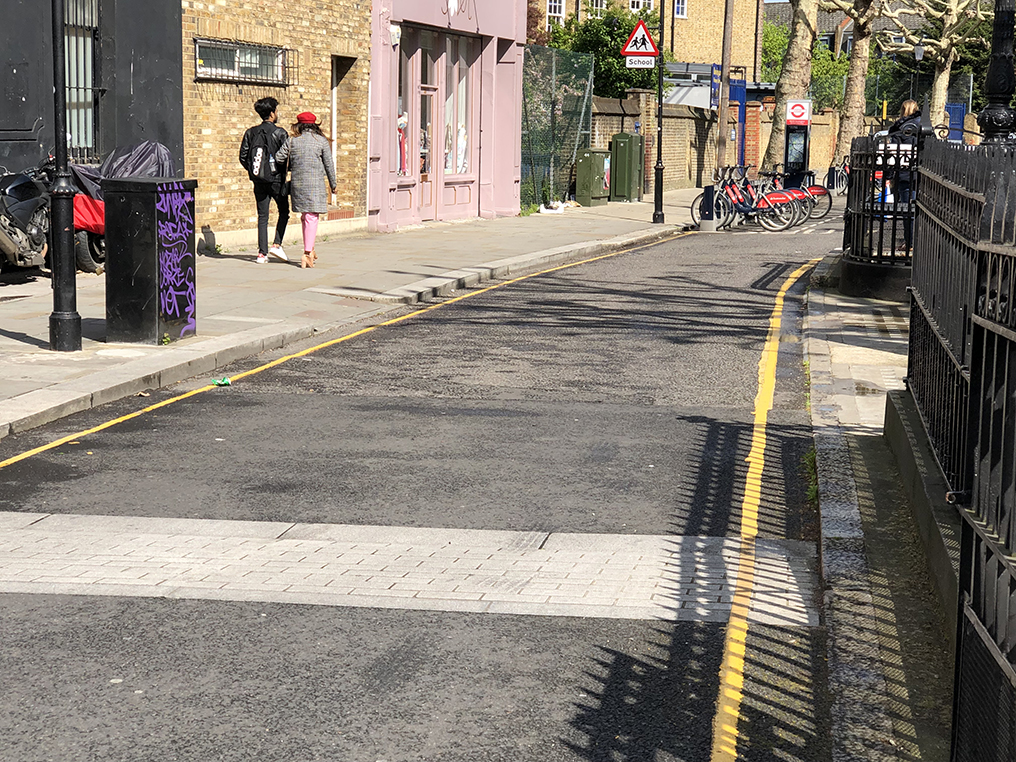
Further up the same road – though it now becomes Bevington Road – we come across another surviving anachronism of old London, an underground public lavatory (2). This is where Carter dashes into to hide, having been rousted from the junk shop by Tober. We see George running up Bevington Road towards us, having come out the back of the shop:
The railings have been given a new coat of paint or two in the intervening years, but besides that I doubt if it has changed much. You don’t see inside the toilets during the episode; having availed myself of the facilities, I doubt you’d get much more than a person with a small handheld camera in there anyway, and would certainly struggle with any lighting or sound gear. (Nice to see a public loo that’s free, though.) Behind George’s head, you can see Bevington Primary School – which, per usual ‘brickwork cleaned up’ – you can see in the modern-day shot looking otherwise much the same. Most of the other buildings are still the same as well, with just cosmetic face lifts.
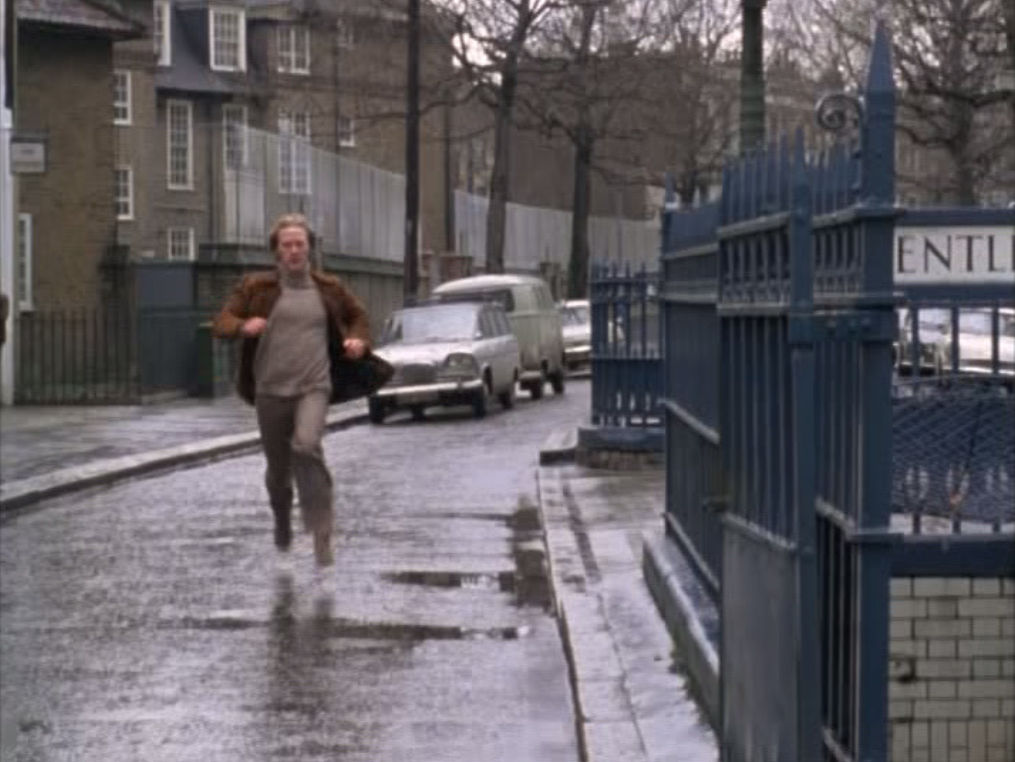
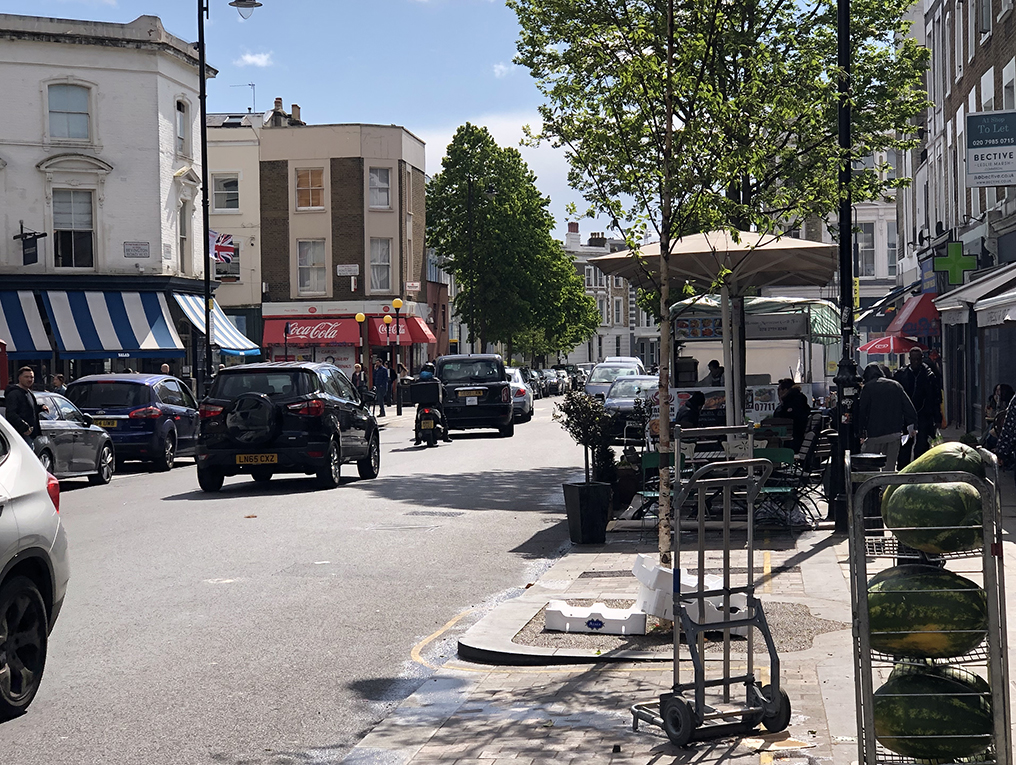
Finally for this visit, just around the corner in Goldborne Road (3) we come to the location of the junk shop. We see both sides of the street, as Tober pauses across from the shop (on the North side of the road) to make sure the coast is clear before entering:
Whilst the markets and shops along here are clearly a bit more up-market these days, the buildings themselves are no different, as you can see when matching them up; for example the building ‘on’ Tober’s left shoulder is the one now sporting a Coca Cola awning.
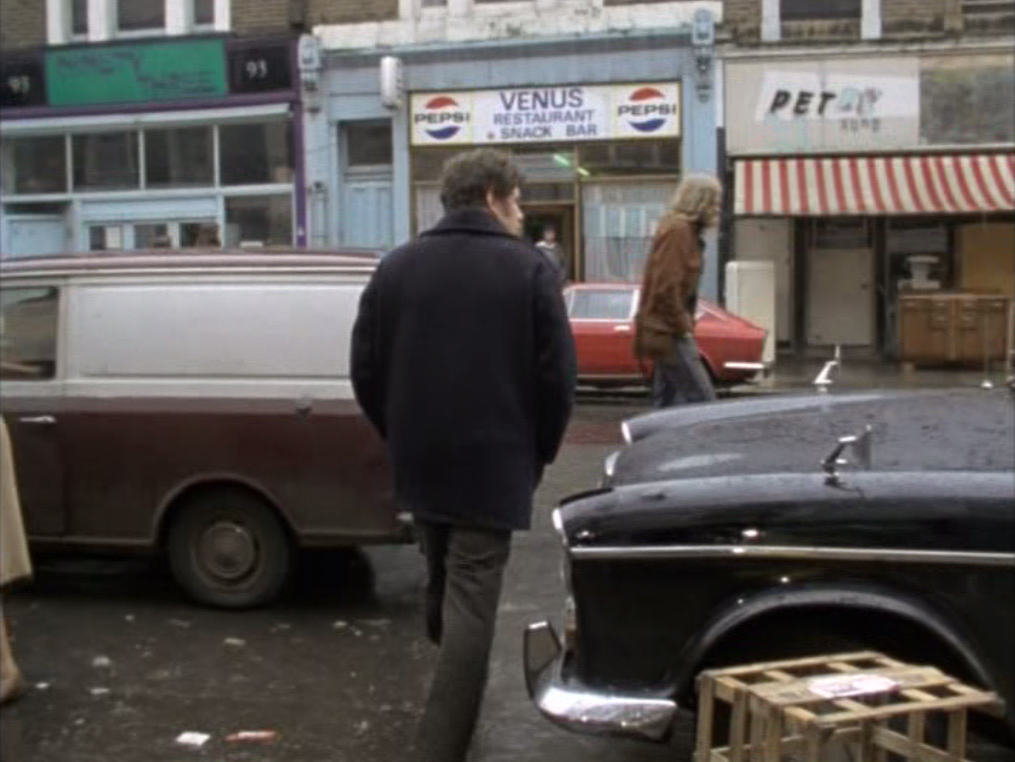
Once Tober has satisfied himself that nobody is following, he turns and crosses the road into the shop:
On the 70s picture, the shop is the one to the far right (‘Pet’); unfortunately it was too hidden by a parked van for me to want to include in the frame. The left-hand shop (’91’ – you can’t really make out what it is in the episode shot) is now ‘Zayane’, a mediterranean’ restaurant, whilst the rather excellent looking ‘Venus Restaurant Snack Bar’ is now the far less appealing ‘Snaps + Rye’, a ‘modern Nordic restaurant’. (Yeah, I’m sure it’s lovely; but it’s just so… very. I’d be far more excited to find a proper old greasy spoon these days.)
And with that, it was time to head back to Waterloo and rejoin the family!
A Saturday afternoon Mummy and Daughter trip into London to see friends afforded me the opportunity for my first Sweenealogical outing of the new year; I could travel in on an earlier train than them to maximise what, on a grey and gloomy January day, passed for ‘daylight’, and then meet them later for the train home again. Given the run of several hours at my disposal, I was almost paralysed by choice as to where to head for; in the end, I opted for Peckham on the basis that i) the locations I had so far identified are from the very first episode of S1 – and so why not go for it on chronological grounds, and ii) I felt it was at least a bit less likely to be an area I needed to go back to in future. (I have a notion of some dialogue in one of the later series – Jack saying to George, “the Rye is your manor”, and telling him to go and scout for information – so it’s possible I may be heading back there at some point; however, it is definitely less frequently featured than places like Hammersmith, Shepherds Bush etc. which crop up multiple times.)
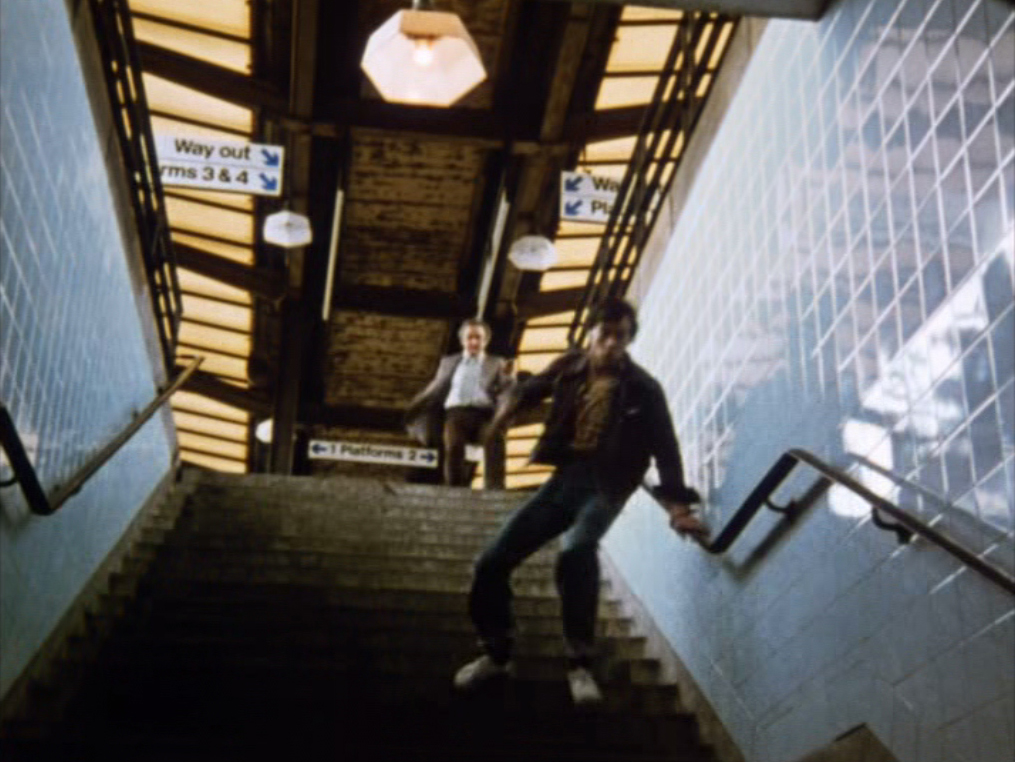
So, Travelcard in hand I got the train to Clapham Junction, and from there to Peckham Rye. As the train rolled in, the landscape already looked pretty familiar; I could see down to the street where one of the shots must have been filmed from, and into the ‘arches’ that served as the location of Billy and Stupid’s lock up. Alighting from the train and heading down to the exit immediately ticked off one shot location: the stairs (1) down which Regan chases Billy Martin after he’s fled the lock up:
The platform signs have obviously changed, and there are some new yellow banisters; from here it looks as though the skylights on the platform roof may have been given a makeover as well. The tiles on the stairwell still look pretty similar – though it’s a little tricky to tell if they were actually blue in the 70s, or just appear that way due to the lighting. (I’m leaning towards the former.)
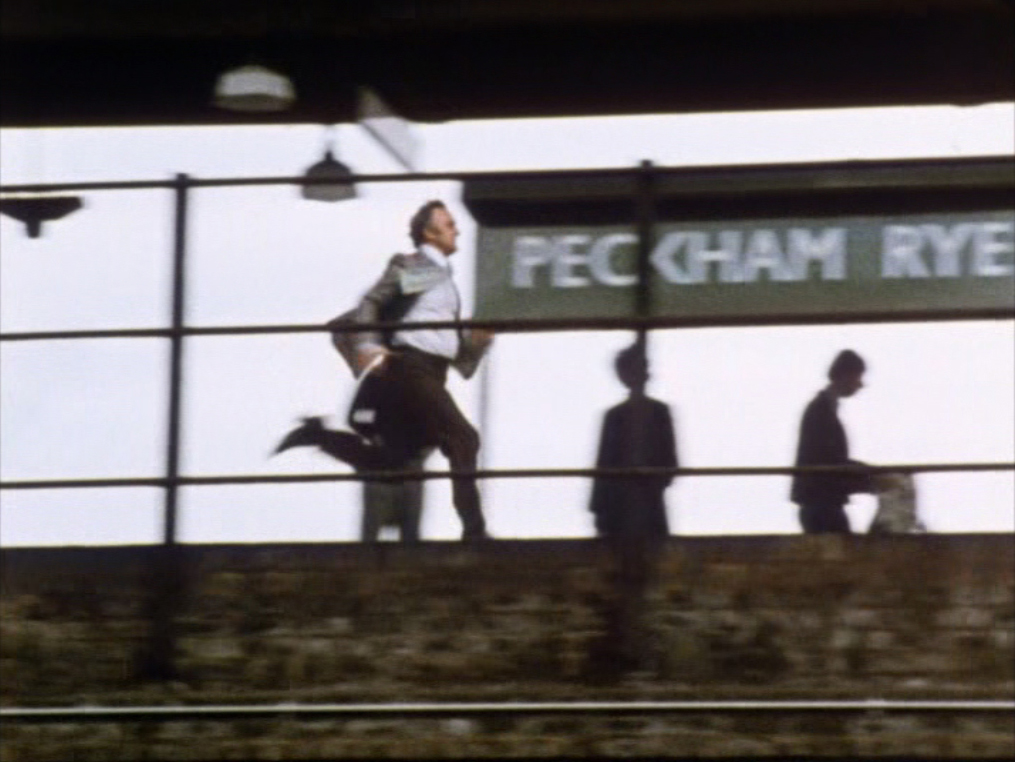
Exiting the station via the main (well, only) exit, you quickly have 2 more shot locations from the chase scene. Turning around and looking back at the station front (2) you get a view of one of my favourite bits of 70s grime – one that always captured the imagination, as it nestled in between alleyways and the divided tracks:
It’s clear that the brickwork has been cleaned up a fair bit since the 70s (it reminds me of the similar job they did on the Natural History Museum); there was some sort of external staircase originally as well, now obviously removed. Additionally, the wall on the right has new windows / doors that weren’t there in the days that Billy was tearing past; the whole place does however still retain a good deal of its original feel.
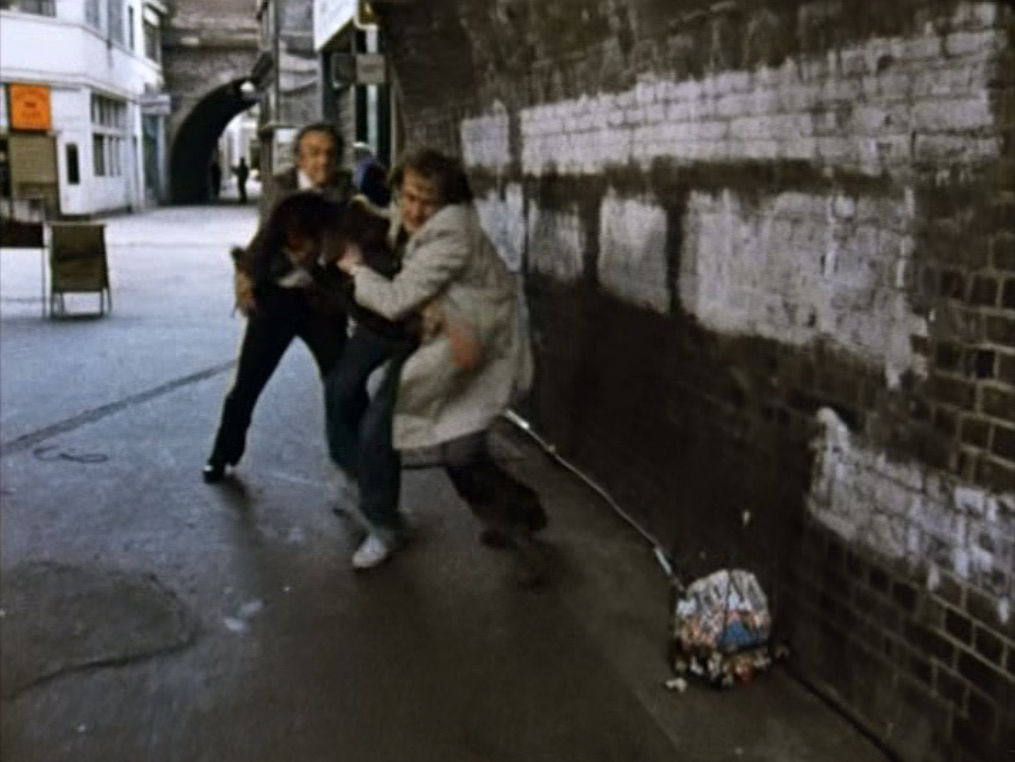
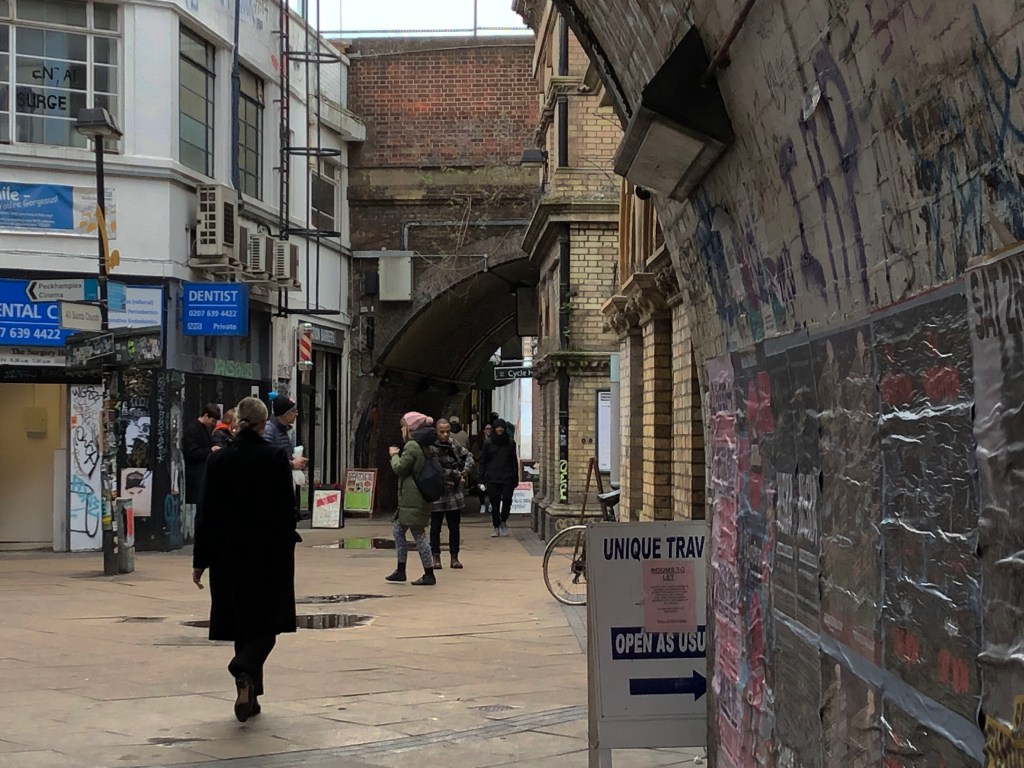
Just to the right of the shots above (i.e. in the direction that Billy is running), we get to where Regan and Carter finally catch up and collar him (3):
The floor has evidently been repaved – but on the whole, this area doesn’t really look or feel an awful lot more salubrious over 40 years later, despite Peckham’s gradual succumbing to the hipster tide.
Walking ‘into’ the shot above, and under the railway arch you can see ahead, turning right along the road then affords you the view of the station from the street that I mentioned previously; this is where in long shot we see Regan chasing Billy along the platform:
(I’ve mentioned before the difference in perspective between a TV film camera & my phone; the view is pretty much the same though, different signage apart.) From this angle, I might reconsider my assessment that the platform skylights had been replaced or cleaned up; it may have just been backlighting causing me to think that, as from here they looked just as yellow and opaque as in the 70s stairwell view.
The long shot of the platform was taken from down on Blenheim Grove, that runs along the south side of the station platforms; this is also where the railway arch units (4) are found, that provided the location for Billy & Stupid’s lock up. Unfortunately, however the exact arch (226) was in an area now privately owned by Network Rail & was thus unreachable; the best I could do was photograph the entrance:
(Of course, the ‘Arch 226’ on the sign doesn’t necessarily mean that’s where the shot was taken, as I’m guessing the sign was one made for the production; however, there seems no real reason to suppose that they’d wouldn’t have made the sign correspond to the unit in which they were filming.)
With that, I was done with the area immediately in and around Peckham Rye station; from there, it was a 5 minute or so walk to the next location at Bushey Hill Road. Well, it would have been about 5 minutes – had I not encountered a Brew By Numbers (BBNO) tap room in a railway arch just off the end of the station. It seemed rude not to drop in and have a quick beer, so that’s what did before carrying on my walk. Walking down Lyndhurst Grove towards Bushey Hill Road is where we first see Billy and Stupid out on the lookout for a car to steal:
This still looks largely unchanged; even the wooden fence doesn’t look much different. I daresay the house prices have gone up, though. The pair turn into Bushey Hill Road, which is where they steal Regan’s girlfriend’s Mini whilst he’s in a phone box across the road:
The road sign has been moved off the fence and onto a piece of ‘street furniture’ a little to the right, but otherwise again it looks remarkably unchanged. The phone box across the road is now a post box, however.
From here, it was a walk of a good 20 minutes or so to get to the penultimate set of Episode 1 locations in the area, a little to the north east and over the other side of Peckham High Street. These next locations were mostly residential back streets, where The Squad pull an ambush on the armed gang who are in turn attempting to ambush a police van to spring a prisoner being transferred. On the way, I passed another institution of old London, a branch of Manze’s Eel and Pie shop. I was unable to pass it by on the return walk. However, before pie & mash was on the table, a quick circuit of the back streets netted 3 shot locations. Firstly, where the robbers turn out of Pennelthorne Road into Fenham Road (1) to tail the police van:
Through the driver’s side window of the robbers’ van, it looks like there’s a low wall that isn’t there any more (the wall that is around that last house is now only about shin-height); the houses across the other side of Fenham road meanwhile, look virtually unchanged. There may have been the odd slightly different coloured coat of paint here and there, but that’s about all in the intervening 44 years.
The van turns left into Fenham Road and then immediately crosses Friary Road, which we see from the driver’s POV:
Predictably, the little yellow corner shop is now a private residence, and there’s been a coat of white paint applied to that and the building further down from it; right at the end of the street in the distance, you can see there’s a new set of flats across the end of Fenham Road. The houses in between, and the wall on the right belonging to a primary school all remain intact.
At the end of the street (in front of where the new flats are) the vans turn left again, into Furley Road (2). We see a shot of them coming towards us down Furley Road:
The trees have obviously grown a bit, but from this view little else has changed. Finally, at the end of Furley Road (3) the ambushes take place – robbers on prisoner van, Sweeney on the robbers:
The corrugated metal fencing in the 70s shot is around a vacant lot (ah, that lovely ubiquitous ‘waste ground’) that has now been built upon; the block at the end of the street in the centre of the photo has had some cosmetic procedures performed on the stairwell area by the looks of things. But beyond that, again the rest of the scene looks pretty much unchanged. Peckham may be slowly hipsterising, but there’s still a fair chunk of the old residential neighbourhood still standing.
With that, I was done in Peckham for the day; there was just one more visit to make for this trip – but first, as I mentioned previously, I just couldn’t walk past Manze’s a second time without being drawn in for some proper old school London grub. There are some things about old London that you don’t miss when they change or disappear; Manze’s with its green and white tiling and piles of liquor poured all over your pie and mash would not be one of them. I know the photo has nothing really to do with The Sweeney – but I can’t resist putting it here anyway.
Suitably sustained by that late lunch, I headed back to Peckham Rye Station and caught the train to East Dulwich for my last location of the day, Dulwich Hamlets FC. In the episode, Regan and Carter meet Bernard Driscoll here to obtain some information – Driscoll is sat on the old terracing whilst his dog exercises across the pitch. Back in those days, it looks as though the ground must have been one of those which you could just wander into at will; nowadays, not so – as it’s all fenced and walled off, and the only way in would be to buy a match ticket when there’s a game on.
Well, as it happened on this particular Saturday – the Hamlet were evidently at home to Chelmsford at 3PM, and as I got off the train there was a steady stream of people making their way to the ground. I debated for a while whether I wanted to pay £12 to get in just to take one more location photo full of football supporters – before deciding that yes, of course I did and joining the queue. I stayed up until half-time, at which point it was 1-1 (Chelmsford taking the lead in the first couple of minutes, Dulwich equalising about 5 minutes later) – I gather it ended up 3-1 to the visitors. It was quite an enjoyable end to the location visiting; here’s the then-and-now from the ground:
There’s a bit more of a modern stand along the far touchline now (and a Sainsbury’s behind it), and the old mud-and-sleepers terracing is long gone; I suppose it’s progress – but I think I preferred it as it was in the old days.
And with that, another Sweenealogy session was in the books. Until next time – shut it!
Having got off and running quite recently with the lunchtime trip out from work, I thought it would be good to try and keep up the momentum and not – as is far too often the case – start a project only for it quickly to fade. Thus, J going into London on the train to see some friends gave me the perfect opportunity to hit some spots close to Waterloo Station. Tag along on the train as company / daughter-wrangling assistance, head off to visit locations whilst they go off to meet people, all reconvene at the station later on for the journey home. Everyone’s a winner.
None of the locations lined up for this visit required any internet research, IMDB etc. to sort out; as soon as they appeared on screen, I could pinpoint them immediately through having been past each one countless times over the years – walking to and back from gigs at The Marquee or The Astoria back in the day, or just wandering around that part of London for any other number of reasons. I could see in my mind’s eye how they used to look – I remember many of them still being as they were in the episodes – and how they’ve since changed.
Episode Context – South Bank – S1E08, “Cover Story”
Whilst investigating a case, Regan becomes romantically involved with a reporter called Sandy Williams; but it’s not clear whether she herself is involved with the criminal gang in question. Torn between emotion and duty, he and Carter follow her when she goes out to meet a contact.
George and Jack – in the trusty brown Ford Consul – follow Sandy to Waterloo Station, both of them coming under the railway bridge on Belvedere Road and turning into Concert Hall Approach (1).
The brickwork etc. of the railway bridge structure, with its twin road and pedestrian tunnels, is still pretty much identical. Note on the episode shot, the old footbridge that used to connect Waterloo Station to the South Bank via the Shell Centre is present; since demolished during the regeneration of the area, the old road and arches underneath it have all gone and a series of shops and restaurants now sit behind where that footbridge was.
On parking up, both Sandy, and then (keeping a professional tailing distance, of course) George and Jack, go up the steps that used to lead from Concert Hall approach to the South Bank Centre via another walkway (2):
As you can see, the paving slabs have been replaced by a tarmac type surface, and the road has been cut in a bit to give buses an area to stop and wait. The main building on the left (part of “The Whitehouse”) is still largely unchanged; however the staircase and walkway are now gone, replaced by an ornamental garden. In the background – though the difference in perspective and focal distances of the TV cameras and my phone respectively don’t make it so obvious – some of the same buildings can still be seen. The biggest change is just “up and to the left” – where the IMAX cinema now stands.
Next up, we have one of those little shifts you often get in TV and film, where the route someone is seen taking would not lead them to the next place you see – but it makes for a good sequence, so is edited to look as if it does. The Sweeney duo follow Sandy through what was the middle of The Shell Centre (3) – on the walkway that you used to be on if you came out the NW exit of Waterloo Station. This route dog-legged right after passing through The Shell Centre to take you under the railway line, on the elevated section that could be seen in sequence (1). The stairs they took in (2) actually used to go over to the South Bank via a different route. Neither still exist; as far as the one through The Shell Centre goes, that’s now the site of many boring shiny office buildings, and many more in the process of following:
Next we cut to Sandy walking across the concourse in front of the Royal Festival Hall (4); there’s a whole lot of ‘semi-permanent’ bars, pop-up tents, cafe seating etc. right in this area now, so it’s difficult to stand in the right place to get a similarly angled shot, but this is pretty close to where it would have been:
The ramp on the right of Sandy would have gone up to the old Hungerford Bridge footbridge, if I remember rightly; this was replaced as part of the Millennium redevelopment, and a twin was added on the other side of the railway bridge, around 2000 – 2002 (though they’re named the Golden Jubilee bridges). She then goes down the slope to the riverside (5); at present this is swarming with Christmas Markets and shoppers; I knew this would be the case, and part of me considered skipping the South Bank entirely until I could go there on a rainy Tuesday in February with nobody about – but in the end I decided the free couple of hours on a Sunday afternoon was too good to pass up.
Although the same cannot be said for much of this area now, thankfully this walkway is one place where the old Brutalist concrete is still present.
A longish-range shot (6) from alongside The Thames shows Jack and George stood by the Festival Hall, observing Sandy:
It was rather nice of a couple to stand in more or less the correct spot for me! As you can see, the concrete has been replaced with a more modern-looking glass and steel construction; London certainly could learn a thing or two from Montreal in this respect. Again, here the difference in perspective offered by TV and iPhone cameras means that you can’t see like-for-like in terms of things like the buildings in the background – though obviously those on the right-hand shot are pretty new.
We then switch to Regan and Carter’s POV, looking at Sandy down by the river (7):
That tree to Sandy’s left has certainly grown! This is another of those shots where part of me wants to go back when it’s grey and wet and nobody is filling the shot, to get more of the same atmosphere. Who knows; maybe I’ll do some addenda or something some day.
Finally, after discussing the situation, Jack sends George back off to ‘The Factory’; we see him walking away (8) in front of the Festival Hall:
Again, there was too much in the way to get the angle as close as I might like, but you can clearly see that the external structure, and parts of the interior, are still the same.
With this cluster of shots taken care of, it was time to head up over the bridge to the other side of The Thames, and return to our previous post’s episode – “Golden Boy”.
Carter follows informant Harry Fuller as he goes to meet robber Max Deller to warn him that The Sweeney are onto them, and gives chase to them both.
To begin with, we see George coming down the old steps leading from Hungerford Bridge (9) to the front of Embankment tube station:
As can be seen from the shot on the left, the old steps down used to make a 180-degree turn, followed by a 90-degree to take you down to street level; I remember there being a sort of bitumen-covered flat roof in the middle of the turns in the stairs, and occasionally you’d see people sleeping rough on it. The new stairs down from the replaced bridge come straight down, and the old metal railings have been replaced with yet more of that steel and glass. (It’s so beloved of ‘modern’ city designers, and yet to me it looks like a dining table we had in the 1980s.)
Outside the tube station entrance (10) he almost bumps into a woman coming in the other direction; it looks like he offers a somewhat unaccepted apology – though we’re in long-shot and don’t hear any dialogue:
Not a massive amount has changed in the station entrance itself; the steps and flooring have been relaid, and there are more modern information boards now, but that’s about it. After this, we cut to the other side of the station (11) to see George exiting; these shots would have been taken from up on the walkway that continues on from Hungerford Bridge to Charing Cross:
Again, there’s very little change in the station frontage itself; I daresay any fruit and veg sold outside these days would cost you a bit more, though.
After this we have an excellent chase sequence through the streets around Embankment up towards The Strand; it’s another one where – unless we’re meant to think that the cons really were running round in circles, it’s cut in a route that would seem ‘illogical’ to us, as George actually chases them back towards Embankment Station where he’s just come from. There’s a road I couldn’t quite identify well enough to include, so the next location we see (12) is George coming through the gates at the bottom of Buckingham Street, and into the passageway at the bottom of Victoria Embankment Gardens:
From the looks of things, the railings have been ever so slightly altered – there are some extra spikes added on the top, but otherwise they’re the same. In terms of the building in the background, the stonework and window-surrounds look identical; there’s a doorway in the 70s with the [I don’t know the architectural term!] ‘triangle-y roof-like bit’ above it, but otherwise things are looking much the same.
We cut next to a longer shot down the same passageway (13), from the Villiers Street end next to Gordon’s Wine Bar (thought to have been established in the 1890s, so definitely there when George was haring past; I think he’s more of a light and bitter man, though – and in any case he didn’t have time to stop):
Apart from some cleaning and painting of the surrounding buildings (including the one in the background at the end of the alley, which we can see is the same but grimier in the 70s – as most buildings were), not much has changed here. Nowadays the passageway is full of umbrella-covered tables belonging to Gordon’s. (It may have been back then as well, it’s possible they were removed for filming or when the bar was shut.) In terms of the wall on the right of the modern-day shot – which appears to be missing in the 70s – this is again a trick of focus-pull on the film cameras; it was most definitely there, as the final shot of George exiting the alley (14) shows:
This building has been a number of things over the years – but usually some kind or other of newsagent, sandwich or grocery shop. Again, these shots would have been taken back up on the walkway from Hungerford Bridge to Charing Cross.
And that was that for this location visit; George’s pursuit of Deller and Fuller proved unsuccessful (though, not as unsuccessful as it was for Fuller – he had a fatal heart attack whilst hiding in amongst some old electrical appliances in an alley!) For me though, a pretty successful trip.